标签:names false 响应 保存 level 高度 nal blog 添加
参数说明:
InputArray curve:输入的点集drawContours(InputOutputArray image, InputArrayOfArrays contours, int contourIdx, const Scalar& color, int thickness=1, int lineType=8, InputArray hierarchy=noArray(), int maxLevel=INT_MAX, Point offset=Point() )
maxLevel=0,绘制与输入轮廓属于同一等级的所有轮廓即输入轮廓和与其相邻的轮廓
maxLevel=1, 绘制与输入轮廓同一等级的所有轮廓与其子节点。
maxLevel=2,绘制与输入轮廓同一等级的所有轮廓与其子节点以及子节点的子节点
PS:findContours()运行的时候,这个图像会被直接涂改,因此如果是将来还有用的图像,应该复制之后再传给findContours()。
以上描述摘至参考资料5trackbarname:滑动空间的名称;
winname:滑动空间用于依附的图像窗口的名称;
value:初始化阈值;
count:滑动控件的刻度范围;
TrackbarCallback是回调函数。
取消approxPolyDP调用

Example分析
1.申明需要使用的变量

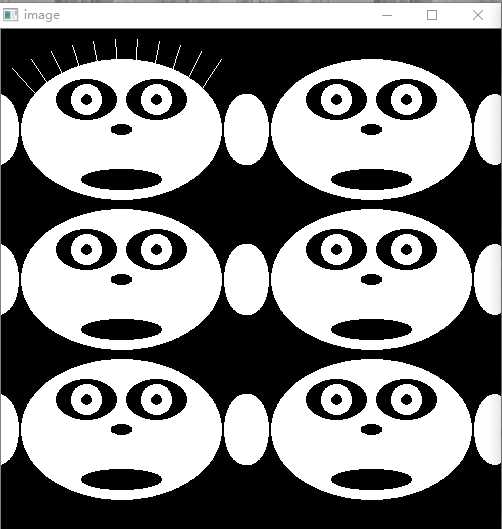
for( int i = 0; i < 6; i++ )
    {
        int dx = (i%2)*250 - 30;
        int dy = (i/2)*150;
        const Scalar white = Scalar(255);
        const Scalar black = Scalar(0);

        if( i == 0 )
        {
            for( int j = 0; j <= 10; j++ )
            {
                double angle = (j+5)*CV_PI/21;
                line(img, Point(cvRound(dx+100+j*10-80*cos(angle)),
                    cvRound(dy+100-90*sin(angle))),
                    Point(cvRound(dx+100+j*10-30*cos(angle)),
                    cvRound(dy+100-30*sin(angle))), white, 1, 8, 0);
            }
        }

        ellipse( img, Point(dx+150, dy+100), Size(100,70), 0, 0, 360, white, -1, 8, 0 );
        ellipse( img, Point(dx+115, dy+70), Size(30,20), 0, 0, 360, black, -1, 8, 0 );
        ellipse( img, Point(dx+185, dy+70), Size(30,20), 0, 0, 360, black, -1, 8, 0 );
        ellipse( img, Point(dx+115, dy+70), Size(15,15), 0, 0, 360, white, -1, 8, 0 );
        ellipse( img, Point(dx+185, dy+70), Size(15,15), 0, 0, 360, white, -1, 8, 0 );
        ellipse( img, Point(dx+115, dy+70), Size(5,5), 0, 0, 360, black, -1, 8, 0 );
        ellipse( img, Point(dx+185, dy+70), Size(5,5), 0, 0, 360, black, -1, 8, 0 );
        ellipse( img, Point(dx+150, dy+100), Size(10,5), 0, 0, 360, black, -1, 8, 0 );
        ellipse( img, Point(dx+150, dy+150), Size(40,10), 0, 0, 360, black, -1, 8, 0 );
        ellipse( img, Point(dx+27, dy+100), Size(20,35), 0, 0, 360, white, -1, 8, 0 );
        ellipse( img, Point(dx+273, dy+100), Size(20,35), 0, 0, 360, white, -1, 8, 0 );
    }
2.3.创建显示源图像的窗口
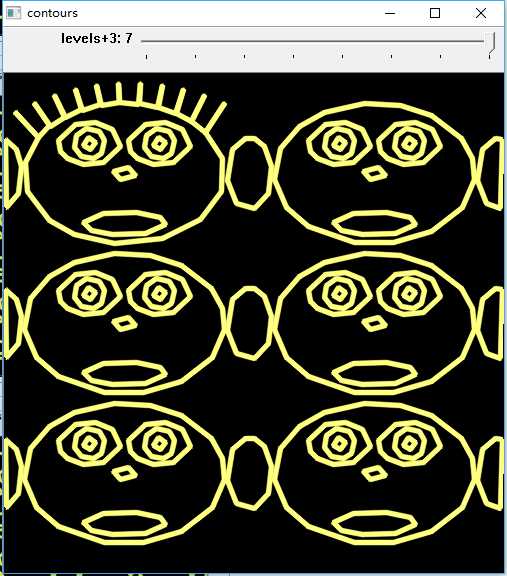
 1 #include "opencv2/imgproc/imgproc.hpp"
 2 #include "opencv2/highgui/highgui.hpp"
 3 #include <math.h>
 4 #include <iostream>
 5
 6 using namespace cv;
 7 using namespace std;
 8
 9 static void help()
10 {
11     cout
12     << "\nThis program illustrates the use of findContours and drawContours\n"
13     << "The original image is put up along with the image of drawn contours\n"
14     << "Usage:\n"
15     << "./contours2\n"
16     << "\nA trackbar is put up which controls the contour level from -3 to 3\n"
17     << endl;
18 }
19
20 const int w = 500;
21 int levels = 3;
22
23 vector<vector<Point> > contours;
24 vector<Vec4i> hierarchy;
25
26 static void on_trackbar(int, void*)
27 {
28     Mat cnt_img = Mat::zeros(w, w, CV_8UC3);
29     int _levels = levels - 3;
30     drawContours( cnt_img, contours, _levels <= 0 ? 3 : -1, Scalar(128,255,255),
31                   3, LINE_AA, hierarchy, std::abs(_levels) );
32
33     imshow("contours", cnt_img);
34 }
35
36 int main( int argc, char**)
37 {
38     Mat img = Mat::zeros(w, w, CV_8UC1);
39     if(argc > 1)
40     {
41         help();
42         return -1;
43     }
44     //Draw 6 faces
45     for( int i = 0; i < 6; i++ )
46     {
47         int dx = (i%2)*250 - 30;
48         int dy = (i/2)*150;
49         const Scalar white = Scalar(255);
50         const Scalar black = Scalar(0);
51
52         if( i == 0 )
53         {
54             for( int j = 0; j <= 10; j++ )
55             {
56                 double angle = (j+5)*CV_PI/21;
57                 line(img, Point(cvRound(dx+100+j*10-80*cos(angle)),
58                     cvRound(dy+100-90*sin(angle))),
59                     Point(cvRound(dx+100+j*10-30*cos(angle)),
60                     cvRound(dy+100-30*sin(angle))), white, 1, 8, 0);
61             }
62         }
63
64         ellipse( img, Point(dx+150, dy+100), Size(100,70), 0, 0, 360, white, -1, 8, 0 );
65         ellipse( img, Point(dx+115, dy+70), Size(30,20), 0, 0, 360, black, -1, 8, 0 );
66         ellipse( img, Point(dx+185, dy+70), Size(30,20), 0, 0, 360, black, -1, 8, 0 );
67         ellipse( img, Point(dx+115, dy+70), Size(15,15), 0, 0, 360, white, -1, 8, 0 );
68         ellipse( img, Point(dx+185, dy+70), Size(15,15), 0, 0, 360, white, -1, 8, 0 );
69         ellipse( img, Point(dx+115, dy+70), Size(5,5), 0, 0, 360, black, -1, 8, 0 );
70         ellipse( img, Point(dx+185, dy+70), Size(5,5), 0, 0, 360, black, -1, 8, 0 );
71         ellipse( img, Point(dx+150, dy+100), Size(10,5), 0, 0, 360, black, -1, 8, 0 );
72         ellipse( img, Point(dx+150, dy+150), Size(40,10), 0, 0, 360, black, -1, 8, 0 );
73         ellipse( img, Point(dx+27, dy+100), Size(20,35), 0, 0, 360, white, -1, 8, 0 );
74         ellipse( img, Point(dx+273, dy+100), Size(20,35), 0, 0, 360, white, -1, 8, 0 );
75     }
76     //show the faces
77     namedWindow( "image", 1 );
78     imshow( "image", img );
79     //Extract the contours so that
80     vector<vector<Point> > contours0;
81     findContours( img, contours0, hierarchy, RETR_TREE, CHAIN_APPROX_SIMPLE);
82
83     contours.resize(contours0.size());
84     for( size_t k = 0; k < contours0.size(); k++ )
85         approxPolyDP(Mat(contours0[k]), contours[k], 3, true);
86
87     namedWindow( "contours", 1 );
88     createTrackbar( "levels+3", "contours", &levels, 7, on_trackbar );
89
90     on_trackbar(0,0);
91     waitKey();
92
93     return 0;
94 }
OpenCV示例学习笔记(1)-contours2.cpp-通过findContours 函数实现轮廓提取
标签:names false 响应 保存 level 高度 nal blog 添加
原文地址:http://www.cnblogs.com/max198727/p/6279725.html
