标签:ued rest deb ram sub ace isp flags with
Content:
(1) Clarifying the Docker terms
(2) Working with the Docker images and containers
(3) The Docker Hub Registry
(4) Searching the Docker images
(5) Working with an interactive container
(6) Tracking the changes inside the container
(7) Controlling and housekeeping the Docker containers
(8) Building images from containers
(9) Launching a container as a daemon
(1) Clarifying the Docker terms
Docker images and containers
A Docker image is a collection of all of the files that make up a software application. Each change that is made to the original image is stored in a separate layer. Each time you commit to a Docker image you are creating a new layer on the Docker image, but the original image and each pre-existing layer remains unchanged.(My: Each change is stored in a separate layer, the original image are read-only type.)
Debain is the base image, and a variety of desired capabilities in the form of functional modules can be incorporated on the base image for arriving at multiple images:
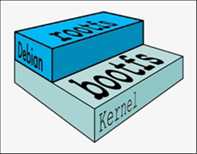
Every image has a unique ID. The base images can create the parent images, which in turn can be used for creating the child images. The base image does not have any parent, that is, the parent images sit on top of the base image. The latest image(recently generated) will always be identified and used by Docker engine.
As per the Docker home page, a Docker image has a read-only template. Docker provides a simple way for building new images or of updating the existing images. You can download the Docker images that the other people have already created. The Docker images are the building components of the Docker containers. In general, the base image can be one of its distributions, such as Debain. Adding additional modules to the base image ultimately dawns a container. The easiest way of thinking about a container is as the read-write layer that site on one or more read-only images. When the container is run, the Docker engine not only merges all of the required images together, but it also merges the changes from the read-write layer into the container itself. This makes it a self-contained, extensible, and executable system. The changes can be merged by using the Docker docker commit subcommand. The new container will accommodate all the changes that are made to the base image. The new image will form a new layer on top of the base image.
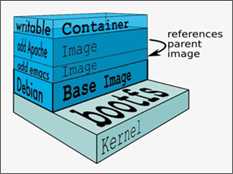
The following diagram will tell you everything clearly. The base image is the Debian distribution, then there is an addition of two images (the emacs and the Apache server), and this will result in the container: (My: Containers can be seen as VMs, images can be seen as ISO files.)
Each commit invariably makes a new image. The storage space is not a big challenge because the new image that is generated is only comprised of the newly added modules. Every time you update an object, there will be a new object that gets created with the latest modification and then it is stored with a new ID. In the case of object storage, the storage size balloons significantly.
A Docker layer
A Docker layer could represent either read-only images or read-write images. However, the top layer of a container stack is always the read-write ( writable) layer, which hosts a Docker container.
A Docker container
From the preceding diagram, the read-write layer is the container layer. There could be several read-only images beneath the container layer. Typically, a container originates from a read-only image through the act of a commit. When you start a container, you actually refer to an image through its unique ID. Docker pulls the required image and its parent image. It continues to pull all the parent images until it reaches the base image.
Docker Registry
A Docker Registry is a place where the Docker images can be stored in order to be publicly, accessed, and used by the worldwide developer for quickly crafting fresh and composite application without any risks. Because all the stored images would have gone through multiple validations, verifications, and refinements, the quality of those images will be ready high. Using the Docker push command, you can dispatch your Docker image to the Registry so that it is registered and deposited. As a clarification, the registry is for registering the Docker images in a publicly discoverable and centralized place. A Docker image is stored within a Repository in the Docker Registry. Each repository is unique for each user or account.
Docker Repository
A Docker Repository is a namespace that is used for storing a Docker image. For instance, if your app is named helloworld and your username or namespace for the Registry is thedockerbook then, in the Docker Repository, where this image would be stored in the Docker Registry would be named thedockerbook/helloworld.
(2) Working with Docker images
$ sudo docker pull –a busybox
The Docker engine downloads a few more images with –a option. –a: all
$ sudo docker images
You will get the list of images.
Here is a list of the possible categories:
Each Docker image repository can have multiple variants of the same image and the –a option downloads all the variants that are associated with that image. A closer observation of the image IDs will reveal that both ****** and latest share the image ID.
By default, Docker always uses the image that is tagged as latest. Each image variant can be directly identified by qualifying it with its tag. An image can be tag-qualified by appending the tag to the repository name with a : this added between the tag and the repository name( <repository>:< tag>). For instance:
$ sudo docker run –t –i busybox:ubuntu-14.04
$ sudo docker pull busybox:ubuntu-14.04
(3) Docker Hub Registry
The Docker folks in the Docker community have built a repository of images and they have made it publicly available at a default location, index.docker.io. This default location is called the Docker index. The docker pull subcommand is programmed to look for the images at this location. The Docker Index is the official repository that contains all the painstakingly curated images that are create and deposited by the worldwide Docker development community.
This so-call cure is enacted to ensure that all the images stored in the Docker index are secure and safe through a host of quarantine tasks. Nonetheless, if the official image has been either corrupted, or tampered with, then the Docker engine will issue a warning and then continue to run the image.
In addition to the official repository, the Docker Hub Registry provides a platform for the third-party developers and providers for sharing their images for general consumption. The third-party images are prefixed by the user ID of their developers or depositors. For example, thedockerbook/helloworld is a third-party image, wherein thedookerbook is the user ID and helloworld is the image repository name. You can download any third-party image by using the docker pull subcommand, as shown here:
$ sudo docker pull thedockerbook/helloworld
Apart from the preceding repository, the Docker ecosystem also provides a mechanism for leveraging the image from any third-party repository hub other than the Docker Hub Registry, and it provides the images hosted by the local repository hubs. Whereas in the case of the third-party or the local repository hub, we must manually specify the path from where the image should be pulled. A manual repository path is similar to a URL without a protocol specifier, such as https://, http:// and ftp://. Following is an example of pulling an image from a third party repository hub:
$ sudo docker pull registry.example.com/myapp
(4) Searching Docker images
You can search for the Docker images in the Docker Hub Registry by using the docker search subcommand, as shown in this example:
$ sudo docker search mysql
The search on mysql will list odd images. The images are ordered based on their star rating. The search result indicates whether or not the image is official.
(5) Working with an interactive container
In this section, we are going to run a container in an interactive mode. The docker run subcommand takes an image as an input and launches it as a container. You have to pass the –t and –i flags to the docker run subcommand in order to make the container interactive. The –i flag is the key driver, which makes the container interactive by grabbing the standard input (STDIN) of the container. The –t flag allocated a pseudo-TTY or a pseudo terminal (terminal emulator) and then assigns that to the container.
In the following example, we are going to launch an interactive container by using the Ubuntu:14.04 image and /bin/bash as the command:
$ sudo docker run –i –t ubuntu:14.04 /bin/bash
  Or
$ sudo docker run –i –t ubuntu:14.04
We can detach it from our container by using the Ctrl + P and Ctrl + Q escape sequence. This escape sequence will detach the TTY from the container and land us in the Docker host prompt $, however the container will continue to run. The docker ps subcommand will list all the running containers and their important properties, as shown here:
$ sudo docker ps
The docker ps command will list out the following details:
Let’s attach it back to our container by using the docker attach subcommand as shown in the following example. We can either use the container ID or use its name. If you don’t see the prompt, then press the Enter key again:
$ sudo docker attach cocky_shannon
As soon as the bash exit command is issued to the interactive container, it will terminate the bash shell process, which in turn will stop the container. As a result, we will land on the Docker Host’s prompt $.
(6) Tracking changes inside containers
In this section, we will demonstrate how we can effectively track the changes that we introduced in our container and compare it with the image from which we launched the container.
Let’s launch a container in the interactive mode, as we had done in the previous section:
$ sudo docker run -i –t ubuntu:14.04 /bin/bash
root@************ (ID):/# cd /home
Now we can create three empty files by using the touch command as shown in the following code snippet.
root@************ (ID):/# touch {abc, cde, fgh}
In order to inspect the container filesystem, we can either detach it from the container or use another terminal of our Docker host and the issue the docker diff subcommand. (Ctrl + P and Ctrl + Q)
$ sudo docker diff ************ (ID)
In the given example, the docker diff subcommand will generate four lines, shown here:
C /home
A /home/abc
A /home/cde
A /home/fgh
The preceding output indicates that the /home directory has been modified, which has been denoted by C, and the /home/abc, /home/cde and /home/fgh files have been added, and these are denoted by A. In addition, D denotes deletion.
(7) Controlling and housekeeping the Docker containers
Controlling Docker containers
In this section, let us introduce a few basic as well as a few advanced command structures for meticulously illustrating how the Docker containers can be managed.
The Docker engine enables you to start, stop, and restart a container with a set of docker subcommand. Let’s begin with the docker stop subcommand, which stops a running container. When a user issues this command, the Docker engine sends SIGTERM (-15) to the main process, which is running inside the container. The SIGTERM signal requests the process to terminate itself gracefully. Most of the process fails to do so, then the Docker engine will wait for a grace period. Even after the grace period, if the process has not been terminated, then the Docker engine will forcefully terminate the process. The forceful termination is achieved by sending SIGKILL (-9). The SIGKILL signal cannot be caught or ignored, and so it will result in an abrupt termination of the process without a proper clean-up.
Now, let’s launch our container and experiment with the docker stop subcommand, as shown here:
$ sudo docker run –i –t ubuntu:14.04 /bin/bash
root@************ (ID):/#
Having launched the container, let’s run the docker stop subcommand on this container by using the container ID that was taken from the prompt. Then, let’s Ctrl + P and Ctrl + D.
$ sudo docker stop ************ (ID)
If we take it one step further and run the docker ps subcommand, then we will not find this container anywhere in the list. The fact is that docker ps subcommand, by default, always lists the container that is in the running state. Since our container is in the stopped state, it has been comfortably left out of the list. Well, the docker ps subcommand takes an additional argument –a, which will list all the containers in that Docker host irrespective of its status.
$ sudo docker ps –a
Let’s look at the docker start subcommand, which is used for starting one or more stopped containers. A container could be moved to the stopped state either by the docker stop subcommand or by terminating the main process in the container either normally or abnormally. On a running container, this subcommand has no effect.
$ sudo docker start ************
By default, the docker start subcommand will not attach to the container. You can attach it to the container either by using the –a option in the docker start subcommand or by explicitly using the docker attach subcommand, as shown here:
$ sudo docker attach ************
The restart command is a combination of the stop and the start functionality. In other words, the restart command will stop a running container by following the precise steps followed by the docker stop subcommand and then it will initiate the start process. This functionality will be executed by default through the docker restart subcommand.
The next important set of container-controlling subcommands are docker pause and docker unpause. The docker pause subcommands will essentially freeze the execution of all the processes within that container. Conversely, the docker unpause subcommand will unfreeze the execution of all the processes within that container and resume the execution from the point where it was frozen.
For example:
On one terminal, we have launched our container and used an infinite while loop for displaying the date and time, sleeping for 5 seconds, and then continuing the loop. We will run the following commands:
$ sudo docker run –i –t Ubuntu:14.04 /bin/bash
root@************:/# while true; do data; sleep 5; done
Here, we encountered a delay of 25 seconds, because this is when we initiated the docker pause subcommand on our container on the second terminal screen, as shown here:
$ sudo docker pause ************
When we paused our container, we looked at the process status by using the docker ps subcommand on our container.
We continued on to issuing the docker unpause subcommand, which unfroze our container, continued its execution, and then started printing the date and time, as we saw in the preceding command, shown here:
$ sudo docker unpause ************
Housekeeping containers
When we issued docker ps -a we saw the many stopped containers. These unused containers will take up the disk space in the filesystem of the Docker host. The Docker engine provides a couple of ways to alleviate this issue.
During a container startup, we can instruct the Docker engine to clean up the container as soon as it reaches the stopped state. For this purpose, the docker run subcommand supports an --rm option (for example: sudo docker run -i -t --rm ubuntu:14.04 /bin/bash).
The other alternative is to list all the containers by using the -a option of the docker ps subcommand and then manually remove them by using the docker rm subcommand, as shown here:
$ sudo docker ps –a
$ sudo docker rm ************
But docker rm and docker ps, could be combined to automatically delete all the containers that are not currently running, as shown in the following command:
$ sudo docker rm $(sudo docker ps –aq)
(8) Building images from containers
In this section, let us see how we can add more software to our base image on a running container and then convert that container into an image for future use.
Let‘s take ubuntu:14.04 as our base image, install the wget (a tool for downloading files from internet) application, and then convert the running container to an image by performing the following steps:
1)
$ sudo docker run -i -t ubuntu:14.04 /bin/bash
2) Having launched the container, let‘s quickly verify if wget is available for our image or not.
root@************:/# which wget
3) Since it is a brand new ubuntu container, before installing wget, we must synchronize with the ubuntu package repository, as shown here:
root@************:/# apt-get update
4) Installing wget
root@************:/# apt-get install –y wget
5) Let‘s confirm our installation of wget by invoking the which command with wget as an argument, as shown here:
root@************:/# which wget
/usr/bin/wget
6) Installation of any software would alter the base image composition, which we can also trace by using the docker diff subcommand
$ sudo docker diff ************
7) Finally, the Docker commit subcommand can be performed on a running or a stopped container. When commit is performed on a running container, the Docker engine will pause the container during the commit operation in order to avoid any data inconsistency. We strongly recommend performing the commit operation on a stopped container. We can commit a container to an image by the docker commit subcommand, as shown here:
$ sudo docker commit ************ \learningdocker/ubuntu_wget
We have committed our image by using the name learningdocker/ubuntu_wget. You can use docker images to see whether is successful.
We would encourage you to predominantly use this method for testing purposes. The most elegant and the most recommended way of creating an image is to use the Dockerfile method, which will be introduced in the next blog.
(9) Launching a container as a daemon—test failed
In this section, we will learn about the steps that are required for launching a container as a daemon. We will also view the text that is generated in the container.
The docker run subcommand supports an option -d, which will launch a container as a daemon.
$ sudo docker run -d ubuntu         /bin/bash -c "while true; do date; sleep 5; done"
0137d98ee363b44f22a48246ac5d460c65b67e4d7955aab6cbb0379ac421269b
The docker logs subcommand is used for viewing the output generated by our daemon container, as shown here:
$ sudo docker logs \
Summary
In this chapter, we described the knowledge that is gained in the post-implementation phases, primarily regarding the operational aspect of the Docker containers. We started the chapter by clarifying important terms, such as images, containers, registry, and repository, in order to enable you to acquire an unambiguous understanding of the concepts illustrated thereafter. We explained how to search for the images in the Docker repository. We also discussed the operation and handling of the Docker containers, how to track the changes inside the containers, how to control and housekeep the containers. In an easy-to-grasp manner, we will explain the process of the Docker image building in the next chapter.
转载请注明出处,O(∩_∩)O谢谢
Learning docker--Chapter2--Handling Docker Containers
标签:ued rest deb ram sub ace isp flags with
原文地址:http://www.cnblogs.com/HurryXin/p/6284331.html