标签:boot cout row elf box nts /var rdp birt
1、最基本的安装配置
首先获取Nginx的rmp包
wget http://nginx.org/packages/centos/7/noarch/RPMS/nginx-release-centos-7-0.el7.ngx.noarch.rpm
安装rpm -ivh nginx-release-centos-7-0.el7.ngx.noarch.rpm
安装Nginx yum install nginx –y
安装完,遇到/var/run/nginx.pid(13:permission denied)错误
修改配置文件内容(/etc/nginx/nginx.conf)
events {
use epoll;
worker_connections 51200;
}
http {
server {
listen 20181;
server_name otpappsec.wanmei.com;
root /var/www/test;
index a.html;
}
server {
listen 80 ;
server_name otpappsec.wanmei.com;
root /var/www/test;
index a.html;
}
}
当遇到上述错误时,reboot系统
之后遇到的错误显示80端口被占用,虽然配置文件没使用80端口,很奇怪,查
了一些占用端口的进程(lsof –i:80),kill掉,nginx启动就成功了,(⊙﹏⊙)b
2、使用ssl
打开一个目录作为配置文件目录(/usr/local/nginx/conf)
执行命令:
2.1、使用openssl创建创建服务器私钥,输入相应提示的信息
openssl genrsa -des3 -out test.key 1024
输入密码 111111 创建完成
2.2、清除以SSL启动Nginx时提示必须输入密钥 即生成一个不需要输入密码的key
openssl rsa -in test.key -out test_nopass.key
输入之前的密码 111111
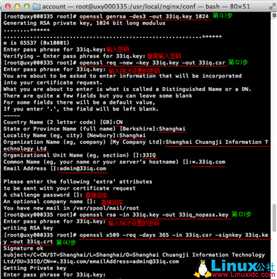
2.3、创建证书签名请求(Certificate Signing Request (CSR))
openssl req -new -key test.key -out test.csr
具体输入信息 参考下图

2.4、使用刚生成的私钥和CSR进行证书签名
openssl x509 -req -days 365 -in test.csr -signkey test.key -out test.crt
一切就绪后,修改配置文件(/etc/nginx/nginx.conf)
server {
listen 20180; 监听端口20180
server_name otpappsec.wanmei.com;
ssl on; 开启443端口
ssl_certificate /usr/local/nginx/conf/test.crt; 证书位置
ssl_certificate_key /usr/local/nginx/conf/test_nopass.key; key的位置
root /var/www/test;
index a.html;
}
配置完成,restart nginx服务,
之后浏览器访问
3、端口转发
配置端口如下
events {
use epoll;
worker_connections 51200;
}
http {
server {
listen 20181;
server_name otpappsec.wanmei.com;
root /var/www/test;
index a.html;
}
server {
listen 80 ;
server_name otpappsec.wanmei.com;
root /var/www/test;
index a.html;
}
server {
listen 20180;
listen 443;
server_name otpappsec.wanmei.com;
ssl on;
ssl_certificate /usr/local/nginx/conf/test.crt;
ssl_certificate_key /usr/local/nginx/conf/test_nopass.key;
root /var/www/test;
index a.html;
}
server {
listen 80 ;
server_name ssl.test.com;
root /var/www/tet;
index index.php index.html;
location ~ .php$ {
fastcgi_pass 127.0.0.1:9000;
fastcgi_index index.php;
fastcgi_param SCRIPT_FILENAME $document_root$fastcgi_script_name;
include fastcgi_params;
}
}
}
4、与Apache &php&mysql 环境
可以参考如下链接
https://www.digitalocean.com/community/tutorials/how-to-install-linux-nginx-mysql-php-lemp-stack-on-centos-7
安装php
yum install -y php php-fpm
修改 /etc/php.ini文件
把cgi.fix_pathinfo=0
修改 /etc/php-fpm.d/www/conf
listen.owner = nobody
listen.group = nobody
user = nginx
group = nginx


修改/etc/nginx/nginx.conf文件

具体见端口转发中  ssl.test.com中的配置


重启nginx  php-fpm


之后在浏览器测试

php测试文件 test.php
<?php
echo phpinfo();
?>

标签:boot cout row elf box nts /var rdp birt
原文地址:http://www.cnblogs.com/playboysnow/p/6347128.html