标签:pat bsp hid open 空格 content font ges mod
一、nginx帮助参数

下面是关于/application/nginx/sbin/nginx 的参数帮助
[root@A conf]# /application/nginx/sbin/nginx -h
nginx version: nginx/1.6.3
Usage: nginx [-?hvVtq] [-s signal] [-c filename] [-p prefix] [-g directives]

Options:
  -?,-h         : this help
  -v            : show version and exit
  -V            : show version and configure options then exit
  -t            : test configuration and exit
  -q            : suppress non-error messages during configuration testing
  -s signal     : send signal to a master process: stop, quit, reopen, reload
  -p prefix     : set prefix path (default: /application/nginx-1.6.3/)
  -c filename   : set configuration file (default: conf/nginx.conf)
  -g directives : set global directives out of configuration file
重启要学脚本,检查api端口,如果没问题就重启,如果有问题恢复到原来的模式
二、利用include功能优化nginx的配置文件
 1 2.1、由于nginx主配置文件工作的时候会有很多虚拟主机维护不方便,因此会做出下面的
 2 先创建一个目录  mkdir  /application/nginx/conf//extra
 3     之后备份 cp nginx.conf nginx.conf.basename1
 4 删除server标签,添加include
 5  # Vim nginx.conf
 6 worker_processes  1;
 7 events {
 8     worker_connections  1024;
 9 }
10 http {
11     include       mime.types;
12     default_type  application/octet-stream;
13     sendfile        on;
14     keepalive_timeout  65;
15     include extra/www.conf;  --》这里添加include
16     include extra/bbs.conf
17 }
18
19 复制nginx配置文件到extra下面
20 [root@oldboy conf]# cp nginx.conf.pyrene.20170320V1 extra/a
21 2.2、查找出虚拟主机的代码,然后添加到上面include创建extra/www,conf 等等文件中
22 [root@oldboy extra]# sed -n "10,17p" a
23     server {
24         listen       80;
25         server_name  www.cnblogs.co;
26         location / {
27             root   html/www;
28             index  index.html index.htm;
29         }
30     }
31 [root@oldboy extra]# sed -n "18,25p" a
32     server {
33         listen       80;
34         server_name  bbs.cnblogs.co;
35         location / {
36             root   html/bbs;
37             index  index.html index.htm;
38         }
39 }
40 [root@oldboy extra]# sed -n "10,17p" a >www.conf
41 [root@oldboy extra]# sed -n "18,25p" a >bbs.conf
42 这样就生成了两个虚拟主机
43 2.3、由于/etc/hosts里面有域名,就不用解析
44
45
46 [root@A conf]# /application/nginx/sbin/nginx -t    →检查语法
47 nginx: the configuration file /application/nginx-1.6.3/conf/nginx.conf syntax is ok
48 nginx: configuration file /application/nginx-1.6.3/conf/nginx.conf test is successful
49
50 [root@A conf]# /application/nginx/sbin/nginx -s reload   →重启
51
52 [root@A conf]# curl www.cnblogs.co    →查看是否成功
53 www.cnblogs.com/pyrene/
三、nginx细腻主机别名配置
 1 1、    虚拟主机别名介绍及配置
 2     所谓虚拟主机别名,就是为虚拟主机设置出了主域名意外的一个域名
 3 方法:直接在配置文件中域名哪里直接添加一个新的域名,然后域名和域名之间要用空格隔开
 4 如:
 5 1、[root@oldboy extra]# vim www.conf
 6
 7     server {
 8         listen       80;
 9         server_name  www.cnblogs.co pyrene;   --》添加别名   别名之间空格就可以
10         location / {
11             root   html/www;
12             index  index.html index.htm;
13         }
14 }
15 2、[root@oldboy extra]# vim bbs.conf
16
17     server {
18         listen       80;
19         server_name  bbs.cnblogs.co cnblog.co;  --》添加别名
20         location / {
21             root   html/bbs;
22             index  index.html index.htm;
23         }
24     }
25
26
27
28 2、把域名写道/etc/hosts解析
29
30 [root@A conf]# vim /etc/hosts
31
32 [root@oldboy extra]# cat /etc/hosts
33 127.0.0.1   localhost localhost.localdomain localhost4 localhost4.localdomain4
34 ::1         localhost localhost.localdomain localhost6 localhost6.localdomain6
35 10.0.0.8 www.cnblogs.co bbs.cnblogs.co cnblog.co pyrene
36
37 3、然后检查语法,重启关闭防火墙,curl 查看就可以
38 [root@oldboy extra]# curl -I pyrene
39 HTTP/1.1 200 OK
40 Server: nginx/1.8.1
41 Date: Sat, 04 Mar 2017 07:06:57 GMT
42 Content-Type: text/html
43 Content-Length: 24
44 Last-Modified: Fri, 03 Mar 2017 18:52:40 GMT
45 Connection: keep-alive
46 ETag: "58b9bb78-18"
47 Accept-Ranges: bytes
48 别名除了可以方便搜索之外,监控服务器里面监控别名,可以很好的判断每一台机器是否正常
四、Nginx状态信息配置
 1 编译的时候制定了一个状态模块  —with-http_stub_status_module 显示nginx当先的状态
 2 配置如下:
 3
 4 1、选择虚拟主机的方式增加了一个server标签到/application/nginx/conf/extra/status.conf里面,起名status.etiantian.org
 5 cat >>/application/nginx/conf/extra/status.conf<<EOF
 6 ##status
 7 server{
 8 listen 80;
 9 server_name status.cnblogs.co;
10 location / {
11   stub_status on;
12   access_log  off;
13 }
14 }
15 EOF
16
17 server_name status. status.cnblog.co;    →这里添加的域名  标签
18
19 2、需要包含,include
20 [root@A conf]# vim nginx.conf
21
22 worker_processes  1;
23 events {
24     worker_connections  1024;
25 }
26 http {
27     include       mime.types;
28     default_type  application/octet-stream;
29     sendfile        on;
30     keepalive_timeout  65;
31     #nginx vhosts config
32     include extra/www.conf;
33     include extra/bbs.conf;
34     include extra/blog.conf;
35     include extra/status.conf;   →这里的包含
36 }
37 3、在/etc/hosts里面解析
38 [root@A conf]# vim /etc/hosts
39 127.0.0.1   localhost localhost.localdomain localhost4 localhost4.localdomain4
40 ::1         localhost localhost.localdomain localhost6 localhost6.localdomain6
41 10.0.0.8 www.cnblogs.co bbs.cnblogs.co cnblog.co pyrene. status.cnblog.co  →这里就是解析
42 4、在window中解析配置 并且重启nginx
5、查看
浏览器中出现

[root@A conf]# curl status.cnblog.co
Active connections: 1 →查看连接数
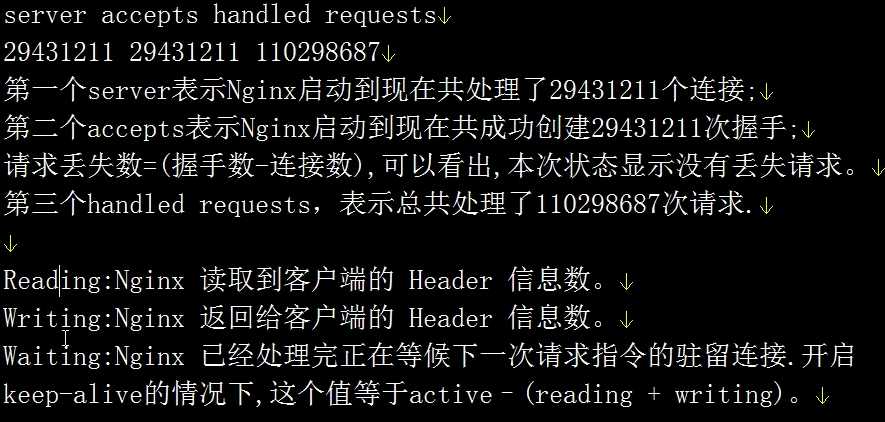
server accepts handled requests
16 16 16
Reading: 0 Writing: 1 Waiting: 0
上面的详细讲解
Active connections:2872
#<==表示Nginx 正处理的活动连接数 2872个
标签:pat bsp hid open 空格 content font ges mod
原文地址:http://www.cnblogs.com/pyrene/p/6501785.html
