标签:reader python animation track 模型 tin stride form server
让机器人行走最简单的方法是先得到一组步态曲线,即腿部每个关节随时间运动的角度值。可以在ADAMS或3D Max、Blender等软件中建立好机构/骨骼模型,设计出脚踝和髋关节的运动曲线,然后进行逆运动学解算,测量每个关节在运动过程中的转角,最后将得到的曲线导出。拿到曲线数据后我们就可以用单片机读取,然后发送给机器人的舵机去执行运行。这种方法的缺点是机器人只能按照固定的步态行走,不够灵活,比如抬脚高度、步长等参数都是定死的,如果需要修改还得再使用别的软件导出新的步态数据。
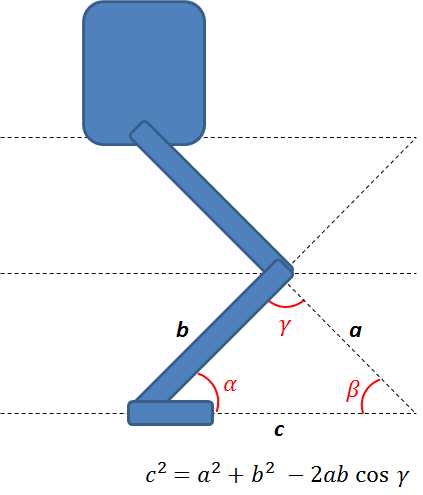
最简单的腿部结构如下图所示,在髋关节、膝关节和踝关节各有一个转动自由度,可以通过三角形余弦定理求得机构的运动学逆解。这种机器人只能在矢状面上直线前进,不能转弯。对行走过程进行一定的简化和假设:
1. 髋关节始终保持恒定的高度(实际上会有微小的波动)
2. 机器人脚面始终平行于地面
为了确定每个关节的角度,需要设计行走过程中踝关节点的运动轨迹。这里采用简单的正弦曲线作为其轨迹(也可以采用样条曲线、Bézier 曲线等),正弦曲线的幅值对应抬脚最大高度。

在Python中实现导入双腿模型文件,生成指定的步态数据后让其循环运动,就可以模拟机器人行走。代码如下(很糙...只是实现了基本功能,细节还有待完善)

#!/usr/bin/env python
import vtk
import math
from vtk.util.colors import *
import numpy as np

filenames = ["link-1.stl","link-2.stl","link-3.stl","link-4.stl","link-5.stl","link-6.stl"]
renWin = vtk.vtkRenderWindow()
actor  = list()             # the list of links

joint1 = vtk.vtkAssembly()
joint2 = vtk.vtkAssembly()
joint3 = vtk.vtkAssembly()
joint4 = vtk.vtkAssembly()
joint5 = vtk.vtkAssembly()
joint6 = vtk.vtkAssembly()

ThighLength = 100.0
ShankLength = 100.0
HipHeight = 180.0
FootLift = 10
StrideLength = 60
Subdivision = 20
leg_joint = np.zeros(3, dtype=np.float)
patterns  = np.zeros((2*Subdivision ,6), dtype=np.float)
_p = 0


def Rad2Deg(rad):
    return  rad * 180.0 / math.pi


def FootHeight(x):
    return (HipHeight - FootLift * math.cos(abs(x * math.pi / StrideLength)))


def LegIK(x, y):
    global leg_joint
    dist = math.sqrt(x**2 + y**2)
    leg_joint[0] = math.acos(dist / (2 * ShankLength)) + math.atan2(x, y)
    leg_joint[1] = math.pi - math.acos((ThighLength**2 + ShankLength**2 - dist**2) / (2 * ThighLength* ShankLength))
    leg_joint[2] = leg_joint[1] - leg_joint[0]


def GenerateGait():
    global leg_joint
    global patterns

    # Move left leg forward.
    for i in range(Subdivision):
        x = (i - Subdivision/2) * (StrideLength / Subdivision)
        y = FootHeight(x)
        LegIK(x, y)
        patterns[i, :3] = Rad2Deg(leg_joint)

    # Move left leg backward.
    for i in range(Subdivision):
        x = (Subdivision/2 - i) * (StrideLength / Subdivision)
        y = HipHeight
        LegIK(x, y)
        patterns[i+Subdivision, :3] = Rad2Deg(leg_joint)

    # Build right leg from phase shift clone of left.
    for i in range(2*Subdivision):
        patterns[i, 3:] = -patterns[(i + Subdivision) % (2*Subdivision), :3]


# Customize vtkInteractorStyleTrackballCamera
class MyInteractor(vtk.vtkInteractorStyleTrackballCamera):
    def __init__(self,parent=None):
        self.AddObserver("CharEvent",self.OnCharEvent)
        self.AddObserver("KeyPressEvent",self.OnKeyPressEvent)

    def OnCharEvent(self,obj,event):
        pass

    def OnKeyPressEvent(self,obj,event):
        global angle
        global _p
        # Get the compound key strokes for the event
        key = self.GetInteractor().GetKeySym()

        GenerateGait()

        if(key == "Return"):
            # start animation
            joint1.SetPosition(0, 0, HipHeight-ThighLength-ShankLength)
            joint4.SetPosition(0, 0, HipHeight-ThighLength-ShankLength)

            if (_p == 2*Subdivision):
                _p = 0

            joint1.SetOrientation(0, -patterns[_p][0], 0)
            joint2.SetOrientation(0, patterns[_p][1], 0)
            joint3.SetOrientation(0, -patterns[_p][2], 0)
            joint4.SetOrientation(0, patterns[_p][3], 0)
            joint5.SetOrientation(0, -patterns[_p][4], 0)
            joint6.SetOrientation(0, patterns[_p][5], 0)

            _p = _p + 1;
            renWin.Render()
        return


def CreateCoordinates():
    # create coordinate axes in the render window
    axes = vtk.vtkAxesActor()
    axes.SetTotalLength(40, 40, 40)  # Set the total length of the axes in 3 dimensions
    # Set the type of the shaft to a cylinder:0, line:1, or user defined geometry.
    axes.SetShaftType(0)
    transform = vtk.vtkTransform()
    transform.Translate(0.0, 0.0, 200.0)
    axes.SetUserTransform(transform)
    axes.SetCylinderRadius(0.02)
    axes.GetXAxisCaptionActor2D().SetWidth(0.03)
    axes.GetYAxisCaptionActor2D().SetWidth(0.03)
    axes.GetZAxisCaptionActor2D().SetWidth(0.03)
    return axes


def CreateGround():
    # create plane source
    plane = vtk.vtkPlaneSource()
    plane.SetXResolution(20)
    plane.SetYResolution(20)
    plane.SetCenter(0,0,0)
    plane.SetNormal(0,0,1)
    # mapper
    mapper = vtk.vtkPolyDataMapper()
    mapper.SetInputConnection(plane.GetOutputPort())
    # actor
    actor = vtk.vtkActor()
    actor.SetMapper(mapper)
    actor.GetProperty().SetRepresentationToWireframe()
    actor.GetProperty().SetColor(light_grey)
    transform = vtk.vtkTransform()
    transform.Scale(400,400,1)
    actor.SetUserTransform(transform)
    return actor


def LoadSTL(filename):
    reader = vtk.vtkSTLReader()
    reader.SetFileName(filename)
    mapper = vtk.vtkPolyDataMapper() # maps polygonal data to graphics primitives
    mapper.SetInputConnection(reader.GetOutputPort())
    actor = vtk.vtkLODActor()
    actor.SetMapper(mapper)
    return actor   # represents an entity in a rendered scene


def CreateScene():
    # Create a rendering window and renderer
    ren = vtk.vtkRenderer()
    renWin.AddRenderer(ren)
    # Create a renderwindowinteractor
    iren = vtk.vtkRenderWindowInteractor()
    iren.SetRenderWindow(renWin)
    style = MyInteractor()
    style.SetDefaultRenderer(ren)
    iren.SetInteractorStyle(style)
    for id, file in enumerate(filenames):
        actor.append(LoadSTL(file))
        r = vtk.vtkMath.Random(.4, 1.0)
        g = vtk.vtkMath.Random(.4, 1.0)
        b = vtk.vtkMath.Random(.4, 1.0)
        actor[id].GetProperty().SetDiffuseColor(r, g, b)
        actor[id].GetProperty().SetDiffuse(.8)
        actor[id].GetProperty().SetSpecular(.5)
        actor[id].GetProperty().SetSpecularColor(1.0,1.0,1.0)
        actor[id].GetProperty().SetSpecularPower(30.0)

    joint1.AddPart(actor[0])
    joint1.AddPart(joint2)
    joint2.AddPart(actor[1])
    joint2.AddPart(joint3)
    joint3.AddPart(actor[2])
    joint4.AddPart(actor[3])
    joint4.AddPart(joint5)
    joint5.AddPart(actor[4])
    joint5.AddPart(joint6)
    joint6.AddPart(actor[5])

    joint1.SetOrigin(0, 0, 200)
    joint4.SetOrigin(0, 0, 200)
    joint2.SetOrigin(0, 0, 100)
    joint5.SetOrigin(0, 0, 100)

    ren.AddActor(joint1)
    ren.AddActor(joint4)

    # Add coordinates
    axes = CreateCoordinates()
    ren.AddActor(axes)

    # Add ground
    ground = CreateGround()
    ren.AddActor(ground)

    # Set background color
    ren.SetBackground(.1, .1, .1)

    # Set window size
    renWin.SetSize(600, 600)

    # Enable user interface interactor
    iren.Initialize()
    iren.Start()


if __name__ == "__main__":
    CreateScene()
按住回车键,一帧一帧播放动画。最后的效果是这样的:

参考:
https://github.com/Rhoban/IKWalk
Using Inverse Kinematics to Develop a Biped Robot Walking Gait C#
8 DOF Biped Robot using Dynamixel AX-12A Servos and Arduino
标签:reader python animation track 模型 tin stride form server
原文地址:http://www.cnblogs.com/21207-iHome/p/6052159.html
