标签:构造方法 方法 bridge es6 extends 扩展 div struct 弹框
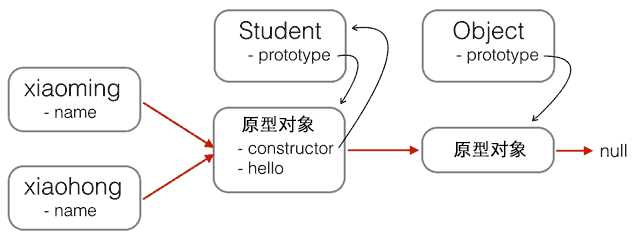
function Student(props) {this.name = props.name || ‘Unnamed‘;}Student.prototype.hello = function () {alert(‘Hello, ‘ + this.name + ‘!‘);}
function PrimaryStudent(props) {// 调用Student构造函数,绑定this变量Student.call(this, props);this.grade = props.grade || 1;}
new PrimaryStudent() ----> PrimaryStudent.prototype ----> Object.prototype ----> null
new PrimaryStudent() ----> PrimaryStudent.prototype ----> Student.prototype ----> Object.prototype ----> null
new PrimaryStudent() ----> Student.prototype ----> Object.prototype ----> null
var bridge = {}; //创建一个没有内容的对象bridge.__proto__ = Student.prototype; //让这个对象的原型对象是Student.prototypebridge.constructor = PrimaryStudent; //让这个对象的构造函数为PrimaryStudentPrimaryStudent.prototype = bridge; //让PrimaryStudent的原型对象指向bridge这样一来,原型链就变成了:new PrimaryStudent() ----> PrimaryStudent.prototype(bridge) ----> Student.prototype ----> Object.prototype ----> null按照我们比喻的说法,就是:- 让Student有个儿子bridge(bridge.__proto__ = Student.prototype;)- 然后这个娃和PrimaryStudent结婚了(bridge.constructor = PrimaryStudent; PrimaryStudent.prototype = bridge;)- - 那么自然PrimaryStudent的子女(通过PrimaryStudent创建的对象),既会老爹bridge的技能,也会爷爷Student的技能”
- //验证一下
- bridge.do = function(){alert("hahaha")};
- var xiaoming = new PrimaryStudent({name:‘xiaoming‘, grade:2});
- xiaoming.do(); // 弹框alert("hahaha");
- //验证原型
- xiaoming.__proto__ === PrimaryStudent.prototype; //true
- xiaoming.__proto__.__proto__ === Student.prototype; //true
- //验证继承关系
- xiaoming instanceof PrimaryStudent; //true
- xiaoming instanceof Student; //true
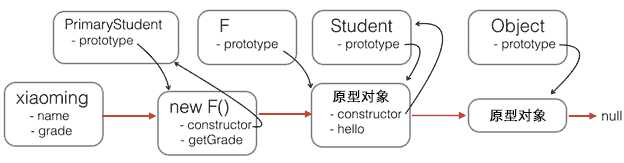
// PrimaryStudent构造函数:function PrimaryStudent(props) {Student.call(this, props);this.grade = props.grade || 1;}// 空函数F,用于后面起桥接作用function F() {}// 把F的原型指向Student.prototype,这样通过F创建的对象,其__proto__属性就是Student.prototypeF.prototype = Student.prototype;// 把PrimaryStudent的原型指向一个新的F对象,F对象的原型正好指向Student.prototypePrimaryStudent.prototype = new F();// 把PrimaryStudent原型的构造函数修复为PrimaryStudentPrimaryStudent.prototype.constructor = PrimaryStudent;// 继续在PrimaryStudent原型(就是new F()对象)上定义方法PrimaryStudent.prototype.getGrade = function () {return this.grade;};// 创建xiaomingvar xiaoming = new PrimaryStudent({name: ‘小明‘,grade: 2});xiaoming.name; // ‘小明‘xiaoming.grade; // 2// 验证原型xiaoming.__proto__ === PrimaryStudent.prototype; // truexiaoming.__proto__.__proto__ === Student.prototype; // true// 验证继承关系xiaoming instanceof PrimaryStudent; // truexiaoming instanceof Student; // true
function inherits(Child, Parent) {var F = function () {};F.prototype = Parent.prototype;Child.prototype = new F();Child.prototype.constructor = Child;}
function Student(props) {this.name = props.name || ‘Unnamed‘;}Student.prototype.hello = function () {alert(‘Hello, ‘ + this.name + ‘!‘);}function PrimaryStudent(props) {Student.call(this, props);this.grade = props.grade || 1;}// 实现原型继承链:inherits(PrimaryStudent, Student);// 绑定其他方法到PrimaryStudent原型:PrimaryStudent.prototype.getGrade = function () {return this.grade;};
class Student {// 定义构造函数constructor(name) {this.name = name;}//定义在原型上的函数,没有function关键字,相当于 Student.prototype.hello = function(){...}hello() {alert(‘Hello, ‘ + this.name + ‘!‘);}}
var xiaoming = new Student(‘小明‘);xiaoming.hello();
class PrimaryStudent extends Student {constructor(name, grade) {super(name); // 记得用super调用父类的构造方法!this.grade = grade;}myGrade() {alert(‘I am at grade ‘ + this.grade);}}
04面向对象编程-02-原型继承 和 ES6的class继承
标签:构造方法 方法 bridge es6 extends 扩展 div struct 弹框
原文地址:http://www.cnblogs.com/deng-cc/p/6649191.html