标签:style blog http color os 使用 io for 数据
简而言之:使UIView可以显示在屏幕上的功能属性,UIView之所以可以显示在屏幕上完全是因为UIView内部含有一个CALayer属性
@property(nonatomic,readonly,retain) CALayer *layer;
// view的完整显示过程
// 1. view.layer准备了一个Layer Graphics Context(图层类型的上下文)
// 2. 调用view.layer.delegate(view)的drawLayer:inContext:,并传入刚才准备好的上下文
// 3. view的drawLayer:inContext:方法内部又会调用view的drawRect:方法
// 4. view就可以在drawRect:方法中实现绘图代码, 所有东西最终都绘制到view.layer上面
// 5. 系统再将view.layer的内容拷贝到屏幕, 于是完成了view的显示
九大属性:
•1.内容(比如设置为图片CGImageRef)
@property(retain) id contents;
@property CGPoint position; // 用来设置CALayer在父层中的位置 以父层的左上角为原点(0, 0)
@property CGRect bounds;
@property CGPoint anchorPoint; // 称为“定位点”、“锚点” 决定着CALayer身上的哪个点会在position属性所指的位置 以自己的左上角为原点(0, 0) 它的x、y取值范围都是0~1,默认值为(0.5, 0.5)
@property CGColorRef backgroundColor;
@property CATransform3D transform;
@property CGColorRef borderColor;
@property CGFloat borderWidth;
@property CGColorRef borderColor;
问题三:CALayer可以用来做什么呢?

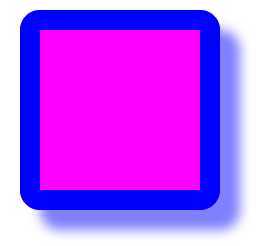
- (void)testView
{
    // 边框宽度
    self.purpleView.layer.borderWidth = 10;
    //    // 边框颜色
    self.purpleView.layer.borderColor = [UIColor blueColor].CGColor;
    // 圆角
    self.purpleView.layer.cornerRadius = 10;
    //    self.purpleView.layer.masksToBounds = YES; // 超出主层边框范围的内容都剪掉
    // 阴影颜色
    self.purpleView.layer.shadowColor = [UIColor blueColor].CGColor;
    // 阴影偏差
    self.purpleView.layer.shadowOffset = CGSizeMake(10, 10);
    // 阴影不透明度
    self.purpleView.layer.shadowOpacity = 0.5;
}

- (void)viewDidLoad
{
    [super viewDidLoad];

    // 新建图层
//    CALayer *layer = [[CALayer alloc] init];
    CALayer *layer = [CALayer layer];
    layer.backgroundColor = [UIColor redColor].CGColor;
    layer.bounds = CGRectMake(0, 0, 100, 100);
    layer.position = CGPointMake(200, 200);
    layer.anchorPoint = CGPointMake(1, 1);
    layer.cornerRadius = 10;
    layer.masksToBounds = YES;
    layer.contents = (id)[UIImage imageNamed:@"lufy"].CGImage;
    [self.view.layer addSublayer:layer];
    // 新建图层
    //    CALayer *layer1 = [[CALayer alloc] init];
    CALayer *layer1 = [CALayer layer];
    layer1.backgroundColor = [UIColor redColor].CGColor;
    layer1.bounds = CGRectMake(0, 0, 100, 100);
    layer1.position = CGPointMake(200, 200);
    layer1.anchorPoint = CGPointMake(0, 0);
    layer1.cornerRadius = 10;
    layer1.masksToBounds = YES;
    layer1.contents = (id)[UIImage imageNamed:@"lufy"].CGImage;
    [self.view.layer addSublayer:layer1];
}
ps:自定义图层

@implementation WHBLayer
/**
 *  只有明显地调用setNeedsDisplay方法,才会调用drawInContext:方法进行绘制
 */
- (void)drawInContext:(CGContextRef)ctx
{
    // 红色
    CGContextSetRGBFillColor(ctx, 1, 0, 0, 1);
    // 添加圆
    CGContextAddEllipseInRect(ctx, CGRectMake(0, 0, 50, 50));
    // 实心绘制
    CGContextFillPath(ctx);
}

- (void)viewDidLoad
{
    [super viewDidLoad];
    WHBLayer *layer = [WHBLayer layer];
    layer.bounds = CGRectMake(0, 0, 100, 100);
    layer.backgroundColor = [UIColor greenColor].CGColor;
    layer.anchorPoint = CGPointZero;
    [layer setNeedsDisplay]; // 绘图 会自动调用WHBLayer的drawInContext:(CGContextRef)ctf 方法
    [self.view.layer addSublayer:layer];
}
原因主要:考虑移植性,跨平台性
// bounds:用于设置CALayer的宽度和高度。修改这个属性会产生缩放动画
// backgroundColor:用于设置CALayer的背景色。修改这个属性会产生背景色的渐变动画
// position:用于设置CALayer的位置。修改这个属性会产生平移动画
[CATransaction begin];
[CATransaction setDisableActions:YES];
self.myview.layer.position = CGPointMake(10, 10);
[CATransaction commit];
代码示例:

- (void)viewDidLoad
{
    [super viewDidLoad];
    // Do any additional setup after loading the view, typically from a nib.

    CALayer *layer = [CALayer layer];
    layer.bounds = CGRectMake(0, 0, 100, 100);
    layer.backgroundColor = [UIColor redColor].CGColor;
    layer.position = CGPointZero;
    layer.anchorPoint = CGPointZero;
    [self.view.layer addSublayer:layer];
    self.layer = layer;
}

- (void)touchesBegan:(NSSet *)touches withEvent:(UIEvent *)event
{
    self.layer.backgroundColor = [UIColor blueColor].CGColor;
//    [CATransaction begin]; // 开启事务
//    [CATransaction setDisableActions:YES];

    self.layer.position = CGPointMake(100, 100);
    self.layer.opacity = 0.1;

//    [CATransaction commit]; // 提交事务
}
标签:style blog http color os 使用 io for 数据
原文地址:http://www.cnblogs.com/lszwhb/p/3928050.html