标签:strong 源码下载 extension openxml 应用开发 开发 output 窗口 功能
在 UWP 开发中,我们在进行数据绑定时,除了可以使用传统的绑定 Binding,也可以使用全新的 x:Bind,由于后者是在程序编译时进行初始化操作(不同于 Binding,它是在运行时创建、初始化),所以我们可以称 x:Bind 为编译型绑定,正像本文标题一样。
之所以引入 x:Bind,是因为它相比传统的 Binding 有很多优点,比如:
鉴于 x:Bind 有以上这些优点,所以这里推荐大家在自己的项目中尽可能地使用它;当然,相比 Binding,它也少了一些功能,所以在必要的时候,你任然需要使用传统的绑定。换句话说,在项目中,你可以混合使用这两种绑定方式。再次声明:建议尽可能地使用 x:Bind,除非 x:Bind 不能完成你要的操作时,才考虑使用 Binding。
以下我会把 x:Bind 的使用方法以及上面提及的优点,进行较为详细的说明。本文假设你已经掌握了(或者至少理解) WPF/UWP 中的数据绑定的基本知识;在继续学习下文之前,如果你还不了解数据绑定,建议你最好了解相关知识(相信大多数的 XAML 开发人员都没问题)。
与传统绑定较大的区别,是 x:Bind 的数据源为当前 View(即页面 Page 或用户控件UserControl)自身,也就是说,它使用 Page 或 User Control 的实例为作数据源;因此如果你设置了 Path 属性, x:Bind 会到当前 Code-Bebind 类中找对应名称的成员(属性、字段、方法)。在下例中,x:Bind 会在当前用户控件实例中找到其 InfoA 属性并进行绑定。
<UserControl x:Class="xBindTest.Controls.BindingModeControl"...
        <TextBlock Text="{x:Bind InfoA}" />
        ...
</UserControl>
    public sealed partial class BindingModeControl : UserControl, INotifyPropertyChanged
    {
        public string InfoA { get; set; }
    }
顺便提一下,如果找不到 InfoA 属性,编译就会失败,这就是 x:Bind 的优点之一,提供编译时错误,不像 Binding 一样,仅在 VS 的 输出(Output) 窗口输入错误提示而已。
在传统的绑定中,Binding 的数据源可以通过四种形式指定,它们分别是 DataContext(默认)、RelativeSource、Source、ElementName。而 x:Bind 既然将当前 View 的实例作为唯一数据源,那么我们就完全不需要像传统 Binding 一样设置 DataContext;而对于后面三种设置数据源的方式, x:Bind 也仅支持以下两种情况:
说明:上例中,slider1 和 rect1 都是当前 View 中的控件,本质上它们都是当前 View 的字段,所以可以直接在 x:Bind 中使用;除了上述两种情况外,x:Bind 对于 Source 和其它形式的 RelativeSource 均不支持。
接下来,我们来看 x:Bind 的绑定模式。
x:Bind 的 Binding Mode 值有以下三项:OneWay、OneTime、TwoWay;它的默认值是 OneTime。记住这一点非常重要,因为在开发过程中,很多时候绑定并不像我们想象的正常工作,就是因为 Mode 没有被设置为合适的值。OneTime 的意思是仅在界面初始化时去初始化界面中的绑定;这一点也是 x:Bind 性能更优化的原因。顺便提一下,传统 Binding 的 Mode 属性默认值是 Default(这个值的意义是对于只读控件它是 OneWay,对于可编辑的控件,它是 TwoWay)。
更具体来说,x:Bind 的绑定是在 Page 或 User Control 的 Loading 事件中初始化的;也就是说,在 Mode=OneTime(默认值)时,仅当一个属性值的设置在 View 的构造函数中时(在 Loading 事件之前)才会在 x:Bind 初始化中被更新到 UI 中;在其它位置(如 Loaded 事件或某一操作的响应事件中等等)修改此属性的值,都不会再被更新(即使调用了 INotifyPropertyChanged 中的 PropertyChanged 事件)。参考以下代码:
<TextBlock Margin="{StaticResource ContentMargin}" Text="{x:Bind InfoA}" />
public BindingModeControl()
{
      InfoA = "InfoA: Value for x:Bind (Mode=One Time)";
}
而如果设置了 Mode=OneWay,绑定初始化时,会创建关联,当绑定源的值更改后,绑定目标(UI)也及时更新。参考以下代码:
<TextBlock VerticalAlignment="Center" Text="{x:Bind InfoB, Mode=OneWay}" />
private void btnUpdateValueForOneWay_Click(object sender, Windows.UI.Xaml.RoutedEventArgs e)
{
     InfoB = "InfoB: Value Updated";
}
现在重新考虑第一种情况,如果我们没有为绑定设置 Mode,它就使用默认值 OneTime。在这种情况下,如果我们确实想要在构造函数之外的其它地方通过更新该属性值以更新 UI,该怎么办呢?这里就需要使用当前 View 的 Bindings 对象。
如果当前 View 中使用了 x:Bind,那么它就会有一个字段 Bindings,这个字段是在 obj 文件夹中生成的 <viewname>.g.cs 文件中动态生成的。它有三个方法如下:
当我们修改了某个属性值时,即使它是 OneTime 绑定模式,通过 Bindings 的 Update 方法也可以更新 UI。参考以下代码:
<TextBlock VerticalAlignment="Center" Text="{x:Bind InfoC}" />
private void btnUpdateValueForOneTime_Click(object sender, Windows.UI.Xaml.RoutedEventArgs e)
{
    InfoC = "InfoC: Value updated by this.Bindings.Update() method";
    this.Bindings.Update();
}
在数据源属性类型和绑定目标属性类型不一致时,如果我们使用传统的 Binding,可以将一个实现了 IValueConverter 的对象设置到 Binding 的 Converter 属性来实现值的转换。而使用 x:Bind,除了这种方式之外,还有更方便的——绑定属性到函数。也就是说,你可以将一个函数放到 x:Bind 中。当然,x:Bind 仍然是在当前 View 的 Code-Behind 代码中来找所指定的函数。参考如下代码:
        <Border
            x:Name="border"
            Background="{x:Bind GetBrush(IsPass), Mode=OneWay}">
            <Image Margin="20" Source="{x:Bind GetImage(IsPass), Mode=OneWay}" />
        </Border>
        public Brush GetBrush(bool isPass)
        {
            return isPass ? new SolidColorBrush(Colors.LimeGreen) : new SolidColorBrush(Colors.Crimson);
        }

        // both public and private work well
        private ImageSource GetImage(bool isPass)
        {
            return isPass ? new BitmapImage(new Uri("ms-appx:///Assets/Happy.png")) : new BitmapImage(new Uri("ms-appx:///Assets/Sad.png"));
        }
在上面的例子中,两处被绑定的函数均接受一个参数,事实上,这里支持多个参数。所以这一点也要比 IValueConverter 方便;此外,绑定属性到函数也支持类似于 IValueConverter 中的双向转换,除了能从源类型转换到目标类型,也支持从目标类型转换到源类型,方法是使用 BindBack 属性指定另外一个方法。
另外,还一个非常便捷的转换是 Visibility 和 bool 之间的转换:控件的 Visibility 可以直接绑定到一个布尔属性或字段;当布尔值为 true 时,Visibility 的值是 Visible,反之,是 Collapsed。参考如下代码:
<Button Content="Logout" Visibility="{x:Bind IsLogin}" />
最后,需要说明的是,上述两项转换功能仅在周年更新(14393/1607)版本及更高版本中才支持,所以如果你要在项目中使用,就需要修改目标版本和最小版本。
为列表控件(如 ListView 等)设置 ItemTemplate 属性时,要用到 DataTemplate;如果在 DataTemplate 中使用 x:Bind,要怎么做呢?
首先要为 DataTemplate 指定 x:DataType,告诉它要展示的数据 Model 类,一般情况下,这需要引入 xmlns 命令空间;然后,在 DataTemplate 内部,使用 x:Bind 直接绑定到该 Model 的相关属性。参考以下代码:
<UserControl ...
    xmlns:models="using:xBindTest.Models">
    <UserControl.Resources>
        <DataTemplate x:Key="FriendItemTemplate" x:DataType="models:Friend">
            <StackPanel Margin="0,4">
                <TextBlock
                    FontSize="20"
                    FontWeight="SemiBold"
                    Text="{x:Bind Name}" />
                <TextBlock
                    Margin="{StaticResource ContentMargin}"
                    FontSize="14"
                    Text="{x:Bind Email}" />
            </StackPanel>
        </DataTemplate>
    </UserControl.Resources>
    <Grid>
        <ListView ItemTemplate="{StaticResource FriendItemTemplate}" ItemsSource="{x:Bind AllFriends}" />
    </Grid>
</UserControl>
编译即可正常运行。如果没有为 DataTemplate 设置 x:DataType,或在 DataTemplate 中绑定了 Model 中不存在的属性都会编译失败。
上面是在当前 View 中引用 DataTemplate 资源。在实际项目开发中,你可能会将资源统一放到一个或若干个 ResourceDictionary 文件中,目的是为了更方便地组织资源。那么上面这个使用了 x:Bind 的 DataTemplate 应该如何被移动到 ResourceDictionary 文件中呢?
首先,直接移动一定会编译出错,原因是使用 x:Bind 的 XAML 文件必须得有 Code-Behind 文件。怎么解决呢?
可以新建一个 Page 或 UserControl,然后,将其基类由 Page 或 UserControl 改为 ResourceDictionary,删去不需要的、默认添加出来的 UI 元素,然后将 DataTemplate 资源项复制进来,即可。参考如下代码:
<ResourceDictionary
    x:Class="xBindTest.Styles.DataTemplates"
    xmlns="http://schemas.microsoft.com/winfx/2006/xaml/presentation"
    xmlns:x="http://schemas.microsoft.com/winfx/2006/xaml"
    xmlns:d="http://schemas.microsoft.com/expression/blend/2008"
    xmlns:mc="http://schemas.openxmlformats.org/markup-compatibility/2006"
    xmlns:models="using:xBindTest.Models"
    mc:Ignorable="d">
    <DataTemplate x:Key="AnotherFriendItemTemplate" x:DataType="models:Friend">
        <StackPanel Margin="0,4">
            <TextBlock
                FontSize="20"
                FontWeight="SemiBold"
                Text="{x:Bind Name}" />
            <TextBlock
                Margin="{StaticResource ContentMargin}"
                FontSize="14"
                Text="{x:Bind Email}" />
        </StackPanel>
    </DataTemplate>
</ResourceDictionary>
using Windows.UI.Xaml;

namespace xBindTest.Styles
{
    public sealed partial class DataTemplates : ResourceDictionary
    {
        public DataTemplates()
        {
            this.InitializeComponent();
        }
    }
}
在使用传统绑定时,对于控件操作的响应,我们一般会用到命令或行为(当控件不支持 Command 或对控件的某一特定事件进行响应时,如 ListView 控件的 SelectionChanged 事件);然而 x:Bind 可以轻松地实现同样的操作,因为它支持绑定到事件,来看代码:
<Button Click="{x:Bind ShowInfoTest1}" Content="Show Info" />
public void ShowInfoTest1()
{
    Info = "Update Info in method: ShowInfoTest1()";
}
像绑定属性一样简单,不同的是,被绑定的不再是属性,而是事件名,而 Path 也不是属性名,而是方法名。相比 ICommand 或行为对此操作的实现,要简单的多。
这里需要补充的是,关于方法的签名:
void ShowInfoTest1()
void ShowInfoTest1(object sender, RoutedEventArgs e)
void ShowInfoTest1(object sender, object e)
如果不一致,在项目编译时就不会通过。
另外,在绑定到事件中,x:Bind 除了支持上述灵活的方法签名,对于方法的返回值并没有要求,不仅可以是 void,也可以是其它任何返回类型;并且也支持 async 方法的绑定。
基本上,x:Bind 的主要特性到这里就基本上都提到了。但是,有一个问题,在 UWP 应用开发过程中,我们一般使用 MVVM 模式,而 x:Bind 将当前 View 作为数据源,怎么才能使其绑定到 ViewModel 中的成员呢?很简单,只要在 Page 或 UserControl 中添加 ViewModel 属性,其类型为对应 View 的 ViewModel,而在 x:Bind 中使用多级 Path 即可。参考如下代码:
    public sealed partial class BindToEventControl : UserControl
    {
        public BindToEventControl()
        {
            this.InitializeComponent();
            ViewModel = new BindToEventViewModel();
        }

        public BindToEventViewModel ViewModel { get; set; }
    }
<Button Click="{x:Bind ViewModel.ShowInfoTest1}" />
<TextBlock Text="{x:Bind ViewModel.Info, Mode=OneWay, TargetNullValue=‘(no value)‘}" />
另外,为了实现 View 与 ViewModel 的解耦,你可能会使用类似 ViewModelLocator 的类来实现对 ViewModel 的定位。在这种情况下,怎么结合 x:Bind 呢?
首先,你仍然可以保留 Page 的 DataContext 对 Locator 的引用;需要进一步处理的是,像上例一样,在 Page 中添加 ViewModel。参考如下代码:
<Page ...
    DataContext="{Binding HomeViewModel, Source={StaticResource Locator}}">
    public sealed partial class HomePage : Page
    {
        public HomePage()
        {
            this.InitializeComponent();
        }

        public HomeViewModel ViewModel => DataContext as HomeViewModel;
    }
在使用 x:Bind 时,有以下几点,也值得注意:
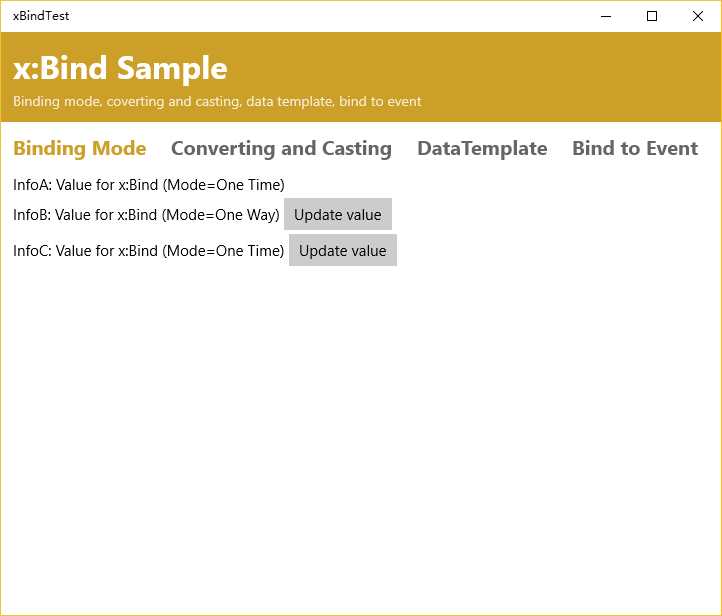
本文主要讲到 UWP 中的 x:Bind,包括它的优点以及用法。它有性能更好、使用更方便、编译时检查错误、便于调试等优点,所以给大家的建议就是在你的项目中尽可能地使用它。当然,与传统 Binding 相比,它也有不及的地方,所以你仍然可以结合传统 Binding 完成你所要的功能。最后附上 xBindTest 的截图和源码,它是我针对 x:Bind 写的一个 Demo,本文中引用的代码几乎都在此项目中能找得到。

参考资料:
标签:strong 源码下载 extension openxml 应用开发 开发 output 窗口 功能
原文地址:http://www.cnblogs.com/wpinfo/p/6673219.html