标签:解码器 conf trie 安装 sso 引用 images integer ima
在学习Logstash之前,我们需要先了解以下几个基本概念:
logstash收集日志基本流程:
input-->codec-->filter-->codec-->output
1.input:从哪里收集日志。
2.filter:发出去前进行过滤
3.output:输出至Elasticsearch或Redis消息队列
4.codec:输出至前台,方便边实践边测试
5.数据量不大日志按照月来进行收集
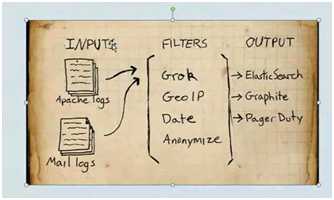
处理流程(图解)
Logstash需要Java环境,所以直接使用yum安装。
1.安装java
[root@linux-node1 ~]# java -version
openjdk version "1.8.0_111"
OpenJDK Runtime Environment (build 1.8.0_111-b15)
OpenJDK 64-Bit Server VM (build 25.111-b15, mixed mode)
2.下载并安装GPG key
[root@linux-node1 ~]# rpm --import https://packages.elastic.co/GPG-KEY-elasticsearch
3.添加logstash的yum仓库
[root@linux-node1 ~]#cat /etc/yum.repos.d/logstash.repo
[logstash-2.3]
name=Logstash repository for2.3.x packages
baseurl=https://packages.elastic.co/logstash/2.3/centos
gpgcheck=1
gpgkey=https://packages.elastic.co/GPG-KEY-elasticsearch
enabled=1
4.安装Logstash
[root@linux-node1 ~]#yum install -y logstash
注:因为镜像是国外的,如果下载缓慢或者无法下载,可以使用代理FQ或者香港地区主机访问下载rpm包安装,下载rpm安装包同样需要上面的yum仓库
通常使用rubydebug方式前台输出展示以及测试
[root@linux-node1 /]#  /opt/logstash/bin/logstash -e ‘input { stdin {} } output { stdout{codec => rubydebug} }‘
OpenJDK 64-Bit Server VM warning: If the number of processors is expected to increase from one, then you should configure the number of parallel GC threads appropriately using -XX:ParallelGCThreads=N#这个jdk的警告就是显示需要加CPU
hello  #输入
Settings: Default pipeline workers: 1
Pipeline main started
{
       "message" => "hello",
      "@version" => "1",
    "@timestamp" => "2017-01-03T17:00:24.285Z",
          "host" => "linux-node1.example.com"
}
把内容写到elasticsearch中
[root@linux-node1 /]# /opt/logstash/bin/logstash -e ‘input { stdin {} } output { elasticsearch { hosts => ["192.168.230.128:9200"]}}‘
OpenJDK 64-Bit Server VM warning: If the number of processors is expected to increase from one, then you should configure the number of parallel GC threads appropriately using -XX:ParallelGCThreads=N
Settings: Default pipeline workers: 1
Pipeline main started
123123
hehehehe
123hehe
hehe123
kkkksisi
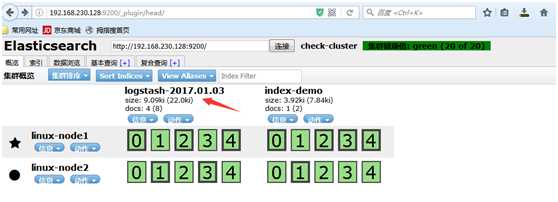
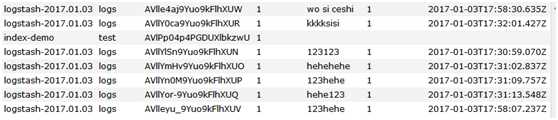
数据浏览,查看写得数据

写到标准输出,同时写到elas里面
在elasticsearch中写一份,同时在本地输出一份,也就是在本地保留一份文本文件,也就不用在elasticsearch中再定时备份到远端一份了。此处使用的保留文本文件三大优势:1)文本最简单 2)文本可以二次加工 3)文本的压缩比最高
[root@linux-node1 /]# /opt/logstash/bin/logstash -e ‘input { stdin {} } output { elasticsearch { hosts => ["192.168.230.128:9200"]} stdout{codec => rubydebug}}‘

OpenJDK 64-Bit Server VM warning: If the number of processors is expected to increase from one, then you should configure the number of parallel GC threads appropriately using -XX:ParallelGCThreads=N
Settings: Default pipeline workers: 1
Pipeline main started
123hehe
{
       "message" => "123hehe",
      "@version" => "1",
    "@timestamp" => "2017-01-03T17:58:07.237Z",
          "host" => "linux-node1.example.com"
}
wo si ceshi
{
       "message" => "wo si ceshi",
      "@version" => "1",
    "@timestamp" => "2017-01-03T17:58:30.635Z",
          "host" => "linux-node1.example.com"
}
刷新查看
以上学习了logstash的多个输出,下一步写成配置文件,总不能在命令行一直敲吧
配置链接官网
https://www.elastic.co/guide/en/logstash/2.3/configuration.html
[root@linux-node1 /]# cd /etc/logstash/conf.d/
[root@linux-node1 conf.d]# cat 01-logstash.conf
input { stdin { } }#标准输入
output {
  elasticsearch { hosts => ["localhost:9200"] }#写到elasticsearch中
  stdout { codec => rubydebug }#写到标准输出中
}
[root@linux-node1 conf.d]# /opt/logstash/bin/logstash -f /etc/logstash/conf.d/01-logstash.conf #-f指定配置文件
OpenJDK 64-Bit Server VM warning: If the number of processors is expected to increase from one, then you should configure the number of parallel GC threads appropriately using -XX:ParallelGCThreads=N
Settings: Default pipeline workers: 1
Pipeline main started
hehe
{
       "message" => "hehe",
      "@version" => "1",
    "@timestamp" => "2017-01-03T19:36:03.909Z",
          "host" => "linux-node1.example.com"
}
浏览器刷新查看


#配置文件的结构
# This is a comment. You should use comments to describe
# parts of your configuration.
input {
...
}

filter {
...
}
output {
...
}
#必需的两个选项input和output ,filter是可选的,通过大括号来指定输入输出
一个插件的配置包含插件的名称,然后是一块插件的设置。例如,这个输入部分配置两个输入文件:
input {#这是一个文件file的插件
file{
    path =>"/var/log/messages"
type=>"syslog"
}

file{
    path =>"/var/log/apache/access.log"
type=>"apache"
}
}

#还可以使用数组
Array
An array can be a single string value or multiple values. If you specify the same setting multiple times, it appends to the array.
Example:

  path =>["/var/log/messages","/var/log/*.log"]#通过*的方式
  path =>"/data/mysql/mysql.log"#还可以写多个
#这个示例配置路径是一个数组,其中包含一个元素的三个字符串。
#Boolean 两个选项true和faslse
#一个布尔必须或真或假。注意,真假关键词并不包含在引号。

A boolean must be either true or false. Note that the true and false keywords are not enclosed in quotes.
Example:

  ssl_enable => true
#Bytes 字节
#如果没有指定单位,整数字符串表示的字节数。
  Examples:

  my_bytes =>"1113"# 1113 bytes
  my_bytes =>"10MiB"# 10485760 bytes
  my_bytes =>"100kib"# 102400 bytes
  my_bytes =>"180 mb"# 180000000 bytes

#编解码器是Logstash编解码器的名称用于表示数据。编解码器可以使用输入和输出。
Example:
  codec =>"json"

#Hash  "field1" => "value1" 注意多个关键值项之间用空格分隔而不是逗号。
 A hash is a collection of key value pairs specified in the format "field1"=>"value1". Note that multiple key value entries are separated by spaces rather than commas.
Example:

match =>{
"field1"=>"value1"
"field2"=>"value2"
...
}
#Number
#数字必须是有效数值(浮点或整数)。
Numbers must be valid numeric values (floating point or integer).
Example:
  port =>33

#Password
#密码是一个没有记录或打印的单个值的字符串.。
A password is a string with a single value that is not logged or printed.
Example:
  my_password =>"password"

#Path
#一条路径是一个字符串,它表示一个有效的操作系统路径。
A path is a string that represents a valid operating system path.
String
#字符串必须是一个单一的字符序列。注意,字符串值括在引号,双或单。文字引用的字符串需要用反斜杠转义
Example:
  my_path =>"/tmp/logstash"

 Example:
  name =>"Hello world"
  name =>‘It\‘s a beautiful day‘

Comments
#注释是一样的,无论是在perl还是在ruby或者python
Comments are the same as in perl, ruby, and python. A comment starts with a # character, and does not need to be at the beginning of a line. For example:
# this is a comment
input { # comments can appear at the end of a line, too
  # ...
}
Input plugins 插件file
#https://www.elastic.co/guide/en/logstash/2.3/input-plugins.html
Required configuration options:
file{
    path =>...
}
Available configuration options:
#add_field

    Value type is hash
    Default value is {}

Add a field to an event
解释:
值类型为哈希值
默认值为{}
向事件添加字段

#discover_interval
值类型为number
默认值为15
#delimiter

值类型为string
默认值为“\”
设置新的行分隔符,默认为“\n”

#discover_interval
    Value type is number
    Default value is 15
发现间隔默认十五秒,监控文件的变化,文件变化才收集,15秒监控一次

#sincedb_write_interval
    Value type is number
    Default value is 15
值类型是number
默认值是15
多久写一次suncedb 默认15秒

#exclude
对文件名排除
    Value type is array
    There is no default value for this setting.
值类型是数组
此设置没有默认值.。
Exclusions (matched against the filename, not full path). Filename patterns are valid here, too. For example, if you have

path =>"/var/log/*"

You might want to exclude gzipped files:

exclude =>"*.gz"

#sincedb_path
sincedb的路径是一个隐藏文件
值类型是字符串
没有默认值的设置。
sincedb数据库文件的路径(当前位置的跟踪监控日志文件),将被写入磁盘。默认将编写sincedb文件路径匹配$HOME/.sincedb*注意:它必须是一个文件路径和不是一个目录路径

#string, one of ["beginning", "end"]
开始的地方,有两个,一个是从头,默认是从尾
什么意思呢?我现在要读一个文件,从哪开始收集。比如一个空文件,从尾部开始收集,写一行收一行,如果这个文件已经有内容了,如果默认什么
参数都不加,从尾部开始收,这个文件之前的内容是不收的,想要把之前的内容也收怎么办,那么可以改成这个beginning
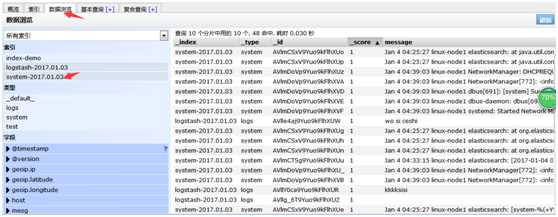
[root@linux-node1 ~]# cat  file.conf
input{ #标准输入
 file {
     path => "/var/log/messages"#路径
     type => "system"#设置类型,系统日志
     start_position => "beginning"#从头开始收集
  }
}
output{#标准输出
 elasticsearch {
   hosts => ["192.168.230.128:9200"]
   index => "system-%{+YYY.MM.dd}"#指定索引,索引的名称,可以指定年月日,会自动生成索引
   }
}

[root@linux-node1 ~]# /opt/logstash/bin/logstash -f file.conf
生成system-2017.01.03
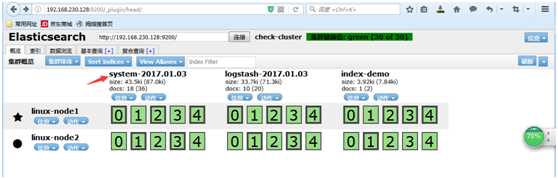
索引的内容
注意:对于文件来说是一行一行来收集的,对于els来说叫事件,不是行
/var/log/elasticsearch/check-cluster.log 这是elasticsearch自带的java日志,我们来收集它,在系统日志的基础上增加收集java日志
[root@linux-node1 ~]# cat file.conf
input{
 file {
     path => "/var/log/messages"
     type => "system"#设置类型
     start_position => "beginning"
  }
 file {
     path => "/var/log/elasticsearch/check-cluster.log"#java日志的路径
     type => "es-error"#设置类型
     start_position => "beginning" #从头开始收集
  }
}
#使用类型来做判断,是system的收集到system的索引里,是es-error的收集到es-error里
output{
   if [type] == "system" {
    elasticsearch {
        hosts => ["192.168.230.128:9200"]
        index => "system-%{+YYY.MM.dd}"
             }
          }
   if [type] == "es-error" {
        elasticsearch {
                hosts => ["192.168.230.128:9200"]
                index => "es-error-%{+YYY.MM.dd}"

       }
    }
}
if判断详细用法
https://www.elastic.co/guide/en/logstash/2.3/event-dependent-configuration.html
[root@linux-node1 ~]# /opt/logstash/bin/logstash -f file.conf
Settings: Default pipeline workers: 1
Pipeline main started
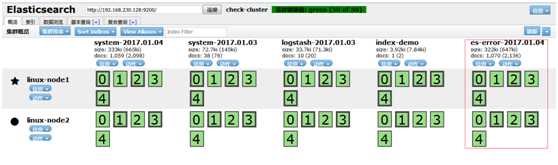
数据浏览,查看索引节点
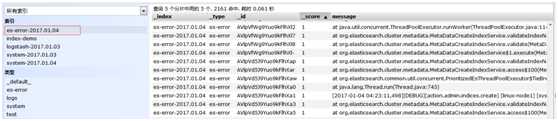
但现在有一个问题,java日志打印出来的是堆栈,每一个都给我收集一行了,文件都是按行收集的,这没法看,连不起来,让开发怎么看
我们希望看到的是这样一个日志格式,而不是像Elasticsearch中那样,一行一行的
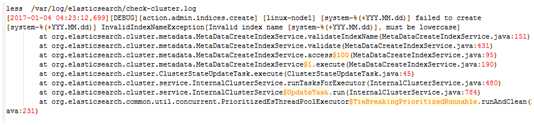
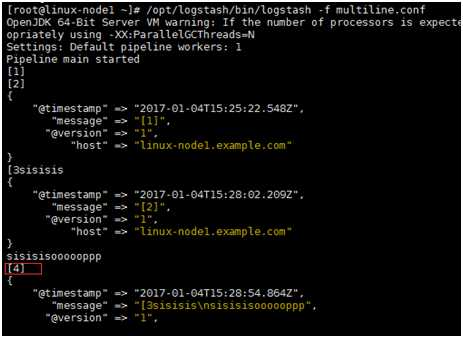
先来测试下
那我应该怎样把多行变为一行呢,我们发现上面的日志格式是[]时间点开头到下一个[]时间点是为一个事件,我们引入Codec multiline插件
[root@linux-node1 conf.d]# cat multilne.conf
input {
   stdin {
       codec => multiline {
           pattern =>"^\["#以中括号开头,\转义
           negate => true
           what =>"previous"
}
}
}

output {
    stdout {
        codec =>"rubydebug"
}
}
意思是什么呢,就是在日志中以中括号开头,出现下一次中括号之前的输出算是一个完整的事件,如下图:输入[1][2]等会输出, 输入不带[]的就不输出
测试好以后引入到刚才的file.conf文件中
[root@linux-node1 ~]# mv file.conf all.conf #先改个名吧,以后陆续会用到这个文件
[root@linux-node1 ~]# cat all.conf
input{
file{
     path =>"/var/log/messages"
type=>"system"
     start_position =>"beginning"
}
file{
     path =>"/var/log/elasticsearch/check-cluster.log"
type=>"es-error"
     start_position =>"beginning"
        codec => multiline {   #增加这几行内容
           pattern =>"^\["
           negate => true
           what =>"previous"
}
}
}
output{
if[type]=="system"{
    elasticsearch {
        hosts =>["192.168.230.128:9200"]
        index =>"system-%{+YYY.MM.dd}"
}
}
if[type]=="es-error"{
        elasticsearch {
                hosts =>["192.168.230.128:9200"]
                index =>"es-error-%{+YYY.MM.dd}"

}
}
}

[root@linux-node1 ~]# /opt/logstash/bin/logstash -f all.conf
#指定文件再次刷新查看,配置文件没错,但还是不太好看,我们引入kibana
为了方便查看,我们先学习kibana
标签:解码器 conf trie 安装 sso 引用 images integer ima
原文地址:http://www.cnblogs.com/w787815/p/6676336.html
