标签:style blog http color java os 使用 io strong

/* 标签页菜单 */
div.bs-docs-example {
position: relative;
width: 600px;
margin: 15px auto;
padding: 39px 19px 14px;
background-color: white;
border: 1px solid #DDD;
-webkit-border-radius: 4px;
-moz-border-radius: 4px;
border-radius: 4px;
}
div.bs-docs-example::after {
content: "Example";
position: absolute;
top: -1px;
left: -1px;
padding: 3px 7px;
font-size: 12px;
font-weight: bold;
background-color: #F5F5F5;
border: 1px solid #DDD;
color: #9DA0A4;
-webkit-border-radius: 4px 0 4px 0;
-moz-border-radius: 4px 0 4px 0;
border-radius: 4px 0 4px 0;
}
div.clear {
clear: both;
}
ul.nav-tabs {
border-bottom: 1px solid #DDD;
padding: 0;
margin: 0;
}
ul.nav-tabs li {
margin-bottom: -1px;
float: left;
line-height: 20px;
}
ul.nav-tabs li a {
display: block;
padding: 8px 12px;
line-height: 20px;
font-size: 14px;
color: #08C;
border: 1px solid transparent;
-webkit-border-radius: 4px 4px 0 0;
-moz-border-radius: 4px 4px 0 0;
border-radius: 4px 4px 0 0;
padding-right: 12px;
margin-right: 2px;
}
ul.nav-tabs li a:hover {
background: #eee;
color: #005580;
}
ul.nav-tabs li.active a:hover,ul.nav-tabs li.active a:focus {
color: #555;
cursor: default;
background-color: white;
border: 1px solid #DDD;
border-bottom-color: transparent;
}
<!-- 标签页菜单 -->
<div class="bs-docs-example">
<ul class="nav-tabs">
<li class="active"><a href="#">首页</a></li>
<li><a href="#">profile</a></li>
<li><a href="#">messages</a></li>
<div class="clear"></div>
</ul>
</div>
*****
一个完整的margin属性是这么写的margin: top right bottom left;(eg: margin:10px 20px 30px 40px)。在margin属性中一共有两类参考线,top和left的参考线属于一类,right和bottom的参考线属于另一类。top和left是以外元素为参考,right和bottom是以元素本身为参考。margin的位移方向是指margin数值为正值时候的情形,如果是负值则位移方向相反。

上面段文字和图片或许挺难理解,我们来看实际代码:
|
1
2
3
4
5
6
7
8
9
10
11
12
13
14
15
16
17
18
19
|
<meta http-equiv="Content-Type" content="text/html; charset=utf-8" /><title>Margin参考线举例说明</title><style type="text/css">*{margin:0; padding:0;}.wrap{width:400px; border:5px solid #aaa;}.example{width:200px; height:200px; background:#CCCCFF;}.normal{width:200px; height:200px; background:#CCE8CF;}/* 添加或者注释掉下面的margin属性,查看前后差别.example{margin:-10px 20px -30px 40px;}*/</style></head><body><div class="wrap"> <div class="example">example元素:margin参考线举例说明文字,请查看此元素由于margin的变化所移动的位移量。</div> <div class="normal">一个普通的Box</div></div></body></html> |
来分析这段代码,example元素下方有一相邻元素normal(注:这里分析的是添加和删除margin后的example元素,normal元素仅作为example元素前后效果的参照)。
根据上文的参考线原理margin:-10px(top) 20px(right) -30px(bottom) 40px(left); 上-10px和左40px将以外元素为参考,所谓外元素就是本元素的边界元素(再白话点的解释就是元素的紧邻元素,这里涉及到containing block知识,可自行网上搜索)。example元素上边和左边的边界元素即为wrap父元素,wrap父元素为基准点,example的margin-top为-10px,想象下如果这里margin-top为+10px会什么情况,没错如果为+10px,example元素相对于wrap父元素边缘为基准,那么example元素会同wrap父元素10px产生间隙边距,那么反过来,margin-tip:-10px;还是与wrap父元素边缘为基准,反过来向上推10px的距离位置。example元素的margin-left为40px,这里就按照正常逻辑相隔40px边距,同理如果为-40px,那么就是反方向向左推进40px的距离位置。
再来看example元素的margin-right和margin-bottom,由上文得知这俩个值是以元素本身为参考。什么叫以元素本身为参考呢,确切含义是指以自身为参考来影响周围元素的位置(实质即为影响下边和右边相邻元素的参考线)。这里的margin-bottom为-30px,对于其自身位置没有任何变化,但是对于其下方元素normal元素产生了极大的影响,因为normal元素的上边界元素即为example元素,根据example元素边界来判定自身位置,想象下如果example元素margin-bottom为+30px,那么example元素将隔开下方的normal元素,反之为-30px,下方normal元素由于example参考线内凹,导致了normal元素自个儿身不由己的被“提”了上去了。这就是以自身为参考影响周围元素位置的含义。
这里梳理一下规律,当margin四个值都为正数值的话,那么margin按照正常逻辑同周围元素产生边距。当元素margin的top和left是负值时会引起元素的向上或向左位置移动。而当元素margin的bottom和right是负值时会影响右边和下边相邻元素的参考线。如果你再想深入了解参考线理论的话你也可访问由浅入深漫谈margin属性这篇文章。
负margin实战:
据我所知至今没有一套完整的关于负margin专题研究的文章。有也仅仅是偏理论或者偏实例,理论终究是理论,学以致用才是根本,而有了实例你还得知晓原理,授人鱼不如授人以渔。接下来我们将利用四个例子深入讲解负margin技术的应用领域。
负margin在Tab选项卡中的应用:
效果预览:

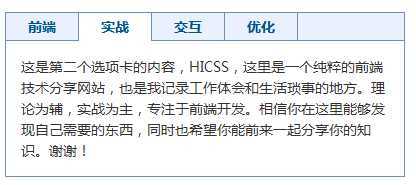
核心分析:
如上面的这个Tab选项卡效果,最核心的就是下方俩行高亮部分代码,第二行的margin-bottom:-1px;使下方的正文部分向上“提”了1px的距离,从而达到了鼠标上移后选项卡白色遮住下方黑色边框的效果(注:由于IE不是符合W3C标准,所以当鼠标移到选项卡上时需要添加一个额外属性position:relative;来修复IE不覆盖下方边框的这个Bug)。第四行的margin-left:-1px;的目的是让四个选项卡向左移动1px的距离,达到左右都只有一条分割线的效果。
CSS代码:
|
1
2
3
4
5
6
7
8
9
|
.demoTab{width:400px; font:14px/1.5 Microsoft YaHei,verdana,Helvetica,Arial,sans-serif;}.demoTab .demoTabHd{margin-bottom:-1px; border:1px solid #6C92AD; border-bottom:none; background:#EAF0FD;}.demoTab .demoTabNav{height:28px; overflow:hidden; *zoom:1;}.demoTab .demoTabList{float:left; margin-left:-1px; padding:0 22px; line-height:28px; border-left:1px solid #6C92AD; border-right:1px solid #6C92AD; font-weight:bold; color:#005590; text-align:center; cursor:pointer;}.demoTab .demoTabList.current{position:relative; background:#fff;}.demoTab .demoTabBd{border:1px solid #6C92AD;}.demoTab .demoTabBd .roundBox{padding:15px;}.demoTab .demoTabContent{display:none;}.demoTab .demoTabContent.current{display:block;} |
HTML代码:
|
1
2
3
4
5
6
7
8
9
10
11
12
13
14
15
16
17
18
|
<div id="demoTab" class="demoTab"> <div class="demoTabHd"> <ul class="demoTabNav clearfix"> <li class="demoTabList current">前端</li> <li class="demoTabList">实战</li> <li class="demoTabList">交互</li> <li class="demoTabList">优化</li> </ul> </div> <div class="demoTabBd"> <div class="roundBox"> <div class="demoTabContent current">这是第一个选项卡的内容。</div> <div class="demoTabContent">这是第二个选项卡的内容。</div> <div class="demoTabContent">这是第三个选项卡的内容。</div> <div class="demoTabContent">这是第四个选项卡的内容。</div> </div> </div></div> |
负margin负位移技术应用:
效果预览:
核心分析:
上面那个类似于商城热销商品邮戳效果其实也是由负margin实现的,把以往使用的relative/absolute这样的“危险”属性代替为相对“温和”的margin属性。核心在于小的邮戳图片利用负margin-top向上移动,达到类似absolute的叠加效果。
CSS代码:
|
1
2
3
4
|
.demoSpecItem{width:212px; min-height:178px; _height:178px;}.demoSpecItem .demoItemPic{display:block; text-align:center;}.demoSpecItem .demoItemPic img{padding:5px; border:1px solid #ccc;}.demoSpecItem .demoIcon{display:block; margin:-185px 0 0 150px;} |
HTML代码:
|
1
2
3
4
5
6
|
<div class="demoSpecItem"> <a href="javascript:void(0)" class="demoItemPic"> <img width="200" height="166" src="toygersKittens.jpg" alt="toygers kittens" /> </a> <span class="demoIcon"><img width="54" height="54" src="buyInSoon.png" alt="icon" /></span></div> |
利用负margin制作鳞片式导航:
效果预览:

核心分析:
鳞片式导航可以说是使用负margin技术最佳场合之一。如上方的例子,试着想象不使用负margin,单纯的使用图片来制作这类鳞片式导航,想象下切图、定位、点击后图片切换、中间接壤部分的遮罩、维护开发的工作量,光想想这些就不寒而栗。而利用负margin这里仅仅添加一个margin-left即可达到前后遮盖的效果。
CSS代码:
|
1
2
3
4
5
6
|
.demoNav .demoList{float:left; width:154px; height:53px; margin:0 0 0 -20px;}.demoNav .demoList.firstList{margin:0;}.demoNav .demoList a{display:block; line-height:53px; padding:0 0 0 25px; color:#005590; background:url("flakeNavTab.png") left top no-repeat; font-weight:bold; text-decoration:none;}.demoNav .demoList a:hover{background:url("flakeNavTabHover.png") left top no-repeat;}.demoNav .demoList.current a{background:url("flakeNavTabCurrent.png") left top no-repeat;}.demoNav .demoList.current a:hover{background:url("flakeNavTabCurrent.png") left top no-repeat;}/* fix ie6 hover issue */ |
HTML代码:
|
1
2
3
4
5
6
7
8
|
<div id="demoNav" class="demoNav"> <ul class="clearfix"> <li class="demoList firstList current"><a href="javascript:void(0)">鳞片导航</a></li> <li class="demoList"><a href="javascript:void(0)">前端开发</a></li> <li class="demoList"><a href="javascript:void(0)">用户体验</a></li> <li class="demoList"><a href="javascript:void(0)">实战为主</a></li> </ul></div> |
利用负margin制作自适应左右布局:
效果预览:

核心分析:
如上例这类布局效果(左边一个固定图片,右边为内容),负margin能够替代float浮动布局,进行左右布局规划,并且拥有float所没有的自适应效果。你可以尝试点击变宽和变窄按钮来查看本例。你或许也发现了第三个“不设置最小宽度”按钮,这个是做什么用的呢?你可以使用标准浏览器查看上方例子,依次点击变宽按钮至宽度最大,再点击不设置最小宽度按钮,你会发现出现了一个Bug。负margin用作布局效果的确有其独到之处,但自身也有一个小的缺陷,即如果内部最后一个子元素使用负margin上移后,由于父元素是其边距元素,其实际高度由于内部子元素上移也会跟着变小。解决方式就是设置一个最小高度,最小高度值为较小的固定元素高度(此例即为左边固定的图片高度),就可彻底解决负margin上移影响父元素高度Bug。
CSS代码:
|
1
2
3
4
5
|
.demoLayout{width:500px; border:1px solid #aaa; background:#EEEEEE;}.demoLayout .roundBox{padding:10px; min-height:170px; _height:170px;}.demoLayout .demoShowPic img{padding:1px; border:1px solid #DAA520;}.demoText{margin:-170px 0 0 215px;}.demoLayoutBtn{margin:15px 0 0 0;} |
HTML代码:
|
1
2
3
4
5
6
|
<div id="demoLayout" class="demoLayout"> <div class="roundBox"> <div class="demoShowPic"><img width="200" height="166" src="toygersKittens.jpg" alt="toygers kittens" /></div> <div class="demoText">利用负margin制作自适应左右布局</div> </div></div> |
标签:style blog http color java os 使用 io strong
原文地址:http://www.cnblogs.com/lina6251125/p/3933092.html