标签:style blog http color os 使用 io for ar
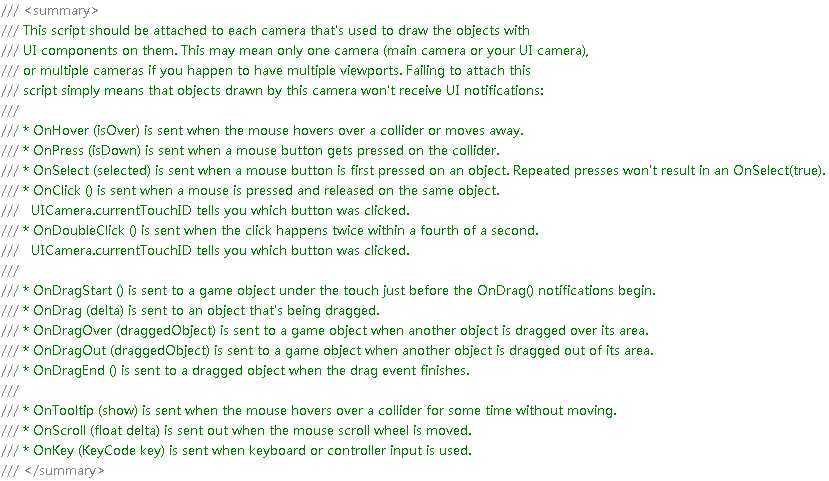
通常我们为对象附加一个脚本组件,脚本组件只要加此鼠标处理事件方法,这个对象就有了点击事件了:
void OnClick() {
        Debug.Log("onclick");
}

这些都是大家很常用的事件,所以就不一一解释了!有哪些事件我们可以调用,这个问题解决了,接下来看,附加到对象上的脚本中的事件(以上所列出的事件)是如何被执行的?接下来我们就来看下UICamera是如何对这些事件进行处理的!
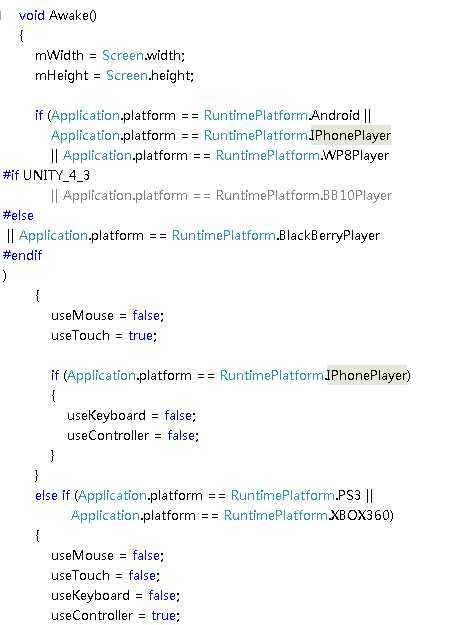
在UICamera里面最先执行的就是Awake方法,所以我们先从Awake方法看起:

可以看出Awake方法主要的功能就是判断设备类型,从而确定你是使用的是鼠标还是触摸方式,但我们通常都是用电脑去设计游戏,所以以上的判断都没有被执行,而useMouse和useTouch字段默认都为true,所以这两个字段的值不变,接下来看Update方法(Start方法没什么好说的),当执行到update中的一段代码时,如下:
    // Process touch events first
    if (useTouch) ProcessTouches();
    else if (useMouse) ProcessMouse();
因为useTouch为true,所以程序回去执行 ProcessTouches方法,这个方法主要是对触屏事件方法的响应,转到ProcessTouches方法,运行到这句话:for (int i = 0; i < Input.touchCount; ++i),这句话Input.touchCount为0,因为我们操作电脑只能通过鼠标,根本不存在触屏操作,所以Input.touchCount为0,程序继续执行下面的
if (Input.touchCount == 0)
        {
            if (useMouse) ProcessMouse();
#if UNITY_EDITOR
            else ProcessFakeTouches();
#endif
        }
如果没有触屏事件,那么就会去执行鼠标事件,也就是去执行ProcessMouse方法去,转到ProcessMouse方法,里面有这么一段代码:
        bool isPressed = false;
        bool justPressed = false;

        for (int i = 0; i < 3; ++i)
        {
            if (Input.GetMouseButtonDown(i))
            {
                currentScheme = ControlScheme.Mouse;
                justPressed = true;
                isPressed = true;
            }
            else if (Input.GetMouseButton(i))
            {
                currentScheme = ControlScheme.Mouse;
                isPressed = true;
            }
        }

        // No need to perform raycasts every frame
        if (isPressed || posChanged || mNextRaycast < RealTime.time)
        {
            mNextRaycast = RealTime.time + 0.02f;
            if (!Raycast(Input.mousePosition)) hoveredObject = fallThrough;
            if (hoveredObject == null) hoveredObject = genericEventHandler;
            for (int i = 0; i < 3; ++i) mMouse[i].current = hoveredObject;
        }
当我们点击按钮时,isPressed就会为true,而mNextRaycast 永远<RealTime.time,所以内部的代码一直会被执行,也就是说一直执行里面的Raycast方法(即我们所知的发射线),转到Raycast方法去,在Raycast方法里面,他会判断你当前选择的EventType,有两种选择:World 表示按被击中点的距离排序执行一个物理射线,UI表示按部件深度排序执行一个物理射线,通常我们选择的是UI,因为对象的层次我们通常是按depth来设计的,在 i f (cam.eventType == EventType.UI) 里面他会执行Physics.RaycastAll ,也就是发出射线,并把击中的对象赋给hoveredObject(hoveredObject = hit.collider.gameObject),RayCast的作用差不多就是找到被击中的对象,赋给hoveredObject,回过头来,因为hoveredObject对象保存的是被击中的对象,在ProcessMouse方法里for (int i = 0; i < 3; ++i) mMouse[i].current = hoveredObject;把此对象付给了mMouse[i],for循环之所以为3次,因为鼠标有三个键,左键,滚轮键,右键,代码继续执行
        // Process all 3 mouse buttons as individual touches
        for (int i = 0; i < 3; ++i)
        {
            bool pressed = Input.GetMouseButtonDown(i);
            bool unpressed = Input.GetMouseButtonUp(i);

            if (pressed || unpressed) currentScheme = ControlScheme.Mouse;

            currentTouch = mMouse[i];
            currentTouchID = -1 - i;
            currentKey = KeyCode.Mouse0 + i;
            if (pressed || unpressed)
                // We don‘t want to update the last camera while there is a touch happening
                if (pressed) currentTouch.pressedCam = currentCamera;
                else if (currentTouch.pressed != null) currentCamera = currentTouch.pressedCam;

            // Process the mouse events
            ProcessTouch(pressed, unpressed);
            currentKey = KeyCode.None;
        }
这里可以看到,射线击中的对象被赋给了currentTouch对象了,当鼠标按下时,pressed表示是否按下,unpressed表示鼠标是否抬起,当我们点击按钮知道完成,pressed和unpressed值会经历这样的变化:True,false -> false true,程序执行到ProcessTouch方法,因为我们是点击事件,所以此方法内部的Notify(currentTouch.pressed, "OnClick", null)这段代码会被执行,继续执行Notify方法:
static public void Notify(GameObject go, string funcName, object obj)
    {
        if (mNotifying) return;
        mNotifying = true;

        if (NGUITools.GetActive(go))
        {

            go.SendMessage(funcName, obj, SendMessageOptions.DontRequireReceiver);

            if (genericEventHandler != null && genericEventHandler != go)
            {
                genericEventHandler.SendMessage(funcName, obj, SendMessageOptions.DontRequireReceiver);
            }
        }
        mNotifying = false;
    }
内部是调用对象的SendMessage方法的,对SendMessage方法不懂得,可以参照这篇文章:
http://www.cnblogs.com/MrZivChu/p/sendmessage.html
就此就完成了整个onclick方法的执行了,因为Update方法是一直执行的,所以UICamera脚本会一直发出射线来检测鼠标或者触屏事件,从而执行相应的方法,原理大概就是这样!
以上是个人的总结,如有不当,希望大家多多批评指正!
标签:style blog http color os 使用 io for ar
原文地址:http://www.cnblogs.com/MrZivChu/p/event.html