标签:style blog http color java os io ar 数据
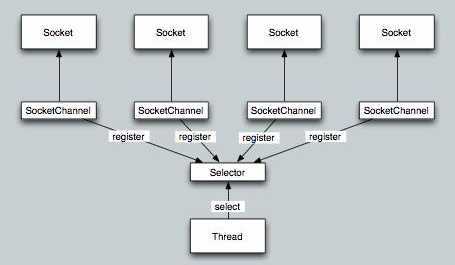
工作模式:

客户端代码:
package demos.nio.socketChannel;

import java.io.ByteArrayOutputStream;
import java.io.IOException;
import java.net.InetSocketAddress;
import java.nio.ByteBuffer;
import java.nio.channels.SelectionKey;
import java.nio.channels.Selector;
import java.nio.channels.SocketChannel;
import java.util.Arrays;
import java.util.Iterator;
import java.util.Set;

import org.apache.log4j.Logger;

/**
 * 非阻塞 Socket 客户端
 * 通过一个线程监听管理所有通道
 *
 */
public class Client {
    private Logger logger=Logger.getLogger(Client.class);
    /** * 服务器Ip */
    private String ip;
    /** * 服务器端口 */
    private int port;
    /** * 控制是否监听通道事件 */
    private volatile boolean isListenable;
    /** * 缓冲区大小 */
    private final int bufferSize = 1024;
    /** * 选择器每次阻塞监听的最大时间 */
    private final int selectorTime = 1000;
    /** * 创建Selector来管理通道事件 */
    private Selector selector;

    public Client(String ip, int port) {
        this.ip = ip;
        this.port = port;
        // 监听器
        try {
            selector = Selector.open();
        } catch (IOException e) {
            e.printStackTrace();
        }
    }

    public void send(String msg) {
        send(msg.getBytes());
    }

    /**
     * 发送数据
     *
     * @param data
     */
    public void send(byte[] data) {
        try {
            // 打开一个网络通道
            SocketChannel socketChannel = SocketChannel.open();
            // 设置通道为非阻塞
            socketChannel.configureBlocking(false);
            // 注册管道事件,监听连接成功
            SelectionKey key = socketChannel.register(selector,
                    SelectionKey.OP_CONNECT);
            // 将发送数据附加在SelectionKey上
            key.attach(ByteBuffer.wrap(data));
            // 建立连接
            socketChannel.connect(new InetSocketAddress(ip, port));

            //当第一个通道被注册到Selector上时,开启守护线程开始监听通道的事件
            if (!isListenable&&selector.keys().size() == 1) {
                //开启监听
                isListenable = true;
                // 开一个线程监听所有通道的事件
                Thread thread = new Thread(this.new SelectionTask());
                thread.setDaemon(true);
                thread.start();
            }
        } catch (Exception e) {
            e.printStackTrace();
        }
    }

    /**
     * 往通道中写入数据
     * 当通道为非阻塞时它都是可写的,所以如果需要写数据,则注册监听写事件即可
     * @param selectionKey
     */
    private void writeData(SelectionKey selectionKey) {
        selectionKey.interestOps(selectionKey.interestOps()
                | SelectionKey.OP_WRITE);
        selectionKey.selector().wakeup();
    }

    public void closeListen() {
        logger.debug("关闭监听");
        this.isListenable = false;
        this.selector.wakeup();
    }

    /**
     * 判断是否继续监听
     * 如果selector中没有可监听的通道,则取消监听
     * @return
     */
    private boolean isListen() {
        return this.isListenable && (this.selector.keys().size() > 0);
    }

    /**
     * 监听任务
     *
     * @author root
     *
     */
    class SelectionTask implements Runnable {

        /**
         * 处理监听到的事件
         *
         * @param selectionKey
         * @throws IOException
         */
        private void handleSelectionKey(SelectionKey selectionKey)
                throws IOException {
            /** * 缓冲区 */
            ByteBuffer byteBuffer = ByteBuffer.allocate(bufferSize);
            SocketChannel channel = (SocketChannel) selectionKey.channel();
            if (!selectionKey.isValid()) {
                return;
            }
            if (selectionKey.isConnectable()) {
                if (!channel.isConnectionPending()) {
                    return;
                }
                channel.finishConnect();
                logger.debug("与服务器连接成功");
                // 连接成功后开始写数据
                writeData(selectionKey);
            } else if (selectionKey.isReadable()) {
                //循环把接受到的数据写入到内存中
                ByteArrayOutputStream outputStream = new ByteArrayOutputStream();
                byteBuffer.clear();
                while (channel.read(byteBuffer) > 0) {
                    byteBuffer.flip();
                    byte[] b = Arrays.copyOf(byteBuffer.array(), byteBuffer
                            .limit());
                    outputStream.write(b);
                    byteBuffer.clear();
                }
                logger.debug("客户端收到信息:"
                        + new String(outputStream.toByteArray()));
                // 使Selector注销对该Channel的监听
                selectionKey.cancel();
            } else if (selectionKey.isWritable()) {
                logger.debug("写出数据");
                ByteBuffer buffer = (ByteBuffer) selectionKey.attachment();
                if (buffer == null) {
                    return;
                }
                while (buffer.hasRemaining()) {
                    channel.write(buffer);
                }
                selectionKey.interestOps(SelectionKey.OP_READ);
            }
        }

        @Override
        public void run() {
            try {
                // 控制是否监听
                while (isListen()) {
                    //判断是否监听到了感兴趣的事件
                    if (selector.select(selectorTime) <= 0) {
                        continue;
                    }
                    Set<SelectionKey> selectionKeys = selector.selectedKeys();
                    Iterator<SelectionKey> iterator = selectionKeys.iterator();
                    while (iterator.hasNext()) {
                        handleSelectionKey(iterator.next());
                        //处理完selectionKey后需要移除它
                        iterator.remove();
                    }
                }
                selector.close();
            } catch (IOException e) {
                e.printStackTrace();
            }
        }
    }

    public static void main(String[] args) throws InterruptedException {
        Client socket = new Client("127.0.0.1", 8686);
        socket.send("hello");
    }
}
标签:style blog http color java os io ar 数据
原文地址:http://www.cnblogs.com/DajiangDev/p/3935160.html