标签:ror order text 前端 event func diff button parse
OpenLayers 是由MetaCarta公司开发的,用于WebGIS客户端的JavaScript包,目前的最高版本是2.7 V,通过BSD License 发行。它实现访问地理空间数据的方法都符合行业标准,比如OpenGIS的WMS和WFS规范, OpenLayers采用纯面向对象的JavaScript方式开发,同时借用了Prototype框架和Rico库的一些组件。
采用OpenLayers作为客户端不存在浏览器依赖性。由于OpenLayers采用JavaScript语言实现,而应用于Web浏览器中的DOM(文档对象模型)由JavaScript实现,同时,Web浏览器(比如IE,FF等)都支持DOM 。
OpenLayers APIs采用动态类型脚本语言JavaScript编写,实现了类似与Ajax功能的无刷新更新页面,能够带给用户丰富的桌面体验(它本身就有一个Ajax类,用于实现Ajax功能)。
目前,OpenLayers所能够支持的Format有:XML、GML、GeoJSON、GeoRSS、JSON、KML、WFS、WKT(Well-Known Text)。在OPenlayers.Format名称空间下的各个类里,实现了具体读/写这些Format的解析器。
OpenLayers所能够利用的地图数据资源“丰富多彩”,在这方面提供给拥护较多的选择,比如WMS、WFS、GoogleMap、KaMap、MSVirtualEarth、WorldWind等等。当然,也可以用简单的图片作为源。
第一次使用OpenLayers:
先到它的官方网站http://www.openlayers.org下载他的压缩包,解压后可以看到其中的一些目录和文件,拷贝目录下的OpenLayer.js、根目录下的lib目录、根目录下的img目录到你网站的Scripts目录下(当然,这个只是例子,您网站的目录结构您自己说得算,只要保证OpenLayers.js,/lib,/img在同一目录中即可)。 然后,创建一个index.html作为查看地图的页面,导入OpenLayers.js和你将要创建的js。
我们以加载WMS和GML文件为例。
//再在刚加载的WMS文件上,加载一GML文件
剩下的工作就是,加上一些控件OpenLayers.Control之类的东西,比如LayerSwitcher等。它们会在地图浏览的“窗口”上增加一些工具栏或是“按钮”,增加互动性和功能性。
例如:
map.addControl(new OpenLayers.Control.LayerSwitcher());
当然,Openlayers中的东西远不止这些,至于它的框架分析、APIs实现机制,会在后续文章中说出。写这个的过程,也是一个学习的过程,其中难免有不妥之处,热烈欢迎大家批评指正,相互交流
通过前面的项目介绍,我们大概已经知道 Openlayers是什么,能够做什么,有什么意义。接下来我们分析它怎么样,以及怎样实现的等问题。
这个图是从它的文档上截取的,旨在从感官上认识一下OpenLayers的类。下面分别介绍(文档中的类是按字母顺序排列的,也按这个顺序说吧):
我们看到在类的顶层“高高在上”的是OpenLayers,它为整个项目实现提供名称空间(JavaScript语言没有名称空间一说,但是它确实有自己的机制实现类似的功能,后面会说明),它直接拥有一常量 VERSION_NUMBER,以标识版本。
Ajax: 顾名思义,用于实现Ajax功能,只是OpenLayers的开发者们把它单独写到一个类里了,其中用到了Prototype.js框架里的一些东西。同时,设计的时候也考虑了跨浏览器的问题。
BaseTypes: 这里定制了OpenLayers中用到的 string,number 和 function。比如,OpenLayers. String. startsWith,用于测试一个字符串是否一以另一个字符串开头;OpenLayers. Number. limitSigDigs,用于限制整数的有效数位;OpenLayers. Function.bind,用于把某一函数绑定于对象等等。
Console: OpenLayers.Console,此名称空间用于调试和把错误等输出到“控制台”上,需要结合使用../Firebug/firebug.js。
Control: 我们通常所说的控件类,它提供各种各样的控件,比如上节中说的图层开关 LayerSwitcher,编辑工具条EditingToolbar等等。加载控件的例子 :

OpenLayers. Feature.WFS与OpenLayers. Feature. Vector继承于它。
Format: 此类用于读/写各种格式的数据,它的子类都分别创建了各个格式的解析器。这些格式有: XML、 GML、GeoJSON 、 GeoRSS、JSON、KML 、WFS、WKT( Well-Known Text )。
Geometry: 怎么翻译呢,几何?是对地理对象的描述。它的子类有Collection、Curve、LinearRing、LineString、MultiLineString、MultiPoint、MultiPolygon、Point、Polygon、Rectangle、Surface,正是这些类的实例,构成了我们看到的地图。需要说明的是,Surface 类暂时还没有实现。
Handler:这个类用于处理序列事件,可被激活和取消。同时,它也有命名类似于浏览器事件的方法。当一个handler 被激活,处理事件的方法就会被注册到浏览器 监 ting 器listener ,以响应相应的事件;当一个handler被取消,这些方法在事件 监 ting 器中也会相应的被取消注册。Handler通过控件control被创建,而control通过icon表现。
Icon:在计算机屏幕上以图标的形式呈现,有url、尺寸size和位置position3个属性。一般情况,它与 OpenLayers.Marker结合应用,表现为一个Marker。
Layer:图层。
Map:网业中动态地图。它就像容器,可向里面添加图层Layer和控件Control。实际上,单个Map是毫无意义的,正是Layer和Control成就了它。
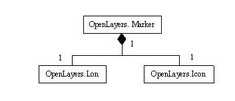
Marker:它的实例是OpenLayers.LonLat 和OpenLayers.Icon的集合。通俗一点儿说,Icon附上一定的经纬度就是Marker。
它们的组合关系是:

Popup:地图上一个小巧的层,实现地图“开关”功能。使用例子:
1 |
Class = new OpenLayers.Popup("chicken", |
2 |
new OpenLayers.LonLat(5,40), |
3 |
new OpenLayers.Size(200,200), |
4 |
"example popup", |
5 |
true); |
6 |
map.addPopup(popup); |
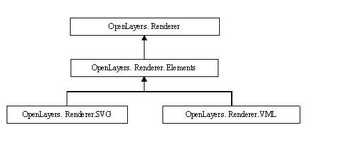
Renderer:渲染类。在OpenLayers中,渲染功能是作为矢量图层的一个属性存在的,我们称之为渲染器,矢量图层就是通过这个渲染器提供的方法将矢量数据显示出来。以SVG和VML为例,继承关系是这样的:

至于OpenLayers. Renderer. Elements为什么要存在,以及它的渲染机制,后面会说。
Tile:设计这个类用于指明单个“瓦片”Tile,或者更小的分辨率。Tiles存储它们自身的信息,比如url和size等。它的类继承关系如下:

Util:“跑龙套”的类。
写到这里,可以看到OpenLayers 的类缠绕的挺麻烦的,接下来的文章将从代码部分分析更细部的东西
01 |
/** |
02 |
* APIMethod: toString |
03 |
* |
04 |
* Returns: |
05 |
* {String} String representation of bounds object. |
06 |
* (ex.<i>"left-bottom=(5,42) right-top=(10,45)"</i>) |
07 |
*/ |
08 |
toString:function() { |
09 |
return ( "left-bottom=(" + this.left + "," + this.bottom + ")" |
10 |
+ " right-top=(" + this.right + "," + this.top + ")" ); |
11 |
} |
01 |
extend:function(object) { |
02 |
var bounds = null; |
03 |
if (object) { |
04 |
switch(object.CLASS_NAME) { |
05 |
case "OpenLayers.LonLat": |
06 |
bounds = new OpenLayers.Bounds(object.lon, object.lat, object.lon, object.lat); |
07 |
break; |
08 |
case "OpenLayers.Geometry.Point": |
09 |
bounds = new OpenLayers.Bounds(object.x, object.y,object.x, object.y); |
10 |
break; |
11 |
case "OpenLayers.Bounds": |
12 |
bounds = object; |
13 |
break; |
14 |
} |
15 |
if (bounds) { |
16 |
if ( (this.left == null) || (bounds.left < this.left)) { |
17 |
this.left = bounds.left;} |
18 |
if ( (this.bottom == null) || (bounds.bottom <this.bottom) ) { |
19 |
this.bottom = bounds.bottom;} |
20 |
if ( (this.right == null) || (bounds.right > this.right) ) { |
21 |
this.right = bounds.right;} |
22 |
if ( (this.top == null) || (bounds.top > this.top) ) { |
23 |
this.top = bounds.top;} |
24 |
} |
25 |
} |
26 |
} |
01 |
drawGeometry: function(geometry, style, featureId) { |
02 |
var className = geometry.CLASS_NAME; |
03 |
if ((className == "OpenLayers.Geometry.Collection") || |
04 |
(className == "OpenLayers.Geometry.MultiPoint") || |
05 |
(className == "OpenLayers.Geometry.MultiLineString") || |
06 |
(className == "OpenLayers.Geometry.MultiPolygon")) { |
07 |
for (var i = 0; i < geometry.components.length; i++) { |
08 |
this.drawGeometry(geometry.components[i], style, featureId); |
09 |
} |
10 |
return; |
11 |
}; |
12 |
//first we create the basic node and add it to the root |
13 |
var nodeType = this.getNodeType(geometry); |
14 |
var node = this.nodeFactory(geometry.id, nodeType, geometry); |
15 |
node._featureId = featureId; |
16 |
node._geometryClass = geometry.CLASS_NAME; |
17 |
node._style = style; |
18 |
this.root.appendChild(node); |
19 |
|
20 |
//now actually draw the node, and style it |
21 |
this.drawGeometryNode(node, geometry); |
22 |
} |
01 |
drawCircle: function(node, geometry, radius) { |
02 |
if(!isNaN(geometry.x)&& !isNaN(geometry.y)) { |
03 |
var resolution = this.getResolution(); |
04 |
|
05 |
node.style.left = (geometry.x /resolution).toFixed() - radius; |
06 |
node.style.top = (geometry.y /resolution).toFixed() - radius; |
07 |
08 |
var diameter = radius * 2; |
09 |
|
10 |
node.style.width = diameter; |
11 |
node.style.height = diameter; |
12 |
} |
13 |
} |
01 |
// create a map with default options in an element with the id "map1" |
02 |
var map = new OpenLayers.Map("map1"); |
03 |
|
04 |
// create a map with non-default options in an element with id "map2" |
05 |
//Optional object with properties to tag onto the map. |
06 |
var options = { |
07 |
maxExtent: new OpenLayers.Bounds(-200000, -200000, 200000, 200000), |
08 |
maxResolution: 156543, |
09 |
units: ‘meters‘, |
10 |
projection: "EPSG:41001" |
11 |
}; |
12 |
var map = new OpenLayers.Map("map2", options); |
01 |
addLayer: function (layer) { |
02 |
for(var i=0; i < this.layers.length; i++) { |
03 |
if (this.layers[i] == layer) { |
04 |
var msg = "You tried to add the layer: " + layer.name + |
05 |
" to the map, but it has already been added"; |
06 |
OpenLayers.Console.warn(msg); |
07 |
return false; |
08 |
} |
09 |
} |
10 |
layer.div.style.overflow = ""; |
11 |
this.setLayerZIndex(layer, this.layers.length); |
12 |
if (layer.isFixed) { |
13 |
this.viewPortDiv.appendChild(layer.div); |
14 |
} else { |
15 |
this.layerContainerDiv.appendChild(layer.div); |
16 |
} |
17 |
this.layers.push(layer); |
18 |
layer.setMap(this); |
19 |
if (layer.isBaseLayer) { |
20 |
if (this.baseLayer == null) { |
21 |
// set the first baselaye we add as the baselayer |
22 |
this.setBaseLayer(layer); |
23 |
} else { |
24 |
layer.setVisibility(false); |
25 |
} |
26 |
} else { |
27 |
layer.redraw(); |
28 |
} |
29 |
this.events.triggerEvent("addlayer"); |
30 |
} |
1 |
Control Functions: |
2 |
addControl: function (control, px) { |
3 |
this.controls.push(control); |
4 |
this.addControlToMap(control, px); |
5 |
} |
01 |
addControlToMap: function (control, px) { |
02 |
// If a control doesn‘t have a div at this point, it belongs in the |
03 |
// viewport. |
04 |
control.outsideViewport = (control.div != null); |
05 |
control.setMap(this); |
06 |
var div = control.draw(px); |
07 |
if (div) { |
08 |
if(!control.outsideViewport) { |
09 |
div.style.zIndex = this.Z_INDEX_BASE[‘Control‘] + |
10 |
this.controls.length; |
11 |
this.viewPortDiv.appendChild( div ); |
12 |
} |
13 |
} |
14 |
} |
01 |
//Allows user to pan by a value of screen pixels |
02 |
pan: function(dx, dy) { |
03 |
// getCenter |
04 |
var centerPx = this.getViewPortPxFromLonLat(this.getCenter()); |
05 |
// adjust |
06 |
var newCenterPx = centerPx.add(dx, dy); |
07 |
|
08 |
// only call setCenter if there has been a change |
09 |
if (!newCenterPx.equals(centerPx)) { |
10 |
var newCenterLonLat = this.getLonLatFromViewPortPx(newCenterPx); |
11 |
this.setCenter(newCenterLonLat); |
12 |
} |
13 |
} |
OpenLayers. Layer提供了一个EVENT_TYPES常量,用于支持关于图层的应用事件类型,这些事件有"loadstart", "loadend", "loadcancel", "Visibilitychanged"。
它“固有”的3个属性:id,name,div。其中,id和name是layer的身份,在对图层进行操作的时候,就是用它们标志的。至于div,大家都制知道,DOM元素,用于存放图层。
定义的map、event属性,是图层对象对map、event对象的引用;projection属性,设置默认情况下,地图的投影,同时也设置maxExtent, maxResolution, 和units 。
来看看构造函数:
下面一组函数是Baselayer Functions函数,就是layer是Baselayer 的话,所用的函数。
比如,initResolutions、getResolution、getExtent等。
通过这两次的分析,可以发现,Map和Layers的关系:它们是相互引用的。实际上是这样,OpenLayers的Map类主要包含了对每个图层的引用,对每个控件的引用,对事件的引用,对装载容器的引用(其实就是那些map上层的div)以及对pop的引用,而其自身又包含有大量的方法和属性。图层主要包含了对map的引用,对自身div容器的引用以及事件的引用,而图层自身又包含了大量的属性和方法。map引用了layer,而layer又引用了map,这里就直接形成了循环引用关系。
这样的组成和关联关系,每动一下,就会涉及到大量的对象,影响了性能。
OpenLayers中的控件,是通过加载到地图上而起作用的,也算地图表现的一部分。同时,控件需要对地图发生作用,所以每个控件也持有对地图(map对象)的引用。
前面说过,控件是于事件相关联的。具体的说就是控件的实现是依赖于事件绑定的,每个OpenLayers.Control及其子类的实例都会持有一个handler的引用的。
那么,怎么来创建并添加一个控件呢?用下面的语句:
//实例化一个控件
var control1 = new OpenLayers.Control({div: myDiv});
//向地图中添加控件
var map = new OpenLayers.Map(‘map‘, { controls: [] });
map.addControl(control1 );
对一些常用的OpenLayers控件,项目本身都封装好了,用下面的语句添加:
map.addControl(new OpenLayers.Control.PanZoomBar());
map.addControl(new OpenLayers.Control.MouseToolbar());
map.addControl(new OpenLayers.Control.LayerSwitcher({‘ascending‘:false}));
map.addControl(new OpenLayers.Control.Permalink());
map.addControl(new OpenLayers.Control.Permalink(‘permalink‘));
map.addControl(new OpenLayers.Control.MousePosition());
map.addControl(new OpenLayers.Control.OverviewMap());
map.addControl(new OpenLayers.Control.KeyboardDefaults());
先看看OpenLayers. Control基类的实现过程,再选择几个典型的子类分析一下。
OpenLayers. Control:
//设置控件的map属性,即控件所引用的地图
setMap: function(map) {
this.map = map;
if (this.handler) {
this.handler.setMap(map);
}
}
//drew方法,当控件准备显示在地图上是被调用。当然,这个方法只对有图标的控件起
//作用。
draw: function (px) {
if (this.div == null) {
this.div = OpenLayers.Util.createDiv();
this.div.id = this.id;
this.div.className = this.displayClass;
}
if (px != null) {
this.position = px.clone();
}
this.moveTo(this.position);
return this.div;
}
前面说过,OpenLayers.Control及其子类的实例都是会持有一个handler的引用的,因为每个控件起作用时,鼠标事件都是不一样的,这需要动态的绑定和接触绑定。在OpenLayers.Control中是通过active和deactive两个方法实现,就是动态的激活和注销。
//激活方法
activate: function () {
if (this.active) {
return false;
}
if (this.handler) {
this.handler.activate();
}
this.active = true;
return true;
}
//注销方法
deactivate: function () {
if (this.active) {
if (this.handler) {
this.handler.deactivate();
}
this.active = false;
return true;
}
return false;
}
再来看OpenLayers.Control的子类,即各类“特色”控件。选鹰眼控件OpenLayers. Control. OverviewMap和矢量编辑工具条控件OpenLayers. Control. EditingToolbar来说。
顺便说一句,OpenLayers中的控件有些是需要图标的,像EditingToolbar,有些是不需要的,像OpenLayers. Control. DragPan。
OpenLayers. Control. OverviewMap:
“鹰眼”实际上也是地图导航的一种形式,在外部形态上跟图层开关控件有点儿像。
添加鹰眼控件的语句:
map.addControl(new OpenLayers.Control.OverviewMap());
在它实现的成员函数中,draw函数是核心,继承基类OpenLayers.Control,在地图中显示这个控件。
此控件关联了一些浏览器事件,比如
rectMouseDown: function (evt) {
if(!OpenLayers.Event.isLeftClick(evt)) return;
this.rectDragStart = evt.xy.clone();
this.performedRectDrag = false;
OpenLayers.Event.stop(evt);
}。
OpenLayers. Control. EditingToolbar:
OpenLayers从2.3版就对矢量编辑进行了支持,就是图上右上角几个图标。完成点、线、面的编辑功能。
同样,它也是用drew方法激活:
draw: function() {
Var div = OpenLayers.Control.Panel.prototype.draw.apply(this, arguments);
this.activateControl(this.controls[0]);
return div;
}
下面的代码是使用此控件的具体过程:
Var map, layer;
map = new OpenLayers.Map( ‘map‘, { controls: [] } );
layer = new OpenLayers.Layer.WMS( "OpenLayers WMS",
"http://labs.metacarta.com/wms/vmap0", {layers: ‘basic‘} );
map.addLayer(layer);
vlayer = new OpenLayers.Layer.Vector( "Editable" );
map.addLayer(vlayer);
map.addControl(new OpenLayers.Control.PanZoomBar());
map.addControl(new OpenLayers.Control.EditingToolbar(vlayer));
map.setCenter(new OpenLayers.LonLat(lon, lat), zoom);
标签:ror order text 前端 event func diff button parse
原文地址:http://www.cnblogs.com/love540376/p/6775103.html