标签:des winform style blog class code
原文:如何扩展 Visual Studio 编辑器
在 Visual Studio 2010 的时代,扩展 Visual Studio 的途径有很多,开发者可以选择宏、Add-in、MEF 和 VSPackages 进行自定义的扩展。但是宏在 Visual Studio 2012 的时候被阉割了,Add-in 也在 Visual Studio 2013 里被抹杀了,这样的调整对于 Visual Studio 来说是好的,但是对于那些习惯了使用宏和Add-in的团队可能就郁闷了。
本文将一步步教你如何实现对 Visual Studio 代码编辑器的扩展,最终将实现一个可以支持如下两个功能的扩展。
1. 自动任务注释(支持后期扩展)
任务注释就是 //TODO、//FIXME 之类可以被 Visual Studio 区别对待的注释,不同的任务注释可能需要不同的格式,比如有些需要先注释掉方法体,有些需要在代码行的前后加上开始、结束标记等,过去在宏还支持的时候,我们可以使用宏来实现此类操作。不同的项目组使用这些标记的方法不同,因此会有不同的要求,本工具支持自定义的扩展。
2. 跳转到方法的头部或尾部
这个功能看似无用,但是当一个方法有几百行,甚至上千行的时候,如何快速跳转到方法的开头或结尾就比较麻烦了。
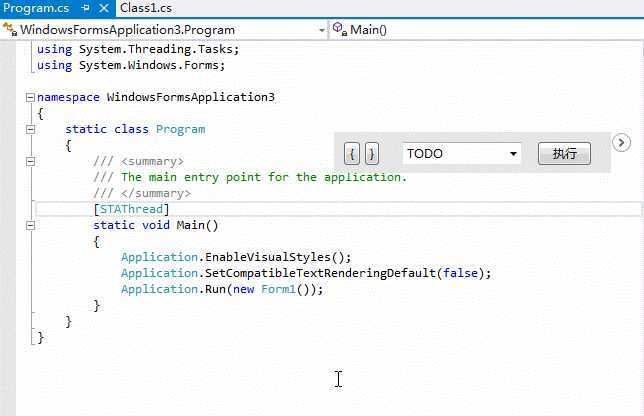
图1 最终效果动画演示(请点击放大后查看)
阅读此文,需要您对如下知识点有一定了解:
1.
MVVM 与 WPF -> 赶紧去了解一下 (此篇文章躺在自己网站上,没有来得及同步到博客园,大家将就一下)
2.
MEF -> 赶紧去了解一下
如果想赶紧体验下这个扩展的话,请猛击这里! (仅限 Visual Studio 2012)
本文提纲
Editor Viewport Adornment 原理解析
在进入正文前,我们先来快速认识下这仅存的两位英雄~
从 Visual Studio 2013 开始,对 Visual Studio 的扩展只剩下 MEF 和 VSPackage。来来来,给大家介绍下你们自己~~
MEF(Managed Extensibility Framework)
这个框架最初是独立于 .Net Framework 发布,后来整合到了 .Net 4.0 中,并伴随着 .Net 4.0 一起发布(包含在 System.ComponentModel.Composition.dll 程序集中)。从名字上看得出这个框架主要就是为编写可扩展的应用程序而生的。随着 .Net 4.0 的推出,还有一项重大的改变就是 Visual Studio IDE中的编辑器,该部分原先和其它组件一样都是采用 COM 方式开发,但现在却被 WPF 技术顶替了。采用了WPF技术搭建的编辑可以完全支持使用 MEF 来进行扩展,这不能不说是一个非常完美的改进。唯一遗憾的是,截止2013的出现,Visual Studio 的其余部分仍然没有从 COM 中脱离出来。
The MEF is a .NET library that lets you add and modify features of an application or component that follows the MEF programming model. The Visual Studio editor can both provide and consume MEF component parts. The MEF is contained in the .NET Framework version 4 System.ComponentModel.Composition.dll assembly.
因此,如果想要扩展已有的编辑器,就可以基于MEF进行开发(比如修改针对C#代码编辑器的高亮颜色、智能提示、括号补全等)。
VSPackage
可以说除了编辑器, Visual Studio 就是多个 VSPackage 的集合,因此使用 VSPackage 可以完美得与 Visual Studio 进行集成,而且能够获得几乎全部的能力。如果想开发对工具栏、菜单栏,甚至是全新的编辑器时(提供对新语言的解析、智能提示等)可以选择VSPackage。
童鞋们,请检查下吃饭的家伙准备好了吗?
1. 英文版的 Visual Studio,中文版的 Visual Studio 无法看到 Editor Text Adornment 等模板。
2. 想要扩展编辑器或整个 Visual Stuio,必须先下载安装 Visual Studio SDK(VS2012版本,请点击链接下载),安装完后,就可以在 “其它项目类型” 的模板上找到想要的模板了。
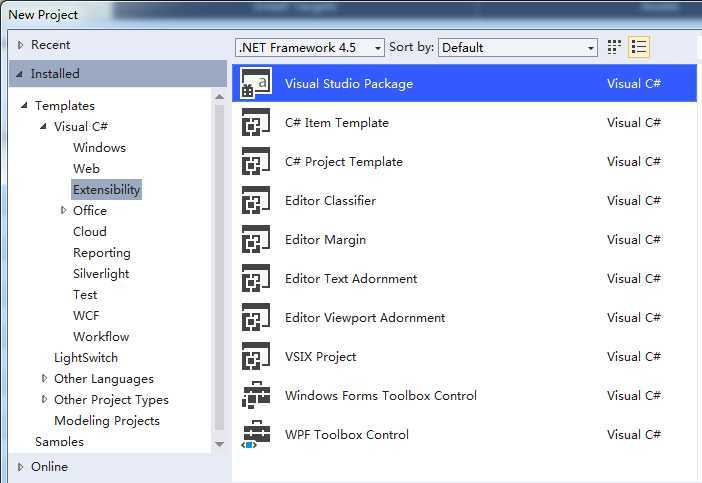
图2 SDK安装后的模板
本文所有代码均基于 Visual Studio 2012 开发,如果您使用的是其它版本,请下载安装适合您版本的 SDK。扩展开发的过程在各个版本间可能会有细小的差距,但不影响整体开发流程。
安装完 SDK 后,就会拥有如上图中所示的多种扩展模板,其中包含四种和 Editor 相关的模板,它们之间有什么区别吗?
Editor Classifier
可以修改编辑器中代码的高亮、添加一些智能的标签(比如当我们修改了某个变量名时,会在变量名下出现一个小短横,当你鼠标移上去后会提示你是否要修改所有引用的地方)等,示例效果如下:
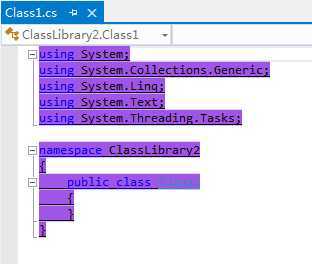
图3 Editor Classifier 示例
Editor Margin
在编辑器的周围添加一些WPF元素,比如当前文件是只读的时候,可以在编辑器下边沿提示文件为只读,示例效果如下:
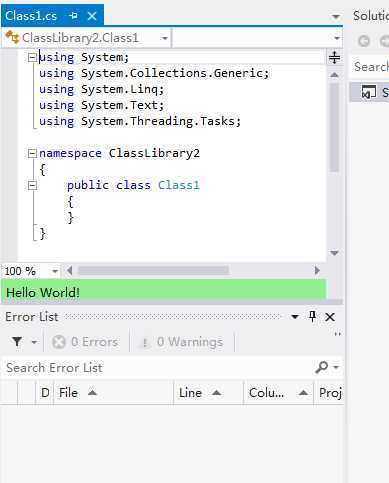
图4 在下边沿添加了一条绿色的信息框
Editor Text Adornment
用于对编辑器中的文字进行修饰,添加一些WPF的元素,示例效果如下:
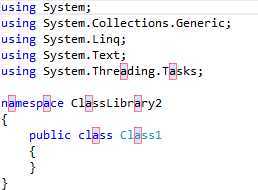
图5 用框框包裹所有字符 a
Editor Viewport Adornment
用于对编辑器本身进行修饰,添加一些WPF元素,示例如下:
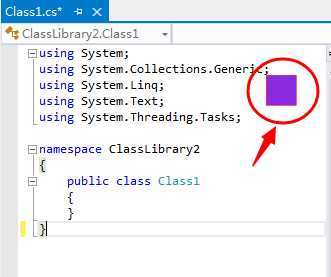
图6 在编辑器的右上角添加了一个矩形元素
本工具使用 Editor Viewport Adornment 作为模板。
对于这些扩展的测试,Visual Studio 提供了 Experimental Instance 用于实验环境,该环境和真实的 Visual Studio 完全一样,只不过它和真实版本各自独享一套配置文件,对于实验环境的配置不会影响到真实环境。
第一次启动实验环境,会进入如图7所示的默认环境配置的界面。
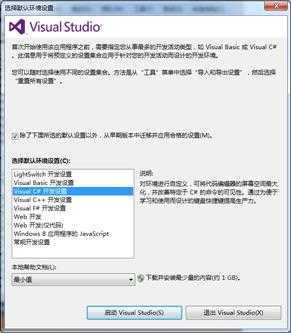
图7 默认环境配置
实验环境中的数据可以初始化
SDK目录中的 Tools提供了 “Reset the Visual Studio 2012 Experimental Instance” 命令行工具,运行该工具就会初始化实验环境。
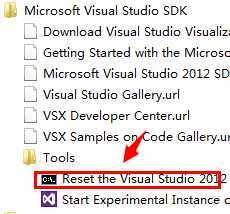
图10 初始化工具
要想理解它,必先使用它。通过模板创建好的新 Editor Viewport Adornment 项目时,已经包含了示例代码,该示例代码的功能就是如图6所示在编辑区添加一个紫色的矩形框。
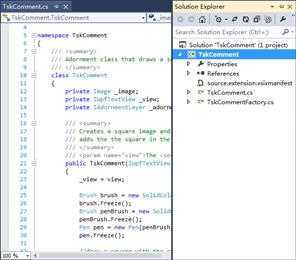
图11 刚创建完的样子
在运行示例代码前必须先修改 source.extension.vsixmanifest 文件中的 author 字段,否则运行将报错。
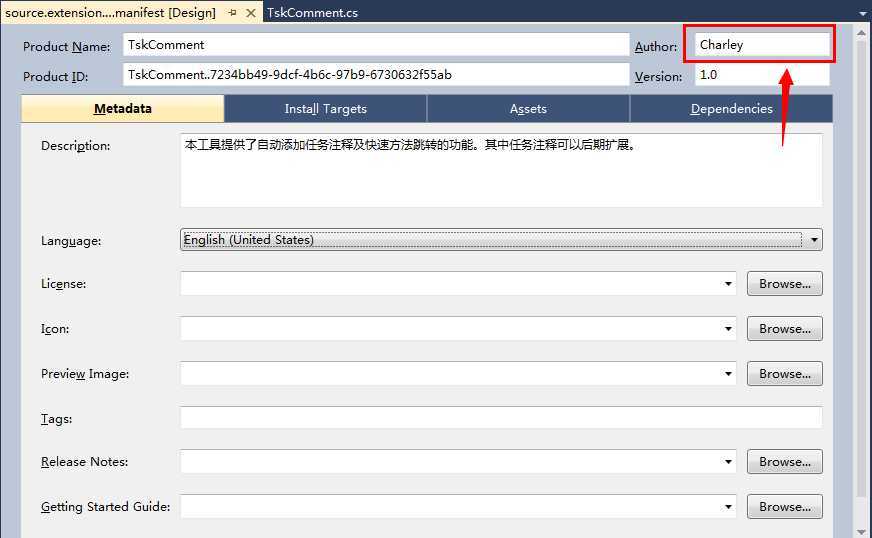
图12 补全 Author 字段
实现原理
在介绍 MEF 和 VSPackage 的时候,我说过整个 Editor 部分都是基于 MEF 思想开发的。简单来说,Visual Studio Editor 向第三方扩展提供了产物(Export)、接受者(Import)及各种协议,第三方扩展根据对应的协议制作生产出符合的产物,然后 VS 会将第三方的产物与自己的接受者进行组合(就好像是把符合形状的积木放入盒子中)。这样,我们就能在下次启动 VS 的时候使用这个扩展了。

图13 MEF 思想
这个项目中主要的就两个文件:TskCommentFactory.cs 和 TskComment.cs。
其中,TskCommentFactory 文件中的 PurpleBoxAdornmentFactory 就是基于 IWpfTextVIewCreationListener 这个协议的产物,也是本项目的主要入口。使用该协议可以在编辑器视图创建的时候加入我们想要的操作。其中最重要的就是 TextViewCreated 方法,该方法调用了 TskComment 构造函数,从而在编辑器上增加了一块紫色的区域。
 1     [Export(typeof(IWpfTextViewCreationListener))]
 2     [ContentType("text")]
 3     [TextViewRole(PredefinedTextViewRoles.Document)]
 4     internal sealed class PurpleBoxAdornmentFactory : IWpfTextViewCreationListener
 5     {
 6         /// <summary>
 7         /// Defines the adornment layer for the scarlet adornment. This layer is ordered
 8         /// after the selection layer in the Z-order
 9         /// </summary>
10         [Export(typeof(AdornmentLayerDefinition))]
11         [Name("TskComment")]
12         [Order(After = PredefinedAdornmentLayers.Caret)]
13         public AdornmentLayerDefinition editorAdornmentLayer = null;
14
15         /// <summary>
16         /// Instantiates a TskComment manager when a textView is created.
17         /// </summary>
18         /// <param name="textView">The <see cref="IWpfTextView"/> upon which the adornment should be placed</param>
19         public void TextViewCreated(IWpfTextView textView)
20         {
21             new TskComment(textView);
22         }
23     }
TskComment 文件中主要就两个方法:构造函数 和 onSizeChange 方法。在构造函数中,通过 Brush 画出了一个紫色的矩形,并为编辑器视图绑定了 onSizeChange 方法。
 1     Brush brush = new SolidColorBrush(Colors.BlueViolet);
 2     brush.Freeze();
 3     Brush penBrush = new SolidColorBrush(Colors.Red);
 4     penBrush.Freeze();
 5     Pen pen = new Pen(penBrush, 0.5);
 6     pen.Freeze();
 7
 8     //draw a square with the created brush and pen
 9     System.Windows.Rect r = new System.Windows.Rect(0, 0, 30, 30);
10     Geometry g = new RectangleGeometry(r);
11     GeometryDrawing drawing = new GeometryDrawing(brush, pen, g);
12     drawing.Freeze();
13
14     DrawingImage drawingImage = new DrawingImage(drawing);
15     drawingImage.Freeze();
16
17     _image = new Image();
18     _image.Source = drawingImage;
上面代码创建了一个紫色的矩形。如果看不懂也不要紧,因为这部分代码是要被删除的。
onSizeChange 中调用了 AddAdornment 这个方法,这才把紫色的矩形加到了编辑器上。
 1     public void onSizeChange()
 2     {
 3         //clear the adornment layer of previous adornments
 4         _adornmentLayer.RemoveAllAdornments();
 5
 6         //Place the image in the top right hand corner of the Viewport
 7         Canvas.SetLeft(_image, _view.ViewportRight - 60);
 8         Canvas.SetTop(_image, _view.ViewportTop + 30);
 9
10         //add the image to the adornment layer and make it relative to the viewport
11         _adornmentLayer.AddAdornment(AdornmentPositioningBehavior.ViewportRelative, null, null, _image, null);
12     }
到现在,原理部分已经讲完了,不管你信不信,你已经可以通过修改 TskComment 中这两个方法来实现自己的扩展了。
如何实现我要的功能呢?
首先,我们的工具需要一个可以交互的界面,这没办法单纯的用 Brush 绘制。因此需要新建一个 WPF 控件(不能是 Winform 控件,AddAdornment 只能接受 WPF 元素)。
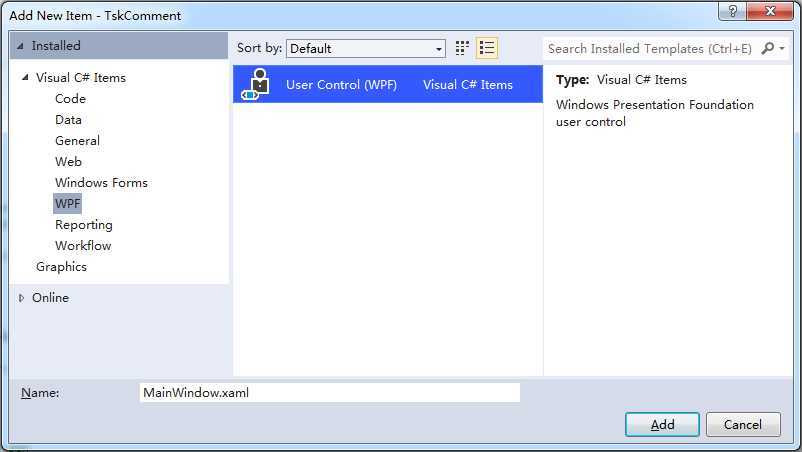
图14 新建 WPF 用户控件
按照 MVVM 的思想,依次添加 DelegateCommand、ViewModelBase、MainViewModel 这几个文件,我们的核心逻辑全部在 MainViewModel 中。
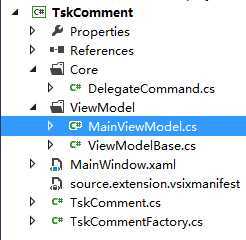
图15 新增的文件
MainWindow.xaml 中的代码如下(省略了一些与逻辑无关的元素)。
 1 <UserControl x:Class="TskComment.MainControl"
 2              ...
 3              d:DesignHeight="41" Width="300">
 4     <UserControl.DataContext>
 5         <local:MainViewModel></local:MainViewModel>
 6     </UserControl.DataContext>
 7
 8     <Expander>
 9         <Grid Height="41" VerticalAlignment="Top">
10             <Button Content="{}{"  Command="{Binding MoveToTopOfBlockCmd}" />
11             <Button Content="}" Command="{Binding MoveToBottomOfBlockCmd}" />
12             <Button Content="执行" Command="{Binding ExecuteCmd}" IsDefault="True"/>
13             <ComboBox IsEditable="True" ItemsSource="{Binding CMTCollection}" SelectedItem="{Binding SelectedItem}" Name="cmtCol"/>
14         </Grid>
15     </Expander>
16 </UserControl>
MainViewModel 中的代码如下(省略部分无关代码),其中的 MoveToTopOrBottomOfBlock 和 Execute 两个方法的代码因为缺少关键元素,暂时为空。
 1     #region Properties and Fields
 2
 3     private ObservableCollection<BaseComment> _cmtCollection = new ObservableCollection<BaseComment>();
 4     public ObservableCollection<BaseComment> CMTCollection
 5     {
 6         get { return _cmtCollection; }
 7         set { _cmtCollection = value; RaisePropertyChanged("CMTCollection"); }
 8     }
 9
10     private BaseComment selectedItem = null;
11     public BaseComment SelectedItem
12     {
13         get { return selectedItem; }
14         set { selectedItem = value; RaisePropertyChanged("SelectedItem"); }
15     }
16
17     public DelegateCommand MoveToTopOfBlockCmd { get; set; }
18     public DelegateCommand MoveToBottomOfBlockCmd { get; set; }
19     public DelegateCommand ExecuteCmd { get; set; }
20
21     #endregion
22
23     #region ctor
24
25     public MainViewModel()
26     {
27         MoveToTopOfBlockCmd = new DelegateCommand((o) => MoveToTopOrBottomOfBlock(true));
28         MoveToBottomOfBlockCmd = new DelegateCommand((o) => MoveToTopOrBottomOfBlock(false));
29         ExecuteCmd = new DelegateCommand((o) => Comment());
30     }
31
32     #endregion
33
34     #region Methods
35
36     private void MoveToTopOrBottomOfBlock(bool up)
37     {
38         //... 缺少关键元素
39     }
40
41     private void Comment()
42     {
43         //... 缺少关键元素
44     }
45
46     #endregion
上一节中所缺少的关键元素其实就是DTE,该对象相当于 Visual Studio 的实例,可以通过操作该实例对编辑器中的东东进行控制(如果想要进一步了解,请见参考资源[1]),比如剪切、粘贴、新建行、跳转到方法体等。所以,如果想实现开头我所讲的工具,就要依托这个对象。
在宏编辑器中,可以很轻松的获取该对象,但是在这里稍微就有点麻烦了。我们必须借助 Visual Studio 的其中一个产物(Export) -- SVsServiceProvider。该产物的 GetService 可以获得这个对象。
修改 TskCommentFactory 代码,如下:
 1 internal sealed class TskCommentFactory : IWpfTextViewCreationListener
 2 {
 3     [Import]
 4     internal SVsServiceProvider ServiceProvider = null;   //<-- 通过这句代码,就可以获取 Visual Studio 的产物
 5
 6     //省略无关代码
 7
 8     public void TextViewCreated(IWpfTextView textView)
 9     {
10         DTE dte = (DTE)ServiceProvider.GetService(typeof(DTE)); //<-- 获取DTE对象
11         new TskComment(textView, dte); //<-- 把dte传给 view
12     }
13
14 }
注:DTE 存在于 EnvDTE.dll 程序集中,SVsServiceProvider 存在于 Microsoft.VisualStudio.Shell.Immutable.10.0.dll 程序集中,需要先添加这些程序集到项目中
既然已经获取了关键元素,我们就把 MainViewModel 中的代码完善一下吧。
 1 private void MoveToTopOrBottomOfBlock(bool up)
 2 {
 3     if (DTE == null)
 4     {
 5         return;
 6     }
 7
 8     CodeFunction func = Selection.ActivePoint.CodeElement[vsCMElement.vsCMElementFunction] as CodeFunction;
 9
10     if (func != null)
11     {
12         if (up)
13         {
14             Selection.MoveToPoint(func.StartPoint);
15         }
16         else
17         {
18             Selection.MoveToPoint(func.EndPoint);
19         }
20     }
21 }
22
23 private void Comment()
24 {
25     Selection.StartOfLine();
26     Selection.NewLine();
27     Selection.LineUp();
28     Selection.Text = "//TODO:";
29     DTE.ExecuteCommand("Edit.FormatSelection");
30 }
修改 MainWindow 的代码让它能够接受 DTE。
1     public partial class MainWindow : UserControl
2     {
3         public MainWindow(DTE dte)
4         {
5             InitializeComponent();
6             ((MainViewModel)this.DataContext).DTE = dte;
7         }
8     }
修改 TskComment.cs 中对应的部分
 1 private MainWindow _win;
 2
 3 //... 省略部分代码
 4
 5 public TskComment(IWpfTextView view,DTE dte)
 6 {
 7     _win = new MainWindow(dte);
 8
 9     //...
10 }
11
12 public void onSizeChange()
13 {
14     //...
15
16     Canvas.SetLeft(_win, _view.ViewportRight - 310); //<-- 调整位置
17     Canvas.SetTop(_win, _view.ViewportTop + 90); //<-- 调整位置
18
19     _adornmentLayer.AddAdornment(AdornmentPositioningBehavior.ViewportRelative, null, null, _win, null); //<-- 把 win 放到界面上
20 }
哦啦,现在可以运行了!
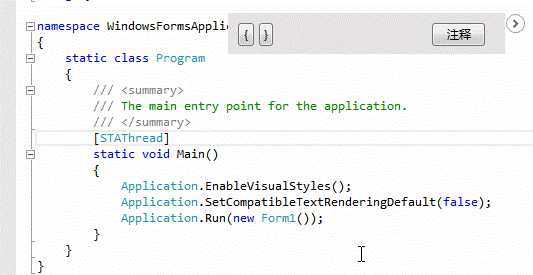
图16 动画演示
上面的代码已经完成了,可惜这个注释太不人性化了,要是我想增加一个 Phase0 的注释或者 FixMe 的注释,还得修改代码。因此,这里也按照 MEF 的思想,对代码进行升级。
这里只对关键代码进行解释说明,其它部分,请童鞋们查看源代码。
新建 “协议” 项目
增加一个独立的项目,用于存放协议接口,同时基于此接口提供一个抽象类。
 1     public interface IComment
 2     {
 3         string Title { get; }
 4         string Description { get; }
 5         void Execute(DTE dte); // 把DTE提供给第三方,这样就可以利用这个来操纵编辑器了
 6     }
 7
 8     public abstract class BaseComment:IComment
 9     {
10         public abstract string Title{get;}
11
12         public abstract string Description{get;}
13
14         public abstract void Execute(DTE dte);
15
16         public override string ToString()
17         {
18             return Title;
19         }
20
21         protected TextSelection Selection(DTE dte)
22         {
23             return dte.ActiveDocument.Selection;
24         }
25
26         protected CodeFunction Function(DTE dte)
27         {
28             return Selection(dte).ActivePoint.CodeElement[vsCMElement.vsCMElementFunction] as CodeFunction;
29         }
30     }
新建 “接受者”
有了协议,就该在我们的工具上增加一个接收者从而让 MEF 帮我们把第三方的产物和我们的接受者组合在一起。
修改 MainViewModel, 增加接收者,因为可能会有不只一个的注释,所以要使用 ImportMany。
    [ImportMany(typeof(BaseComment))]
    public IEnumerable<BaseComment> Comments;
新建 “组合引擎”
 1     private void Init()
 2     {
 3         //设置目录
 4         var catalog = new AggregateCatalog();
 5         catalog.Catalogs.Add(new DirectoryCatalog("D:\\plugin\\"));
 6
 7         _container = new CompositionContainer(catalog);
 8         try
 9         {
10             this._container.ComposeParts(this);
11         }
12         catch (CompositionException compositionException)
13         {
14             Console.WriteLine(compositionException.ToString());
15         }
16
17         //把新的注释绑定到集合中,让界面上能够显示
18         foreach (BaseComment itm in Comments)
19         {
20             CMTCollection.Add(itm);
21         }
22
23         if (Comments != null && Comments.Count() > 0)
24         {
25             SelectedItem = CMTCollection[0];
26         }
27     }
大功告成,如果您还能跟住我的节奏,那可喜可贺,您已经基本掌握了 MEF 的思想和扩展 Editor 的能力了。
换个问法就是 “为什么宏和Add-in不支持了?” 这答案谷歌一下肯定很多,但是考虑到文章的完整性,还是打算来做一下搬运工。
根据Microsoft所做的使用率跟踪数据,Visual Studio中宏的使用人数不到开发人员总数的1%。这还不足以让Microsoft放弃这个功能,Visual Studio中的宏功能维护成本过高,是另外一个原因,与其他功能不同,对宏的支持,必须要随着Visual Studio每个新版本更新,并做大量令人疲倦的测试。理论上,用户应该可以在宏IDE中录制并播放任何功能,这给微软的维护增加了巨大负担。 Matt Kaufman说:宏IDE已经好几个版本都没有更新了。用户把它启动之后,很快就能看出来它像一个老版本的Visual Studio。更麻烦的是:它还是只支持Visual Basic。用户不能使用C#或是其他新的.NET语言来创建宏。
微软已经弃用Visual Studio加载项这一基础结构。根据MSDN上的说法,“Visual Studio 2013弃用了加载项。开发人员应该将加载项升级为VSPackage扩展。”稍后的文档指出,“VSPackage是Visual Studio的主要架构单位,也是部署、许可和安全的单位。Visual Studio本身的大部分就写成了VSPackage集合。”
CodePlex: Visual Studio Editor Extension -- TaskComment
TskComment.vsix: 您也可以直接点击这里获取此扩展,并安装到您的 Visual Studio 当中。
[2] Managed Extensibility Framework (MEF)
本文来源于 《如何扩展 Visual Studio 编辑器》
如何扩展 Visual Studio 编辑器,布布扣,bubuko.com
标签:des winform style blog class code
原文地址:http://www.cnblogs.com/lonelyxmas/p/3717837.html