标签:变量 author 算法 ant orm rom examples windows tair
1、还是以手写识别为类,至于为什么一直用手写识别这个例子,原因很简单,因为书上只给出了这个类子呀,哈哈哈,好神奇
下面是可视化学习的标准函数
‘‘‘
Created on 2017年5月23日

@author: weizhen
‘‘‘
import os
import tensorflow as tf
from tensorflow.examples.tutorials.mnist import input_data
#minist_inference中定义的常量和前向传播的函数不需要改变,
#因为前向传播已经通过tf.variable_scope实现了计算节点按照网络结构的划分
import mnist_inference
from mnist_train import MOVING_AVERAGE_DECAY, REGULARAZTION_RATE,    LEARNING_RATE_BASE, BATCH_SIZE, LEARNING_RATE_DECAY,TRAINING_STEPS,MODEL_SAVE_PATH,MODEL_NAME
INPUT_NODE = 784
OUTPUT_NODE =10
LAYER1_NODE = 500
def train(mnist):
    #将处理输入数据集的计算都放在名子为"input"的命名空间下
    with tf.name_scope("input"):
        x=tf.placeholder(tf.float32, [None,mnist_inference.INPUT_NODE], name=‘x-input‘)
        y_=tf.placeholder(tf.float32,[None,mnist_inference.OUTPUT_NODE],name=‘y-cinput‘)
    regularizer = tf.contrib.layers.l2_regularizer(REGULARAZTION_RATE)
    y=mnist_inference.inference(x, regularizer)
    global_step = tf.Variable(0,trainable=False)

    #将滑动平均相关的计算都放在名为moving_average的命名空间下
    with tf.name_scope("moving_average"):
        variable_averages= tf.train.ExponentialMovingAverage(MOVING_AVERAGE_DECAY,global_step)
        variable_averages_op=variable_averages.apply(tf.trainable_variables())

    #将计算损失函数相关的计算都放在名为loss_function的命名空间下
    with tf.name_scope("loss_function"):
        cross_entropy = tf.nn.sparse_softmax_cross_entropy_with_logits(logits=y, labels=tf.argmax(y_,1))
        cross_entropy_mean = tf.reduce_mean(cross_entropy)
        loss = cross_entropy_mean+tf.add_n(tf.get_collection(‘losses‘))

    #将定义学习率、优化方法以及每一轮训练需要执行的操作都放在名子为"train_step"的命名空间下
    with tf.name_scope("train_step"):
        learning_rate=tf.train.exponential_decay(LEARNING_RATE_BASE,
                                                 global_step,
                                                 mnist.train._num_examples/BATCH_SIZE,
                                                 LEARNING_RATE_DECAY,
                                                 staircase=True)
        train_step = tf.train.GradientDescentOptimizer(learning_rate).minimize(loss, global_step=global_step)

    with tf.control_dependencies([train_step,variable_averages_op]):
        train_op=tf.no_op(name=‘train‘)

    # 初始化Tensorflow持久化类
    saver = tf.train.Saver()
    with tf.Session() as sess:
        tf.global_variables_initializer().run()

        # 在训练过程中不再测试模型在验证数据上的表现,验证和测试的过程将会有一个独立的程序来完成
        for i in range(TRAINING_STEPS):
            xs, ys = mnist.train.next_batch(BATCH_SIZE)
            _, loss_value, step = sess.run([train_op, loss, global_step], feed_dict={x:xs, y_:ys})

            # 每1000轮保存一次模型
            if i % 1000 == 0:
                # 输出当前训练情况。这里只输出了模型在当前训练batch上的损失函数大小
                # 通过损失函数的大小可以大概了解训练的情况。在验证数据集上的正确率信息
                # 会有一个单独的程序来生成
                print("After %d training step(s),loss on training batch is %g" % (step, loss_value))

                # 保存当前的模型。注意这里给出了global_step参数,这样可以让每个被保存模型的文件末尾加上训练的轮数
                # 比如"model.ckpt-1000"表示训练1000轮之后得到的模型
                saver.save(sess, os.path.join(MODEL_SAVE_PATH, MODEL_NAME), global_step=global_step)

                #将当前的计算图输出到TensorBoard日志文件
                writer=tf.summary.FileWriter("/path/to/log",tf.get_default_graph())
                writer.close()

def main(argv=None):
    mnist = input_data.read_data_sets("/tmp/data",one_hot=True)
    train(mnist)

if __name__==‘__main__‘:
    tf.app.run()
下面是封装mnist_inference和mnist_train的函数
‘‘‘
Created on Apr 21, 2017

@author: P0079482
‘‘‘
#-*- coding:utf-8 -*-
import tensorflow as tf
#定义神经网络结构相关的参数
INPUT_NODE=784
OUTPUT_NODE=10
LAYER1_NODE=500

#通过tf.get_variable函数来获取变量。在训练神经网络时会创建这些变量:
#在测试时会通过保存的模型加载这些变量的取值。而且更加方便的是,因为可以在变量加载时
#将滑动平均变量重命名,所以可以直接通过同样的名字在训练时使用变量自身,
#而在测试时使用变量的滑动平均值。在这个函数中也会将变量的正则化损失加入损失集合
def get_weight_variable(shape,regularizer):
    weights =tf.get_variable("weights",shape,initializer=tf.truncated_normal_initializer(stddev=0.1))
    #当给出了正则化生成函数时,将当前变量的正则化损失加入名字为losses的集合。
    #在这里使用了add_to_collection函数将一个张量加入一个集合,而这个集合的名称为losses
    #这是自定义的集合,不在Tensorflow自动管理的集合列表中
    if regularizer!=None:
        tf.add_to_collection(‘losses‘,regularizer(weights))
    return weights

#定义神经网络的前向传播过程
def inference(input_tensor,regularizer):
    #声明第一层神经网络的变量并完成前向传播过程
    with tf.variable_scope(‘layer1‘):
        #这里通过tf.get_variable或tf.Variable没有本质区别,
        #因为在训练或是测试中没有在同一个程序中多次调用这个函数,如果在同一个程序中多次调用,在第一次调用之后
        #需要将reuse参数设置为True
        weights=get_weight_variable([INPUT_NODE,LAYER1_NODE], regularizer)
        biases = tf.get_variable("biases", [LAYER1_NODE], initializer=tf.constant_initializer(0.0))
        layer1=tf.nn.relu(tf.matmul(input_tensor,weights)+biases)
    #类似地声明第二层神经网络的变量并完成前向传播过程
    with tf.variable_scope(‘layer2‘):
        weights=get_weight_variable([LAYER1_NODE,OUTPUT_NODE], regularizer)
        biases=tf.get_variable("biases",[OUTPUT_NODE],initializer=tf.constant_initializer(0.0))
        layer2=tf.matmul(layer1,weights)+biases
    #返回最后前向传播的结果
    return layer2

#在上面这段代码中定义了神经网络的前向传播算法。无论是训练还是测试时
#都可以直接调用inference这个函数,而不用关心具体的神经网络结构
#使用定义好的前行传播过程,以下代码给出了神经网络的训练程序mnist_train.py
mnist_train
‘‘‘
Created on 2017年4月21日

@author: weizhen
‘‘‘
import os
import tensorflow as tf
from tensorflow.examples.tutorials.mnist import input_data

# 加载mnist_inference.py中定义的常量和前向传播的函数
import mnist_inference

# 配置神经网络的参数
BATCH_SIZE = 100
LEARNING_RATE_BASE = 0.8
LEARNING_RATE_DECAY = 0.99
REGULARAZTION_RATE = 0.0001
TRAINING_STEPS = 30000
MOVING_AVERAGE_DECAY = 0.99

# 模型保存的路径和文件名
MODEL_SAVE_PATH = "/path/to/model/"
MODEL_NAME = "model.ckpt"

def train(mnist):
    # 定义输入输出placeholder
    x = tf.placeholder(tf.float32, [None, mnist_inference.INPUT_NODE], name=‘x-input‘)
    y_ = tf.placeholder(tf.float32, [None, mnist_inference.OUTPUT_NODE], name=‘y-input‘)

    regularizer = tf.contrib.layers.l2_regularizer(REGULARAZTION_RATE)
    # 直接使用mnist_inference.py中定义的前向传播过程
    y = mnist_inference.inference(x, regularizer)
    global_step = tf.Variable(0, trainable=False)

    # 和5.2.1小节样例中类似地定义损失函数、学习率、滑动平均操作以及训练过程
    variable_averages = tf.train.ExponentialMovingAverage(MOVING_AVERAGE_DECAY, global_step)
    variable_averages_op = variable_averages.apply(tf.trainable_variables())
    cross_entropy = tf.nn.sparse_softmax_cross_entropy_with_logits(logits=y, labels=tf.argmax(y_, 1))
    cross_entropy_mean = tf.reduce_mean(cross_entropy)
    loss = cross_entropy_mean + tf.add_n(tf.get_collection(‘losses‘))
    learning_rate = tf.train.exponential_decay(LEARNING_RATE_BASE, global_step, mnist.train.num_examples / BATCH_SIZE, LEARNING_RATE_DECAY)
    train_step = tf.train.GradientDescentOptimizer(learning_rate).minimize(loss, global_step=global_step);
    with tf.control_dependencies([train_step, variable_averages_op]):
        train_op = tf.no_op(name=‘train‘)

    # 初始化Tensorflow持久化类
    saver = tf.train.Saver()
    with tf.Session() as sess:
        tf.initialize_all_variables().run()

        # 在训练过程中不再测试模型在验证数据上的表现,验证和测试的过程将会有一个独立的程序来完成
        for i in range(TRAINING_STEPS):
            xs, ys = mnist.train.next_batch(BATCH_SIZE)
            _, loss_value, step = sess.run([train_op, loss, global_step], feed_dict={x:xs, y_:ys})

            # 每1000轮保存一次模型
            if i % 1000 == 0:
                # 输出当前训练情况。这里只输出了模型在当前训练batch上的损失函数大小
                # 通过损失函数的大小可以大概了解训练的情况。在验证数据集上的正确率信息
                # 会有一个单独的程序来生成
                print("After %d training step(s),loss on training batch is %g" % (step, loss_value))

                # 保存当前的模型。注意这里给出了global_step参数,这样可以让每个被保存模型的文件末尾加上训练的轮数
                # 比如"model.ckpt-1000"表示训练1000轮之后得到的模型
                saver.save(sess, os.path.join(MODEL_SAVE_PATH, MODEL_NAME), global_step=global_step)


def main(argv=None):
    mnist = input_data.read_data_sets("/tmp/data", one_hot=True)
    train(mnist)

if __name__ == ‘__main__‘:
    tf.app.run()
最后train的结果如下所示
Extracting /tmp/data\train-images-idx3-ubyte.gz
Extracting /tmp/data\train-labels-idx1-ubyte.gz
Extracting /tmp/data\t10k-images-idx3-ubyte.gz
Extracting /tmp/data\t10k-labels-idx1-ubyte.gz
2017-05-24 07:40:30.908053: W c:\tf_jenkins\home\workspace\release-win\device\cpu\os\windows\tensorflow\core\platform\cpu_feature_guard.cc:45] The TensorFlow library wasn‘t compiled to use SSE instructions, but these are available on your machine and could speed up CPU computations.
2017-05-24 07:40:30.908344: W c:\tf_jenkins\home\workspace\release-win\device\cpu\os\windows\tensorflow\core\platform\cpu_feature_guard.cc:45] The TensorFlow library wasn‘t compiled to use SSE2 instructions, but these are available on your machine and could speed up CPU computations.
2017-05-24 07:40:30.908752: W c:\tf_jenkins\home\workspace\release-win\device\cpu\os\windows\tensorflow\core\platform\cpu_feature_guard.cc:45] The TensorFlow library wasn‘t compiled to use SSE3 instructions, but these are available on your machine and could speed up CPU computations.
2017-05-24 07:40:30.909048: W c:\tf_jenkins\home\workspace\release-win\device\cpu\os\windows\tensorflow\core\platform\cpu_feature_guard.cc:45] The TensorFlow library wasn‘t compiled to use SSE4.1 instructions, but these are available on your machine and could speed up CPU computations.
2017-05-24 07:40:30.909327: W c:\tf_jenkins\home\workspace\release-win\device\cpu\os\windows\tensorflow\core\platform\cpu_feature_guard.cc:45] The TensorFlow library wasn‘t compiled to use SSE4.2 instructions, but these are available on your machine and could speed up CPU computations.
2017-05-24 07:40:30.909607: W c:\tf_jenkins\home\workspace\release-win\device\cpu\os\windows\tensorflow\core\platform\cpu_feature_guard.cc:45] The TensorFlow library wasn‘t compiled to use AVX instructions, but these are available on your machine and could speed up CPU computations.
2017-05-24 07:40:30.910437: W c:\tf_jenkins\home\workspace\release-win\device\cpu\os\windows\tensorflow\core\platform\cpu_feature_guard.cc:45] The TensorFlow library wasn‘t compiled to use AVX2 instructions, but these are available on your machine and could speed up CPU computations.
2017-05-24 07:40:30.910691: W c:\tf_jenkins\home\workspace\release-win\device\cpu\os\windows\tensorflow\core\platform\cpu_feature_guard.cc:45] The TensorFlow library wasn‘t compiled to use FMA instructions, but these are available on your machine and could speed up CPU computations.
After 1 training step(s),loss on training batch is 3.28252
After 1001 training step(s),loss on training batch is 0.186328
After 2001 training step(s),loss on training batch is 0.159306
After 3001 training step(s),loss on training batch is 0.137241
After 4001 training step(s),loss on training batch is 0.116301
After 5001 training step(s),loss on training batch is 0.114999
After 6001 training step(s),loss on training batch is 0.0968591
After 7001 training step(s),loss on training batch is 0.0888067
After 8001 training step(s),loss on training batch is 0.0787699
After 9001 training step(s),loss on training batch is 0.0755315
After 10001 training step(s),loss on training batch is 0.0674159
After 11001 training step(s),loss on training batch is 0.0618796
After 12001 training step(s),loss on training batch is 0.0608711
After 13001 training step(s),loss on training batch is 0.0582478
After 14001 training step(s),loss on training batch is 0.0588126
After 15001 training step(s),loss on training batch is 0.0474006
After 16001 training step(s),loss on training batch is 0.0472533
After 17001 training step(s),loss on training batch is 0.0463238
After 18001 training step(s),loss on training batch is 0.0504166
After 19001 training step(s),loss on training batch is 0.0397931
After 20001 training step(s),loss on training batch is 0.041655
After 21001 training step(s),loss on training batch is 0.0377509
After 22001 training step(s),loss on training batch is 0.0416359
After 23001 training step(s),loss on training batch is 0.0402487
After 24001 training step(s),loss on training batch is 0.0356911
After 25001 training step(s),loss on training batch is 0.0344556
After 26001 training step(s),loss on training batch is 0.0394917
After 27001 training step(s),loss on training batch is 0.0356403
After 28001 training step(s),loss on training batch is 0.0413135
After 29001 training step(s),loss on training batch is 0.0347861
可视化学习的过程,将log写在/path/to/log 文件夹下面,然后tensorboard去读取这个log
C:\Users\weizhen>tensorboard --logdir=/path/to/log
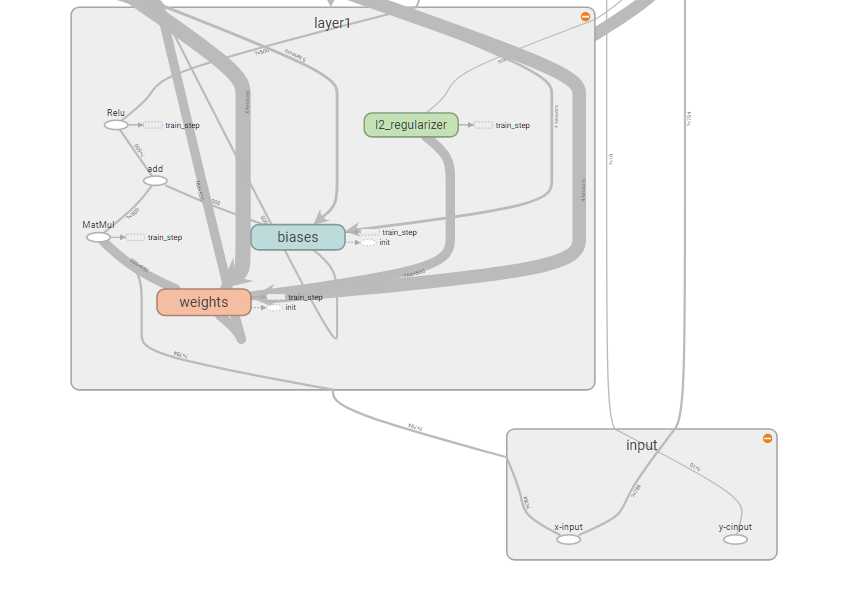
上面是layer1
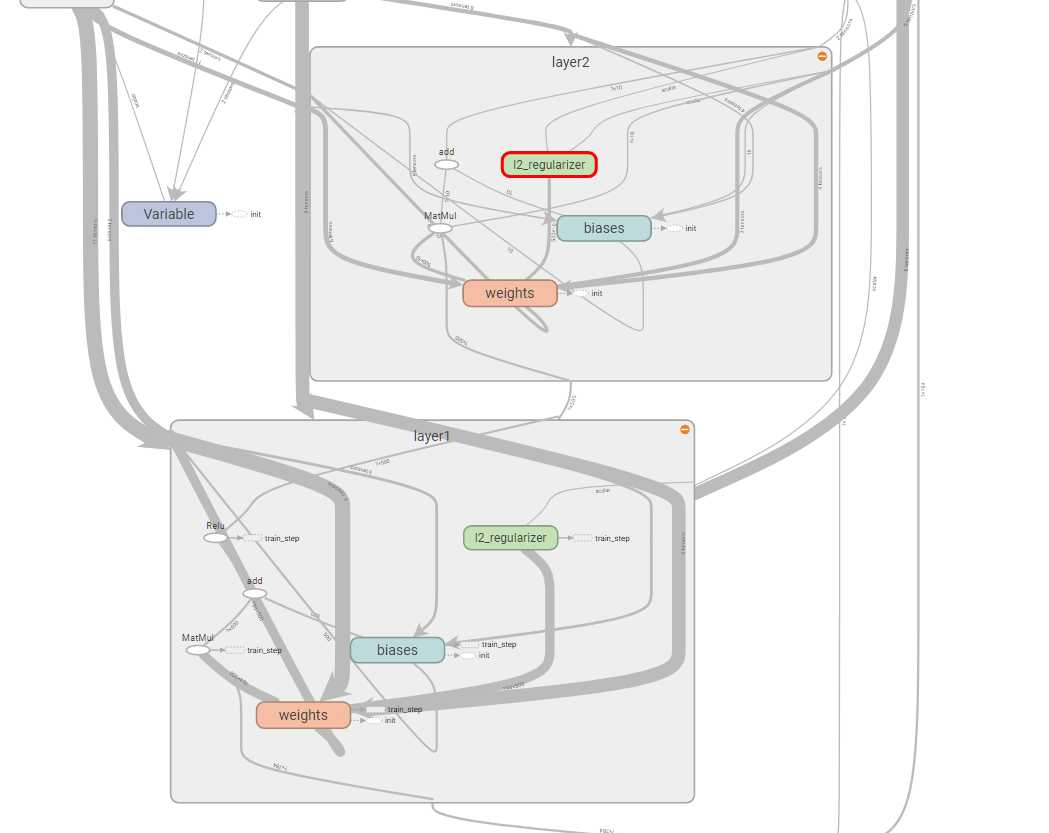
上面是layer2
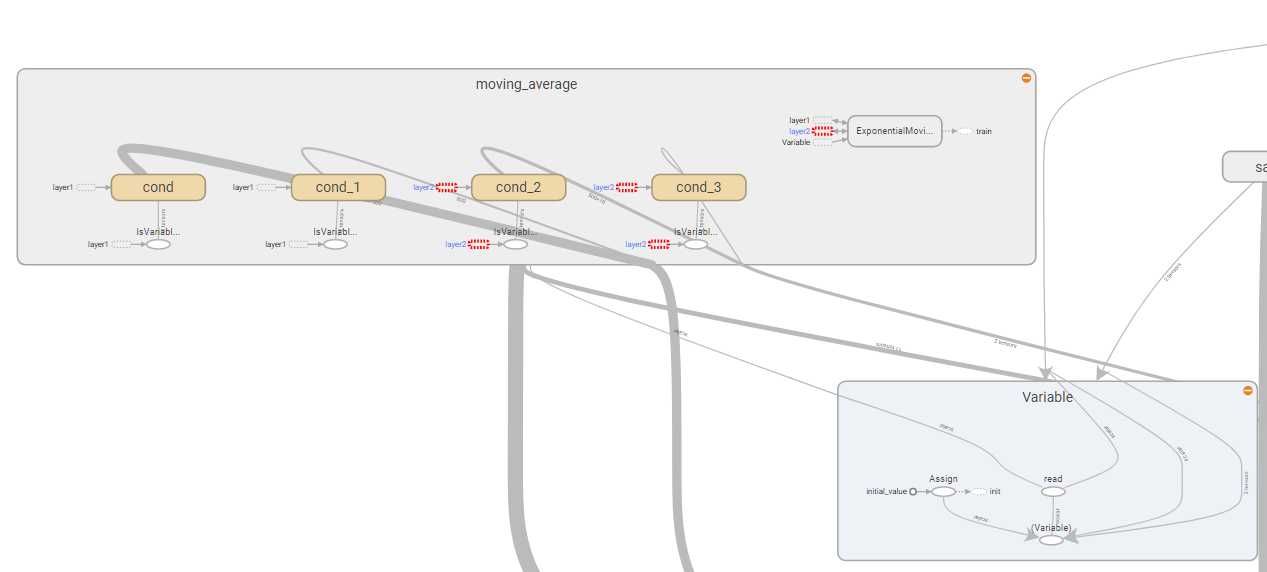
上面是loss_function
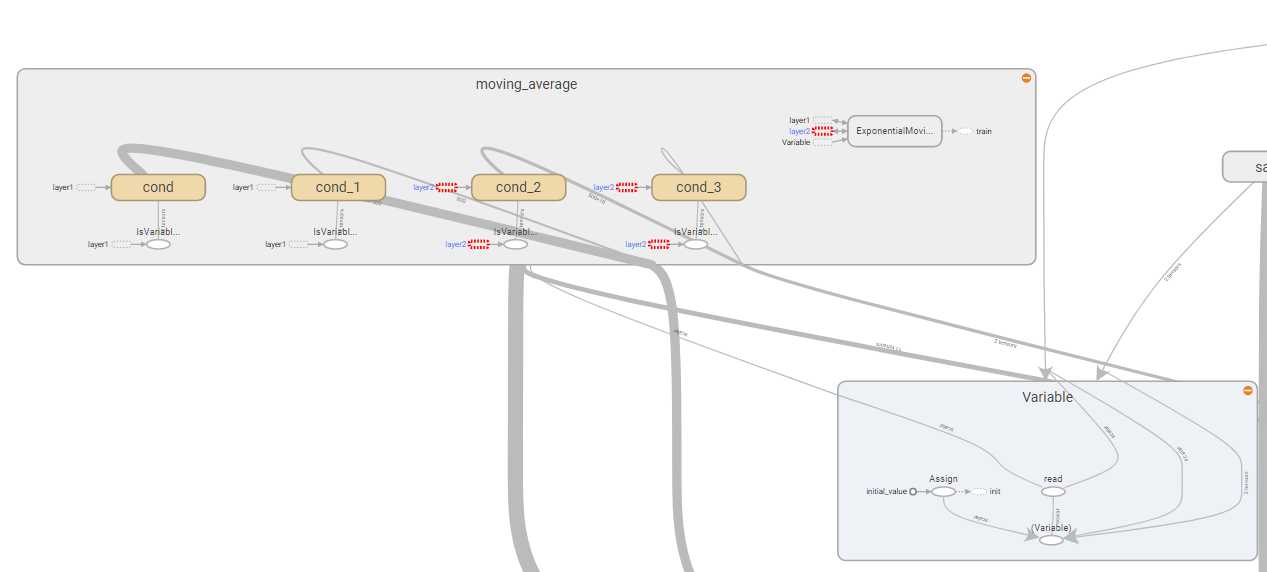
上面是moving_average
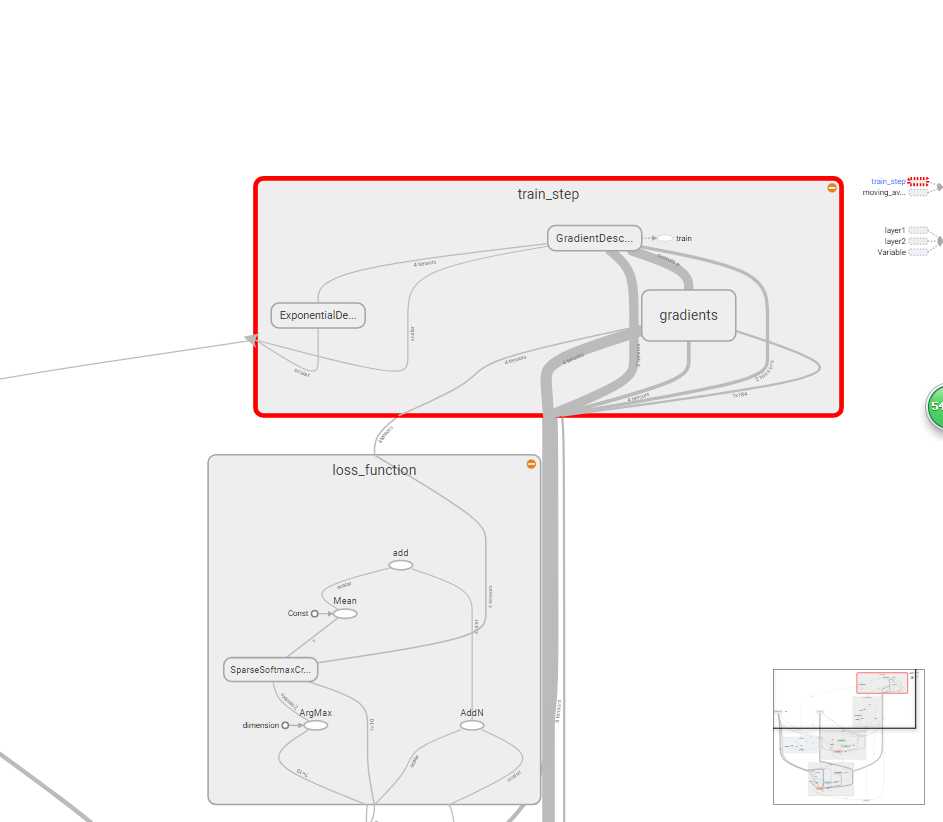
上面是train_step
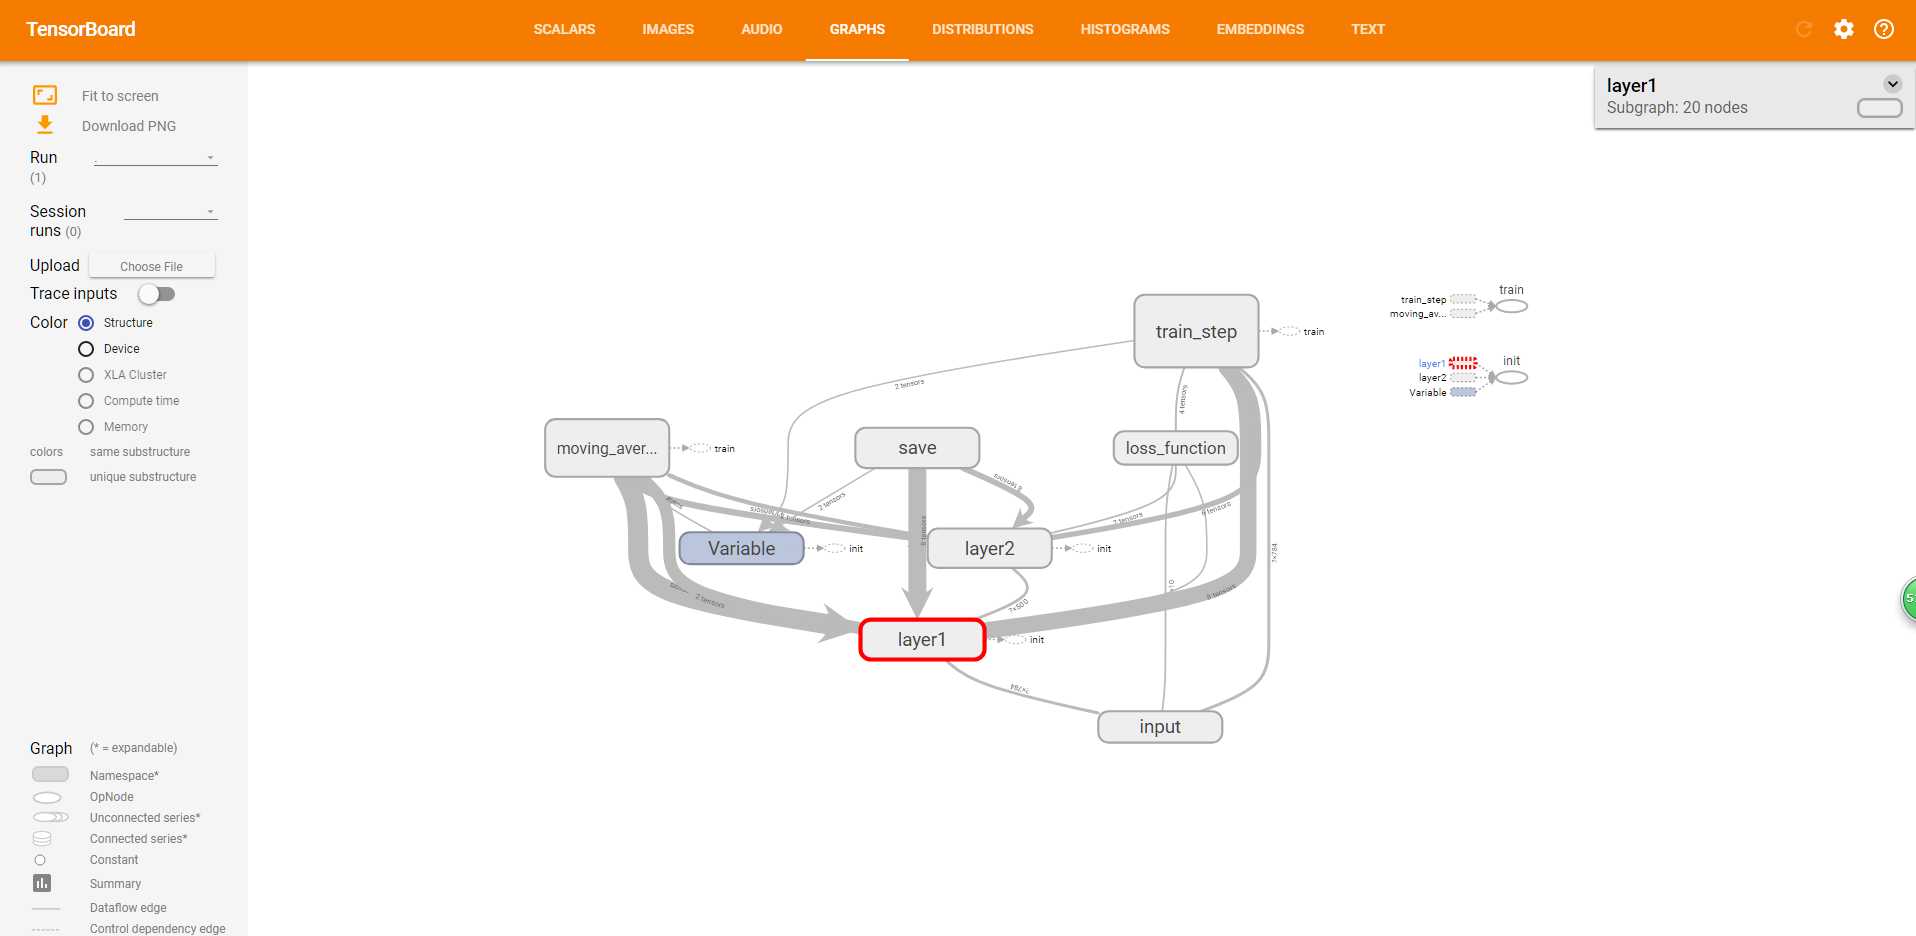
上面是整体的结构tensorBoard
标签:变量 author 算法 ant orm rom examples windows tair
原文地址:http://www.cnblogs.com/weizhen/p/6897066.html