标签:rpd uvc flavor adt gtk tlb ohs role tab
OpenStack三个节点icehouse-gre模式部署一文部署了一套OpenStack环境,接下来使用命令测试一遍。
首先要明确几个概念:
外网:可分配floating ip绑定到虚拟机,外部就可以访问虚拟机。
虚拟网络(内部网络,私有网络):虚拟机的虚拟网卡所在的私有网络。
子网:用户创建的每个网络至少要有一个子网(也可以有多个子网)
路由:用户创建的每个网络至少有一个路由,该路由的接口要关联这个网络
fixed ip:虚拟机网卡在虚拟网络上的ip
floating ip:虚拟网络对应的外部网络上的ip
interface:一个网络接口
端口:子网有多个端口(一般会有MAC地址和IP地址),在GRE模式中子网中一般会有qdhcp端口,qrouter端口和为虚拟机实例分配的端口,它们的ip地址属于这个子网
#nova-manage service list
 View Code
#neutron agent-list
View Code创建租户
# keystone tenant-create --name TenantA
View Code创建用户
# keystone user-create --name=UserA --pass=password --tenant-id TenantA --email=usera@test.com
View Code为租户添加用户
#keystone user-role-add --tenant TenantA --user UserA --role Member
View Code创建外网
# neutron net-create Ext-Net --provider:network_type gre --provider:segmentation_id 1 --router:external true
View Code创建外网的子网
# neutron subnet-create --allocation-pool start=10.1.101.80,end=10.1.101.100 --gateway 10.1.101.254 Ext-Net 10.1.101.0/24 --enable_dhcp=False
View Code接下来创建租户的子网和虚拟路由
创建租户网络
# neutron --os-tenant-name TenantA --os-username UserA --os-password password --os-auth-url=http://localhost:5000/v2.0 net-create tenantA-Net
View Code创建租户子网
# neutron --os-tenant-name TenantA --os-username UserA --os-password password --os-auth-url=http://localhost:5000/v2.0 subnet-create tenantA-Net 10.0.0.0/24
View Code创建租户虚拟路由
neutron --os-tenant-name TenantA --os-username UserA --os-password password --os-auth-url=http://localhost:5000/v2.0 router-create tenant-R1
View Code增加路由接口
(替换${subnet_id}为子网ID)
neutron --os-tenant-name TenantA --os-username UserA --os-password password --os-auth-url=http://localhost:5000/v2.0 router-interface-add tenant-R1 ${subnet_id}
View Code给路由增加网关
# neutron router-gateway-set tenant-R1 Ext-Net
View Code到此为止UserA看到的网络拓扑如下:

安全组规则会影响到外面ping虚拟机和ssh登录虚拟机,所以在controller节点中为openstack设置好ICMP和TCP规则。
这里设置安全组规则相当于打开防火墙端口,允许ssh和ping虚拟机,这是个重点,不设置这个将无法访问虚拟机。
获得TenantA的default安全组规则
# neutron --os-tenant-name TenantA --os-username UserA --os-password password --os-auth-url=http://localhost:5000/v2.0 security-group-list
View Code默认default规则:

设置nova中default的 ICMP/TCP/UDP安全组规则
# nova --os-tenant-name TenantA --os-username UserA --os-password password --os-auth-url=http://localhost:5000/v2.0 secgroup-add-rule default tcp 1 65535 0.0.0.0/0
View Code# nova --os-tenant-name TenantA --os-username UserA --os-password password --os-auth-url=http://localhost:5000/v2.0 secgroup-add-rule default udp 1 65535 0.0.0.0/0
View Code# nova --os-tenant-name TenantA --os-username UserA --os-password password --os-auth-url=http://localhost:5000/v2.0 secgroup-add-rule default icmp -1 -1 0.0.0.0/0
View Code查看镜像:
# glance index
View Code起虚拟机,替换{the cirros ID from Glance}为镜像ID
#root@controller:~# nova --os-tenant-name TenantA --os-username UserA --os-password password --os-auth-url=http://localhost:5000/v2.0 boot --flavor 1 --image{the cirros ID from Glance} vm001
View Code检查虚拟机状态为ACTIVE
# nova --os-tenant-name TenantA --os-username UserA --os-password password --os-auth-url=http://localhost:5000/v2.0 list
View Code创建一个浮动IP
# neutron --os-tenant-name TenantA --os-username UserA --os-password password --os-auth-url=http://localhost:5000/v2.0 floatingip-create Ext-Net
View Code查看floating-ip
# nova --os-tenant-name TenantA --os-username UserA --os-password password --os-auth-url=http://localhost:5000/v2.0 floating-ip-list
View Code我创建了一个新的浮动IP10.1.101.82,分配的是10.1.101.82
分配浮动IP给虚拟机,替换{the vm id}为虚拟机ID
# nova --os-tenant-name TenantA --os-username UserA --os-password password --os-auth-url=http://localhost:5000/v2.0 floating-ip-associate {the vm id} 10.1.101.82
View Code检查虚拟机状态,现在就可以看到浮动ip了。
# nova --os-tenant-name TenantA --os-username UserA --os-password password --os-auth-url=http://localhost:5000/v2.0 list
View Code替换{put_floating_ip_here}为虚拟机的浮动IP
ssh cirros@{put_floating_ip_here}

root@controller:~# ssh cirros@10.1.101.82
The authenticity of host ‘10.1.101.82 (10.1.101.82)‘ can‘t be established.
RSA key fingerprint is da:a3:1a:60:f1:e9:3a:e2:a7:6c:35:cb:f8:9b:b7:65.
Are you sure you want to continue connecting (yes/no)? yes
Warning: Permanently added ‘10.1.101.82‘ (RSA) to the list of known hosts.
cirros@10.1.101.82‘s password:
$
$
$
$ ping 8.8.8.8
PING 8.8.8.8 (8.8.8.8): 56 data bytes
64 bytes from 8.8.8.8: seq=3 ttl=35 time=295.980 ms
64 bytes from 8.8.8.8: seq=7 ttl=35 time=299.047 ms
查看镜像
root@sc-disk01:~/image# glance --os-username admin --os-password windawnKey --os-tenant-name admin --os-auth-url=http://10.0.101.11:35357/v2.0 image-list
+--------------------------------------+---------------------+-------------+------------------+----------+--------+
| ID                                   | Name                | Disk Format | Container Format | Size     | Status |
+--------------------------------------+---------------------+-------------+------------------+----------+--------+
| ae63b964-230f-4ff8-bcf9-524d44b6980b | cirros-0.3.2-x86_64 | qcow2       | bare             | 13167616 | active |
+--------------------------------------+---------------------+-------------+------------------+----------+--------+
上传镜像
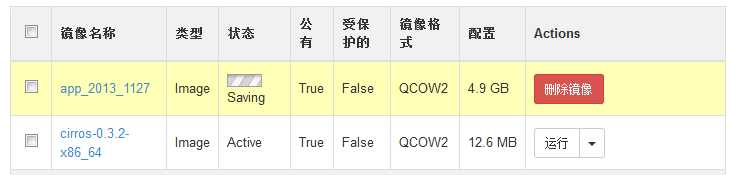
root@sc-disk01:~# cd image/
root@sc-disk01:~/image# ls
app_2013_1127                         devstack_201407171353
root@sc-disk01:~/image# glance image-create --name="app_2013_1127" --is-public=True --disk-format=qcow2 --container-format=bare < ./app_2013_1127
+------------------+--------------------------------------+
| Property         | Value                                |
+------------------+--------------------------------------+
| checksum         | f741693bf9297714917e27ce18394dbb     |
| container_format | bare                                 |
| created_at       | 2015-03-16T01:53:23                  |
| deleted          | False                                |
| deleted_at       | None                                 |
| disk_format      | qcow2                                |
| id               | 0391cd63-59da-48e2-929d-6a35a43c9bfc |
| is_public        | True                                 |
| min_disk         | 0                                    |
| min_ram          | 0                                    |
| name             | app_2013_1127                        |
| owner            | 49b72345ae0046e284f61503f047b587     |
| protected        | False                                |
| size             | 5299503104                           |
| status           | active                               |
| updated_at       | 2015-03-16T01:57:13                  |
| virtual_size     | None                                 |
+------------------+--------------------------------------+
root@sc-disk01:~/image#
上传镜像截图
或者用以下命令上传
root@sc-disk01:~/image# glance image-create --name="app_2014_0124_1604" --is-public=True --disk-format=qcow2 --container-format=bare --file ./app_2014_0124_1604 --progress
+------------------+--------------------------------------+
| Property         | Value                                |
+------------------+--------------------------------------+
| checksum         | bb39bb3b5fa5996aecfa512dc178b5d6     |
| container_format | bare                                 |
| created_at       | 2015-03-16T02:04:12                  |
| deleted          | False                                |
| deleted_at       | None                                 |
| disk_format      | qcow2                                |
| id               | 02111d11-42db-432d-a840-6945794587c0 |
| is_public        | True                                 |
| min_disk         | 0                                    |
| min_ram          | 0                                    |
| name             | app_2014_0124_1604                   |
| owner            | 49b72345ae0046e284f61503f047b587     |
| protected        | False                                |
| size             | 5308547072                           |
| status           | active                               |
| updated_at       | 2015-03-16T02:10:09                  |
| virtual_size     | None                                 |
+------------------+--------------------------------------+
资源链接:
标签:rpd uvc flavor adt gtk tlb ohs role tab
原文地址:http://www.cnblogs.com/zhangyuhang3/p/6910570.html