标签:行编辑 检查 没有 img media org 更改 count mil
尽管TestCase的默认流程是相互依次执行定义的测试步骤,但根据以前的TestStep的结果,您可能希望循环或分支的许多场景。有几种方法可以在soapUI中完成此操作;
- 通过使用Conditional Goto TestStep
- 通过创建一个为您执行此操作的Script TestStep
- 通过使用DataSource循环步骤 - 这与DataSource TestStep紧密相关,并在DataDriven测试部分中介绍
让我们先看看前两个,然后快速查看一下Delay TestStep,它允许你在执行TestCase时插入任意的延迟。
1. 用于流量控制的测试步骤
The Conditional Goto TestStep
Conditional Goto TestStep可包含任意数量的XPath表达式以及相应的目标TestStep。这些应用于之前TestStep的最近响应;配置的XPath表达式从上到下应用,当XPath表达式计算结果为true时,Conditional Goto将执行转移到指定的TestStep。

左上角的列表包含定义的条件(现在为空),右边的编辑器允许在创建条件之后进行编辑,底部的日志可以帮助我们测试一下;
选择添加按钮到左上角并输入一些名字;

按OK,然后选择右下角的XPath向导

这里最近的TestStep是一个JDBC请求,我们可以看到生成的XML以树形视图呈现,使我们能够轻松地选择我们想要用于我们的条件的节点。选择它并按OK后,我们得到以下内容:

生成的XPath是顶部的,在底部,我们现在必须选择TestCase应该跳转到哪个步骤,如果XPath表达式计算为true(现在不需要将上述生成的XPath包围到exists(...)子句来检查指定元素的存在)。
现在如果我们使用顶部的工具栏按钮运行Conditional Goto,我们得到:

日志显示我们的条件已成功触发。现在我们可以添加更多条件与不同的条件和分支,允许我们根据需要路由TestCase执行。
使用Script TestStep分支和循环
脚本为您提供精细的可能性来控制TestCase的流程,允许您跳转到TestCase中任何所需的TestStep,或者只是运行该TestStep,而不会实际执行它。
testRunner.gotoStepByName( "nameofteststep" )
该方法在脚本完成之后将控制权转移到指定的TestStep(不是瞬间!)。所以例如以下脚本,可以在两个目标步骤之间随机选择:
if( Math.random() > 0.5 ) testRunner.gotoStepByName( "Request 1") else testRunner.gotoStepByName( "Request 2") // do something else ....
testRunner.runTestStepByName( "nameofteststep" )
它实际上执行指定的TestStep。更改上述脚本以使用此方法
if( Math.random() > 0.5 ) testRunner.runTestStepByName( "Request 1") else testRunner.runTestStepByName( "Request 2") // do something else ....
This would run the specified TestStep before moving on. Surrounding this in a loop as follows:
// run ten random requests for( i in 1..10 ) { if( Math.random() > 0.5 ) testRunner.runTestStepByName( "Request 1") else testRunner.runTestStepByName( "Request 2") } // do something else ....在执行剩余的脚本之前会运行十个随机请求。这里使用gotoTestStepByName将没有任何效果,它会导致与第一个例子相同。
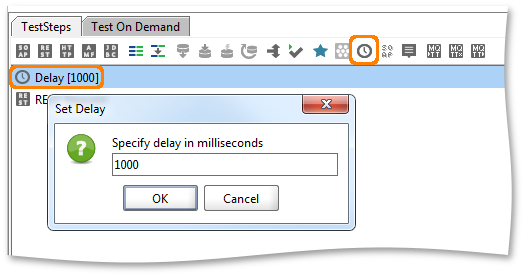
Delay TestStep
延迟测试步骤只是它听起来像它会将TestCase的执行延迟指定的毫秒数。
In the list of TestSteps the label shows the name of the Delay TestStep and its value, which will count down while it is being executed.
双击TestStep打开上述提示,允许您将延迟设置为固定值或标准属性扩展。例如,以下值会在5和10秒之间延迟TestCase:
${=5000 + 5000*Math.random()}
SOAPUI流程控制
标签:行编辑 检查 没有 img media org 更改 count mil
原文地址:http://www.cnblogs.com/zerotest/p/6918009.html