标签:ase 同步 toolbar mbed 详细 prefix except alt simple
一般拿Timer和Quartz相比较的,简直就是对Quartz的侮辱,两者的功能根本就不在一个层级上,如本篇介绍的Quartz强大的集群机制,可以采用基于
sqlserver,mysql的集群方案,当然还可以在第三方插件的基础上实现quartz序列化到热炒的mongodb,redis,震撼力可想而知,接下来本篇就和大家聊
一聊怎么搭建基于sqlserver的quartz集群,实现这么一种双机热备的强大功能。
一:下载sqlserver版的建表脚本
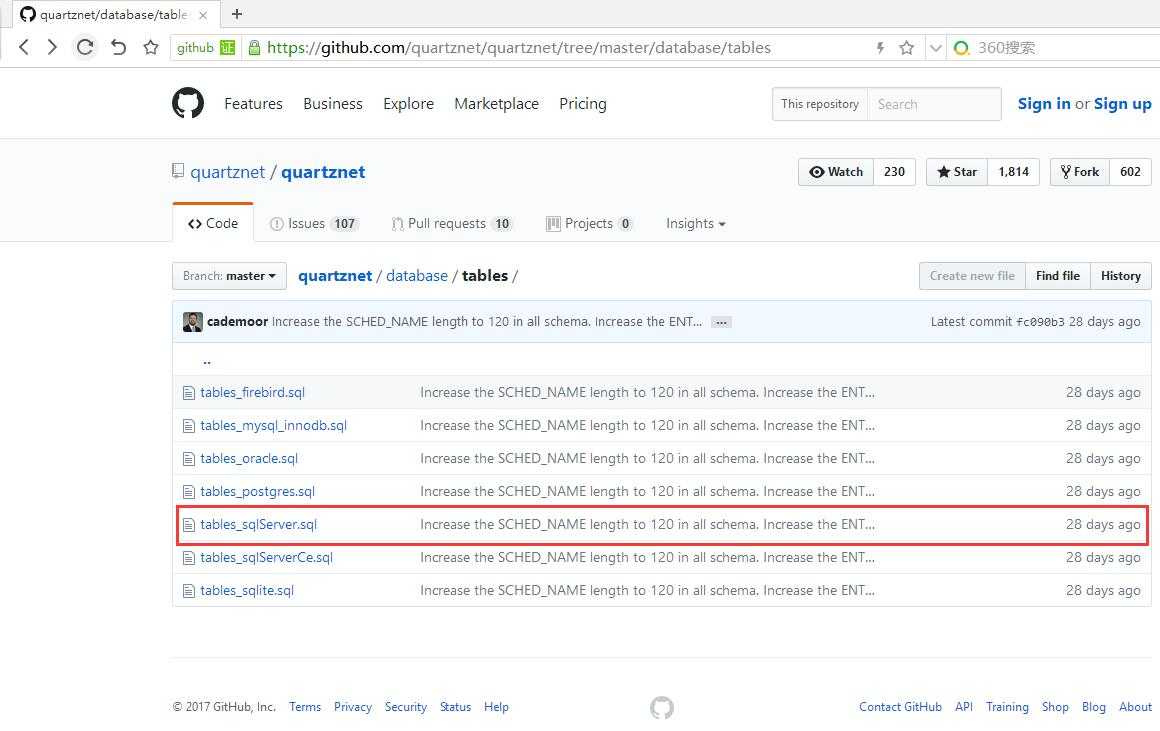
首先大家可以通过github上搜索quartz的源代码,在源码项目的/database/tables目录下,可以找到firebird,oracle,mysql,sqlserver等建库脚本,
本篇只需拿取sqlserver版本即可。 https://github.com/quartznet/quartznet/tree/master/database/tables 如下图所示

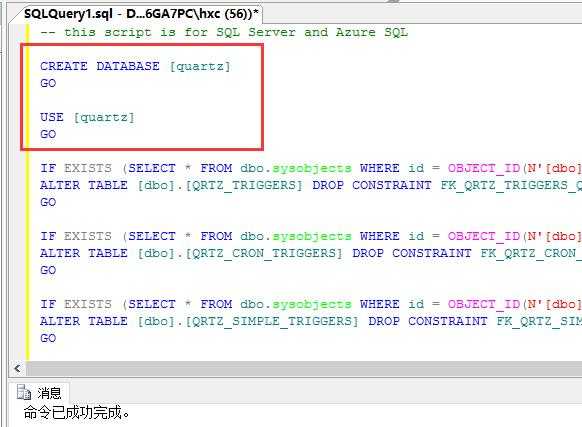
从上面的截图中可以看到,我接下来要做的事情就是增加一个你需要创建的database名字,这里取为:【quartz】,完整的脚本如下:
 View Code
二:配置quartz的集群参数
当我们写var scheduler = StdSchedulerFactory.GetDefaultScheduler()这段代码的时候,如果大家看过源码的话,会知道这个GetScheduler的
过程中有一个初始化方法【Instantiate】方法,此方法中你会发现在做DBProvider的时候会需要几个参数来初始化DB的,比如下面看到的几个标红属性。
 1             IList<string> dsNames = cfg.GetPropertyGroups(PropertyDataSourcePrefix);
 2             foreach (string dataSourceName in dsNames)
 3             {
 4                 string datasourceKey = "{0}.{1}".FormatInvariant(PropertyDataSourcePrefix, dataSourceName);
 5                 NameValueCollection propertyGroup = cfg.GetPropertyGroup(datasourceKey, true);
 6                 PropertiesParser pp = new PropertiesParser(propertyGroup);
 7
 8                 Type cpType = loadHelper.LoadType(pp.GetStringProperty(PropertyDbProviderType, null));
 9
10                 // custom connectionProvider...
11                 if (cpType != null)
12                 {
13                     IDbProvider cp;
14                     try
15                     {
16                         cp = ObjectUtils.InstantiateType<IDbProvider>(cpType);
17                     }
18                     catch (Exception e)
19                     {
20                         initException = new SchedulerException("ConnectionProvider of type ‘{0}‘ could not be instantiated.".FormatInvariant(cpType), e);
21                         throw initException;
22                     }
23
24                     try
25                     {
26                         // remove the type name, so it isn‘t attempted to be set
27                         pp.UnderlyingProperties.Remove(PropertyDbProviderType);
28
29                         ObjectUtils.SetObjectProperties(cp, pp.UnderlyingProperties);
30                         cp.Initialize();
31                     }
32                     catch (Exception e)
33                     {
34                         initException = new SchedulerException("ConnectionProvider type ‘{0}‘ props could not be configured.".FormatInvariant(cpType), e);
35                         throw initException;
36                     }
37
38                     dbMgr = DBConnectionManager.Instance;
39                     dbMgr.AddConnectionProvider(dataSourceName, cp);
40                 }
41                 else
42                 {
43                     string dsProvider = pp.GetStringProperty(PropertyDataSourceProvider, null);
44                     string dsConnectionString = pp.GetStringProperty(PropertyDataSourceConnectionString, null);
45                     string dsConnectionStringName = pp.GetStringProperty(PropertyDataSourceConnectionStringName, null);
46
47                     if (dsConnectionString == null && !String.IsNullOrEmpty(dsConnectionStringName))
48                     {
49
50                         ConnectionStringSettings connectionStringSettings = ConfigurationManager.ConnectionStrings[dsConnectionStringName];
51                         if (connectionStringSettings == null)
52                         {
53                             initException = new SchedulerException("Named connection string ‘{0}‘ not found for DataSource: {1}".FormatInvariant(dsConnectionStringName, dataSourceName));
54                             throw initException;
55                         }
56                         dsConnectionString = connectionStringSettings.ConnectionString;
57                     }
58
59                     if (dsProvider == null)
60                     {
61                         initException = new SchedulerException("Provider not specified for DataSource: {0}".FormatInvariant(dataSourceName));
62                         throw initException;
63                     }
64                     if (dsConnectionString == null)
65                     {
66                         initException = new SchedulerException("Connection string not specified for DataSource: {0}".FormatInvariant(dataSourceName));
67                         throw initException;
68                     }
69                     try
70                     {
71                         DbProvider dbp = new DbProvider(dsProvider, dsConnectionString);
72                         dbp.Initialize();
73
74                         dbMgr = DBConnectionManager.Instance;
75                         dbMgr.AddConnectionProvider(dataSourceName, dbp);
76                     }
77                     catch (Exception exception)
78                     {
79                         initException = new SchedulerException("Could not Initialize DataSource: {0}".FormatInvariant(dataSourceName), exception);
80                         throw initException;
81                     }
82                 }
83             }
接下来的问题就是这几个属性是如何配置进去的,仔细观察上面代码,你会发现所有的配置的源头都来自于cfg变量,ok,接下来你可以继续翻看代码,相信
你会看到有一个Initialize方法就是做cfg变量的初始化,如下代码所示:
 1   public void Initialize()
 2         {
 3             // short-circuit if already initialized
 4             if (cfg != null)
 5             {
 6                 return;
 7             }
 8             if (initException != null)
 9             {
10                 throw initException;
11             }
12
13             NameValueCollection props = (NameValueCollection) ConfigurationManager.GetSection(ConfigurationSectionName);
14
15             string requestedFile = QuartzEnvironment.GetEnvironmentVariable(PropertiesFile);
16
17             string propFileName = requestedFile != null && requestedFile.Trim().Length > 0 ? requestedFile : "~/quartz.config";
18
19             // check for specials
20             try
21             {
22                 propFileName = FileUtil.ResolveFile(propFileName);
23             }
24             catch (SecurityException)
25             {
26                 log.WarnFormat("Unable to resolve file path ‘{0}‘ due to security exception, probably running under medium trust");
27                 propFileName = "quartz.config";
28             }
29
30             if (props == null && File.Exists(propFileName))
31             {
32                 // file system
33                 try
34                 {
35                     PropertiesParser pp = PropertiesParser.ReadFromFileResource(propFileName);
36                     props = pp.UnderlyingProperties;
37                     Log.Info(string.Format("Quartz.NET properties loaded from configuration file ‘{0}‘", propFileName));
38                 }
39                 catch (Exception ex)
40                 {
41                     Log.Error("Could not load properties for Quartz from file {0}: {1}".FormatInvariant(propFileName, ex.Message), ex);
42                 }
43
44             }
45             if (props == null)
46             {
47                 // read from assembly
48                 try
49                 {
50                     PropertiesParser pp = PropertiesParser.ReadFromEmbeddedAssemblyResource("Quartz.quartz.config");
51                     props = pp.UnderlyingProperties;
52                     Log.Info("Default Quartz.NET properties loaded from embedded resource file");
53                 }
54                 catch (Exception ex)
55                 {
56                     Log.Error("Could not load default properties for Quartz from Quartz assembly: {0}".FormatInvariant(ex.Message), ex);
57                 }
58             }
59             if (props == null)
60             {
61                 throw new SchedulerConfigException(
62                     @"Could not find <quartz> configuration section from your application config or load default configuration from assembly.
63 Please add configuration to your application config file to correctly initialize Quartz.");
64             }
65             Initialize(OverrideWithSysProps(props));
66         }
仔细阅读上面的一串代码,你会发现,默认quartz参数配置来源于三个地方。
1. app.config中的section节点。
2. bin目录下的~/quartz.config文件。
3. 默认配置的NameValueCollection字典集合,也就是上一篇博客给大家做的一个演示。
我个人不怎么喜欢通过quartz.config文件进行配置,这样也容易写死,所以我还是喜欢使用最简单的NameValueCollection配置,因为它的数据源可来源
于第三方存储结构中,配置代码如下:
 1                 //1.首先创建一个作业调度池
 2                 var properties = new NameValueCollection();
 3                 //存储类型
 4                 properties["quartz.jobStore.type"] = "Quartz.Impl.AdoJobStore.JobStoreTX, Quartz";
 5
 6                 //驱动类型
 7                 properties["quartz.jobStore.driverDelegateType"] = "Quartz.Impl.AdoJobStore.SqlServerDelegate, Quartz";                //数据源名称
 8                 properties["quartz.jobStore.dataSource"] = "myDS";
 9
10                 //连接字符串
11                 properties["quartz.dataSource.myDS.connectionString"] = @"server=.;Initial Catalog=quartz;Integrated Security=True";
12                 //sqlserver版本
13                 properties["quartz.dataSource.myDS.provider"] = "SqlServer-20";
14
15                 //是否集群
16                 properties["quartz.jobStore.clustered"] = "true";
17                 properties["quartz.scheduler.instanceId"] = "AUTO";
上面的代码配置我都加过详细的注释,大家应该都能看得懂,而且这些配置就是这么定死的,没什么修改的空间,大家记住即可。
三:Job和Trigger定义
在集群中环境下,job和trigger的定义该怎么写的?大家也不要想的太复杂,注意一点就可以了,在Schedule一个Job时候,通过CheckExists判断一下
这个Job在Scheduler中是否已经存在了,如果存在,你就不能再次通过Schedule去重复调度一个Job就可以了。。。所以判断的代码也很简单,如下所示:
 1          IScheduler scheduler = factory.GetScheduler();
 2
 3                 scheduler.Start();
 4
 5                 var jobKey = JobKey.Create("myjob", "group");
 6
 7                 if (scheduler.CheckExists(jobKey))
 8                 {
 9                     Console.WriteLine("当前job已经存在,无需调度:{0}", jobKey.ToString());
10                 }
11                 else
12                 {
13                     IJobDetail job = JobBuilder.Create<HelloJob>()
14                            .WithDescription("使用quartz进行持久化存储")
15                            .StoreDurably()
16                            .RequestRecovery()
17                            .WithIdentity(jobKey)
18                            .UsingJobData("count", 1)
19                            .Build();
20
21                     ITrigger trigger = TriggerBuilder.Create().WithSimpleSchedule(x => x.WithIntervalInSeconds(2).RepeatForever())
22                                                               .Build();
23
24                     scheduler.ScheduleJob(job, trigger);
25
26                     Console.WriteLine("调度进行中!!!");
27                 }
上面这段代码,大家就可以部署在多台机器中了,是不是很简单?
四:强大的cluster完整演示
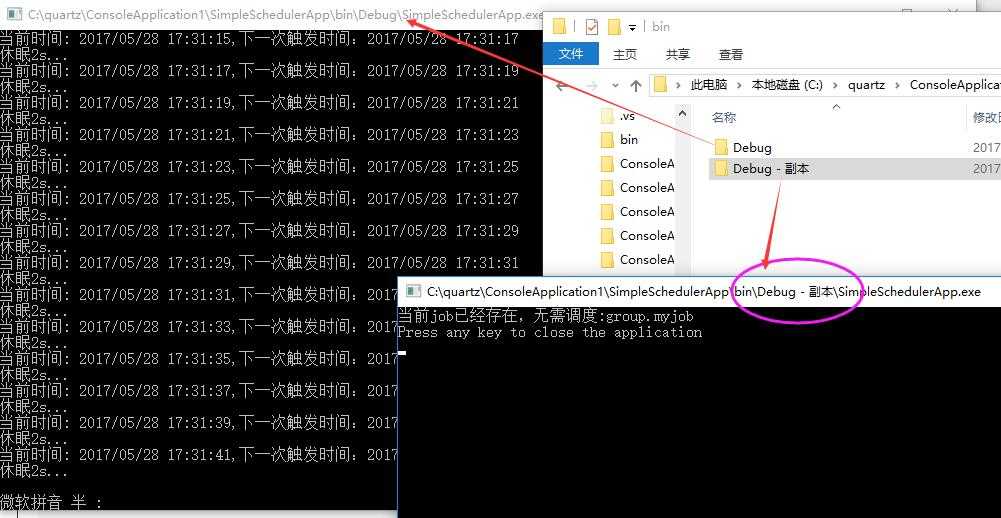
所有的初始化工作都做完了,接下来我们copy一份bin文件,同时打开两个console程序,如下所示,可以看到job任务只会被一个console调度,另外
一个在空等待。
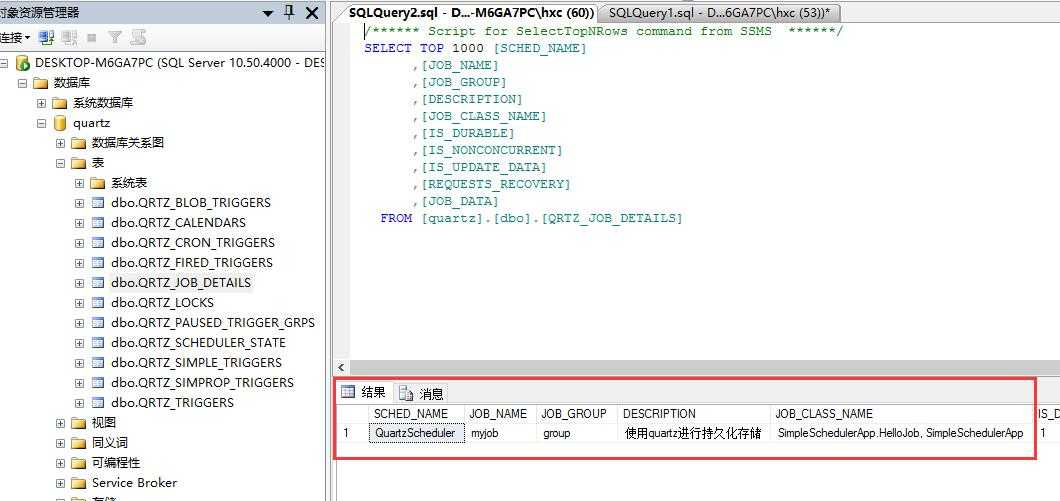
然后你肯定很好奇的跑到sqlserver中去看看,是否已经有job和trigger的db存储,很开心吧,数据都有的。。。
 、
、
好了,一切都是那么完美,接下来可以展示一下quartz集群下的高可用啦,如果某一个console挂了,那么另一台console会把这个任务给接过来,实
现强大的高可用。。。所以我要做的事情就是把console1关掉,再看看console2是不是可以开始调度job了???
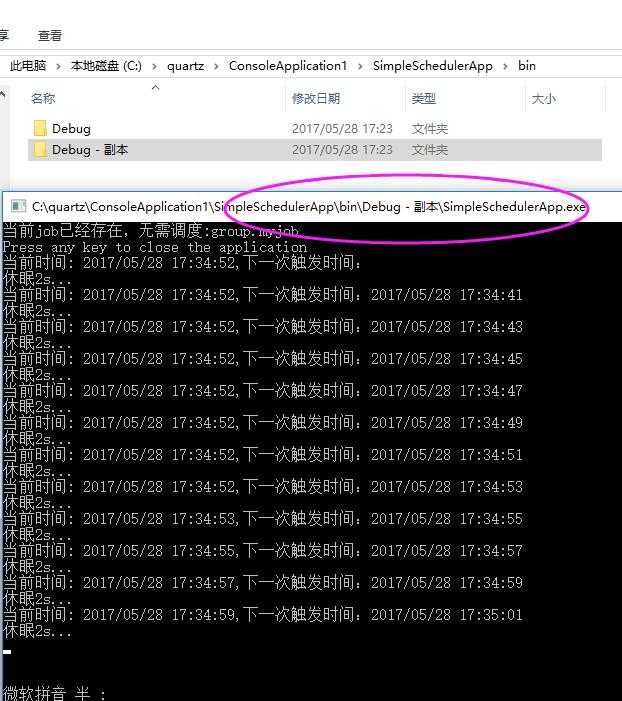
完美,这个就是本篇给大家介绍的Quartz的Cluster集群,一台挂,另一台顶住,双机热备,当然这些console你可以部署在多台机器中,要做的就是保持各
个server的时间同步,因为quarz是依赖于本机server的时间,好了,本篇就先说到这里吧。
小礼物走一波,双击666。。。 完整代码:SimpleSchedulerApp.zip
标签:ase 同步 toolbar mbed 详细 prefix except alt simple
原文地址:http://www.cnblogs.com/Leo_wl/p/6923193.html