标签:端口 eal 备份 nbsp 重启 access exe size osi
思路
1、使用jenkins+gitlab,实现git仓库有push时,立即触发jenkins的job,进行构建。
2、jenkins和gitlab的安装配置直接参考官方文档
3、以下文档仅是抛砖引玉,介绍将jenkins和gitlab打通。
==========================
GitLab
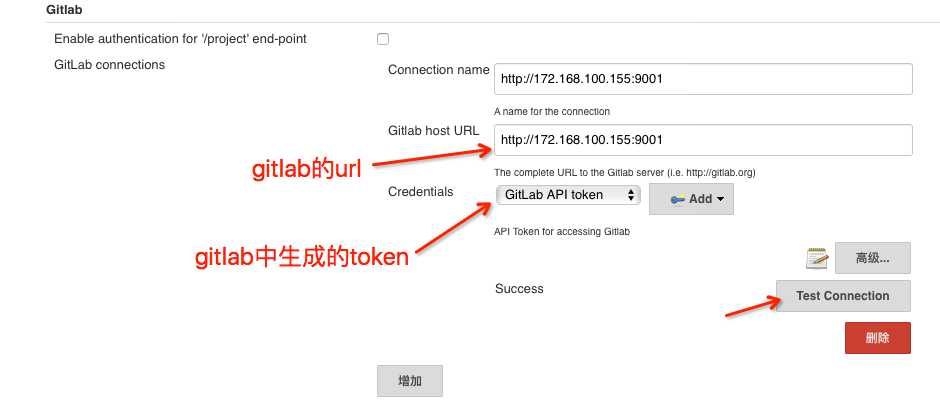
1、Profile->Access Token-:生成token,用于(Jenkins系统设置->系统设置->Gitlab 设置中的Credentials)
2、创建新的仓库,打开该仓库页,设置->Webhooks:url中填写jenkins中的对应的job的地址,并添加参数
如:http://uasername:password@ip:port/job/222/build?delay=0sec
3、【Add Webhook】保存
4、点击【Test】,提示 “Hook executed successfully: HTTP 201”,且Jenkins中对应的job立即执行构建,在Build History可见。
5、jenkins+gitlab已打通,基础配置完成,在仓库中push后,对应的job可以立即执行构建
6、这仅是jenkins+gitlab的冰山一角,后面的打包、测试、发布、备份等等都能做。
==========================
Jenkins
1、系统设置->管理插件:gitplugin,gitlab plugin,gitlab hook plugin
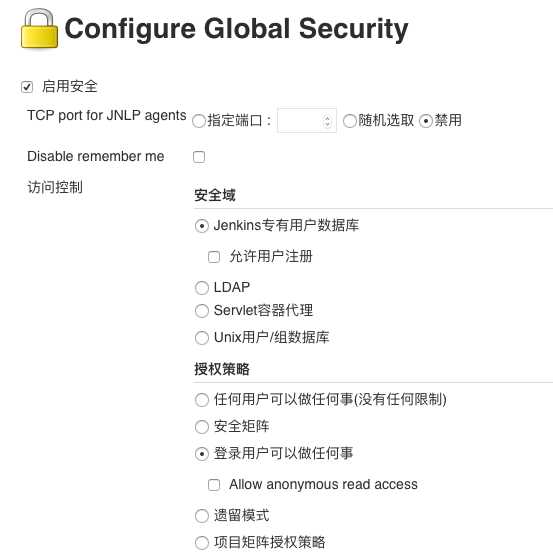
2、系统设置->Configure Global Security:
3、系统设置->系统设置->Gitlab:
4、创建job:
(可不添加该步骤)a、源码管理:Git
Repository URL,仓库地址。如:http://172.168.100.155:9001/root/222.git
Credentials,添加用户名、密码:使用gitlab的账号密码
保存
b、构建触发器:Build when a change is pushed to GitLab. GitLab CI Service URL: http://172.168.100.155:8080/project/222
使用默认
c、保存job,并尝试手动构建,检查结果。
==========================
遇到的问题
==Gitlab
问题:gitlab web打开后502
解决:修改端口号
#log
tail -f /var/log/gitlab/unicorn/unicorn_stderr.log
#修改gitlab端口号
sudo vim /var/opt/gitlab/gitlab-rails/etc/unicorn.rb
#修改gitlab url
sudo vim /etc/gitlab/gitlab.rb
#重载配置
sudo gitlab-ctl reconfigure
==jenkins
#问题:修改用户权限后无法登录
解决:删除config.xml中部分内容,重启jenkins
$ cd /var/lib/jenkins,修改config.xml,删除<useSecurity>true</useSecurity>以下,ADN <securityRealm class="hudson.security.LegacySecurityRealm"/>以上的内容。
充启jenkins
$ cd /etc/init.d
$ sudo ./jenkins restart
#问题:gitlab中webhooks添加的url在执行配置test时,报错401、403
解决:webhooks的rul中拼接参数,如 http://username:password@172.168.100.155:8080/job/222/build?delay=0sec
#问题:gitlab的仓库中设置webhooks时,运行test报错No valid crumb was included in the request
解决:在jenkins全局安全设置中取消勾选“防止跨站点请求伪造(Prevent Cross Site Request Forgery exploits)”
[完]
Jenkins+GitLab
标签:端口 eal 备份 nbsp 重启 access exe size osi
原文地址:http://www.cnblogs.com/izhangyuer/p/6929732.html

