标签:blog http strong ar art div 代码 log sp
该对象有两种信号量状态True和False。构造函数设置初始状态。
    class Program
    {
        public static void Main()
        {
            Thread t = new Thread(Run);
            t.Name = "辅助线程";
            t.Start();

            Console.WriteLine("当前时间:{0}  {1}准备执行!", DateTime.Now.TimeOfDay, t.Name);
            //手动修改信号量为True,也就是恢复一个等待线程执行。
            mr.Set();

            Console.ReadKey();
        }

        //一开始设置为false才会等待收到信号才执行
        static ManualResetEvent mr = new ManualResetEvent(true);

        static void Run()
        {
            //线程开始执行时待命,收到信号才动身
            mr.WaitOne();
            Console.WriteLine("\n当前时间:{0}  {1}正式执行!", DateTime.Now.TimeOfDay, Thread.CurrentThread.Name);

            //我想让辅助线程暂停3秒
            mr.WaitOne(3000);
            Console.WriteLine("\n当前时间:{0}  {1}暂停3秒,但是无效!", DateTime.Now.TimeOfDay, Thread.CurrentThread.Name);

            //我想让辅助线程暂停
            mr.Reset();
            Console.WriteLine("\n当前时间:{0}  {1}还是无效!", DateTime.Now.TimeOfDay, Thread.CurrentThread.Name);
        }
    }
输出如下:

Reset()的意思其实是重置,重置后才又能再WaitOne();
    class Program
    {
        public static void Main()
        {
            Thread t = new Thread(Run);
            t.Name = "辅助线程";
            t.Start();

            Console.WriteLine("当前时间:{0}  {1}准备执行!", DateTime.Now.TimeOfDay, t.Name);
            //手动修改信号量为True,也就是恢复一个等待线程执行。
            mr.Set();


            Thread.Sleep(10000);
            mr.Set();

            Console.ReadKey();
        }

        //一开始设置为false才会等待收到信号才执行
        static ManualResetEvent mr = new ManualResetEvent(false);

        static void Run()
        {
            //线程开始执行时待命,收到信号才动身
            mr.WaitOne();
            Console.WriteLine("\n当前时间:{0}  {1}正式执行!", DateTime.Now.TimeOfDay, Thread.CurrentThread.Name);

            //重置后停止才有效
            mr.Reset();
            //我想让辅助线程暂停3秒
            mr.WaitOne(3000);
            Console.WriteLine("\n当前时间:{0}  {1}暂停3秒,这回有效了!", DateTime.Now.TimeOfDay, Thread.CurrentThread.Name);

            //重置后停止才有效
            mr.Reset();
            //我想让辅助线程暂停,10后由主线程再次唤醒
            mr.WaitOne();
            Console.WriteLine("\n当前时间:{0}  {1}暂停,但会被主线程再次唤醒,这回有效了!", DateTime.Now.TimeOfDay, Thread.CurrentThread.Name    );
        }
    }
输出如下:

AutoResetEvent与ManualResetEvent的区别在于AutoResetEvent 的WaitOne会改变信号量的值。
比如说初始信号量为True,如果WaitOne超时信号量将自动变为False,而ManualResetEvent则不会。
    class Program
    {
        public static void Main()
        {
            Thread t = new Thread(Run);
            t.Name = "辅助线程";
            t.Start();

            Console.WriteLine("当前时间:{0}  {1}准备执行!", DateTime.Now.TimeOfDay, t.Name);

            Console.ReadKey();
        }

        static AutoResetEvent ar = new AutoResetEvent(true);

        static void Run()
        {
            var state = ar.WaitOne(1000);
            Console.WriteLine("当前的信号量状态:{0}", state);

            state = ar.WaitOne(1000);
            Console.WriteLine("再次WaitOne后现在的状态是:{0}", state);
        }
    }
输出如下:

假如要实现上面ManualResetEvent同样的效果,Run方法就不用手动Reset()了:
    static void Run()
    {
        //线程开始执行时待命,收到信号才动身
        mr.WaitOne();
        Console.WriteLine("\n当前时间:{0}  {1}正式执行!", DateTime.Now.TimeOfDay, Thread.CurrentThread.Name);

        //我想让辅助线程暂停3秒
        mr.WaitOne(3000);
        Console.WriteLine("\n当前时间:{0}  {1}暂停3秒,这回有效了!", DateTime.Now.TimeOfDay, Thread.CurrentThread.Name);

        //我想让辅助线程暂停,10后由主线程再次唤醒
        mr.WaitOne();
        Console.WriteLine("\n当前时间:{0}  {1}暂停,但会被主线程再次唤醒,这回有效了!", DateTime.Now.TimeOfDay, Thread.CurrentThread.Name);
    }
少了手动Reset()代码。
用于控制线程的访问数量,默认的构造函数为initialCount和maximumCount,表示默认设置的信号量个数和最大信号量个数。当你WaitOne的时候,信号量自减,当Release的时候,信号量自增,然而当信号量为0的时候,后续的线程就不能拿到WaitOne了,所以必须等待先前的线程通过Release来释放。
    class Program
    {
        static void Main(string[] args)
        {

            Thread t1 = new Thread(Run1);
            t1.Start();

            Thread t2 = new Thread(Run2);
            t2.Start();

            Thread t3 = new Thread(Run3);
            t3.Start();

            Console.Read();
        }

        //初始可以授予2个线程信号,因为第3个要等待前面的Release才能得到信号
        static Semaphore sem = new Semaphore(2, 10);

        static void Run1()
        {
            sem.WaitOne();
            Console.WriteLine("大家好,我是Run1" + DateTime.Now.TimeOfDay);
        }

        static void Run2()
        {
            sem.WaitOne();
            Console.WriteLine("大家好,我是Run2" + DateTime.Now.TimeOfDay);

            //两秒后
            Thread.Sleep(2000);
            sem.Release();
        }

        static void Run3()
        {
            sem.WaitOne();
            Console.WriteLine("大家好,我是Run3" + DateTime.Now.TimeOfDay);
        }
    }
输出:

在以上的方法中Release()方法相当于自增一个信号量,Release(5)自增5个信号量。但是,Release()到构造函数的第二个参数maximumCount的值就不能再自增了。
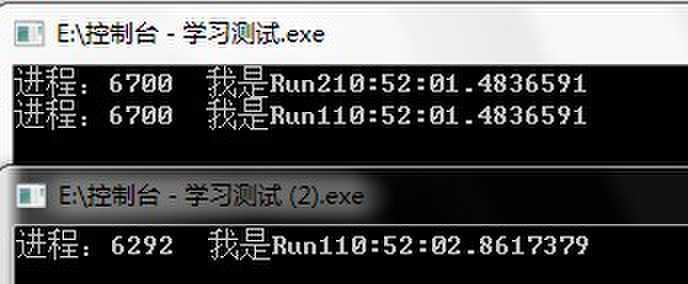
命名Semaphore可用于进程级交互。
    class Program
    {
        static void Main(string[] args)
        {

            Thread t1 = new Thread(Run1);
            t1.Start();

            Thread t2 = new Thread(Run2);
            t2.Start();

            Console.Read();
        }

        //初始可以授予2个线程信号,因为第3个要等待前面的Release才能得到信号
        static Semaphore sem = new Semaphore(3, 10, "命名Semaphore");

        static void Run1()
        {
            sem.WaitOne();

            Console.WriteLine("进程:" +Process.GetCurrentProcess().Id + "  我是Run1" + DateTime.Now.TimeOfDay);
        }

        static void Run2()
        {
            sem.WaitOne();

            Console.WriteLine("进程:" + Process.GetCurrentProcess().Id + "  我是Run2" + DateTime.Now.TimeOfDay);
        }
    }
输出如下:

标签:blog http strong ar art div 代码 log sp
原文地址:http://www.cnblogs.com/mingxuantongxue/p/3944420.html