标签:user href sprite 开始 互动 避免 test 加速 判断
这个动画在很早之前就见过,当时就没迷住了。最近在学canavs动画,动手实现了一下。代码在这里。展示效果在这里。
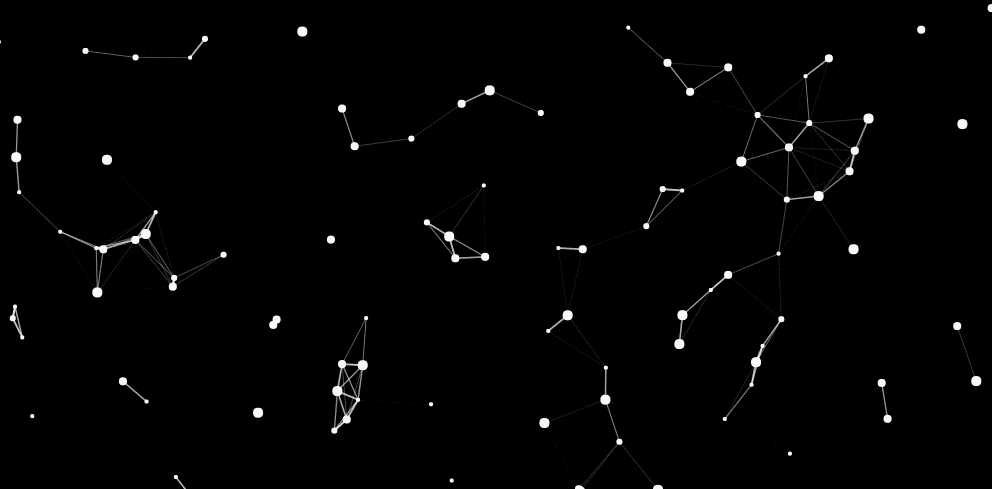
这属于粒子系统的一种,粒子系统就是需要管理一堆粒子嘛,动画实现的关键在于,遍历这些粒子,并更新它们的位置。
粒子
每个粒子都需要包含自己的横纵坐标想x、y,半径r,各分量上的加速度ax、ay,速度vx、vy,还有所属的场景owner,这里的粒子加速度均为0。

// 父类
class Sprite {
    constructor(args={}) {
        this.x = args.x || 0;
        this.y = args.y || 0;
        this.vx = args.vx || 0;
        this.vy = args.vy || 0;
        this.ax = args.ax || 0;
        this.ay = args.ay || 0;
    }

    moveTo(x, y) {
        this.x = x;
        this.y = y;
    }

    update() {
        this.vx += this.ax;
        this.vy += this.ay;

        this.x += this.vx;
        this.y += this.vy;
    }

    render() {
        return true;
    }
}

// 粒子
class Particle extends Sprite{
    constructor(args) {
        super(args);
        this.owner = args.owner;
        this.r = args.r || 10;
        this.color = args.color || ‘black‘;

        this.adjust = this.adjust.bind(this);
    }

    update() {
        super.update();
        if(this.x < this.r || this.x + this.r > this.owner.w) {
            this.vx *= -1;
            this.x = this.adjust(0, this.owner.w, this.x);
        }

        if(this.y < this.r || this.y + this.r > this.owner.h) {
            this.vy *= -1;
            this.y = this.adjust(0, this.owner.h, this.y);
        }
    }

    render(ctx) {
        ctx.beginPath();
        ctx.fillStyle = this.color;
        ctx.arc(this.x, this.y, this.r, 0, Math.PI * 2, false);
        ctx.closePath();
        ctx.fill();
    }

    adjust(min, max, v) {
        return v > max ? max : (v < min ? min : v);
    }
}
父类的update()中用于改变对象的坐标,particle类的update()在调用了父类的update方法之后,进行边界检测。
边界检测
边界检测属于碰撞检测的一种。在改变粒子位置之后,对粒子进行边界检测,防止粒子逃出canvas哦。本例中的粒子是圆形的,可以通过粒子中心点与边界之间的距离进行判断,若小于粒子自身半径,则对粒子坐标进行修正,确保粒子始终位于canvas中。
/*
 * this.x 粒子横坐标
 * this.y 粒子纵坐标
 * this.r 粒子半径
 * this.owner.w 粒子所在场景(canvas)宽度
 * this.owner.h 粒子所在场景(canvas)高度
 */
if(this.x < this.r || this.x + this.r > this.owner.w) {
    this.vx *= -1;
    this.x = this.adjust(0, this.owner.w, this.x);
}

if(this.y < this.r || this.y + this.r > this.owner.h) {
    this.vy *= -1;
    this.y = this.adjust(0, this.owner.h, this.y);
}
当粒子坐标超出边界时,使用adjust()重置粒子坐标,确保粒子在canvas内。
adjust(min, max, v) {
    return v > max ? max : (v < min ? min : v);
}
粒子系统
粒子系统就是对粒子进行管理的。
this.nodes = [];   // 保存粒子
this.edges = [];   // 粒子成对保存,用于连线
存储edges时,使用双层循环,内循环n的从i + 1开始,避免重复保存。
for(let i = 0, len = this.nodes.length; i < len; ++i) {
    for(let n = i + 1; n < len; ++n) {
        this.edges.push({
            from: this.nodes[i],
            to: this.nodes[n]
        })
    }
}
计算两个粒子之间的距离。
lengthOfEdge(edge) {
    let w = Math.abs(edge.from.x - edge.to.x),
        h = Math.abs(edge.from.y - edge.to.y);
    return Math.sqrt(w * w + h * h);
}
粒子间距离越短,连线越粗、越深。
this.ctx.lineWidth = (1 - l / this.threshold) * 2.5;
this.ctx.globalAlpha = 1 - l / this.threshold;
超出一定距离就不连线。
let l = this.lengthOfEdge(edge);
    if(l > this.threshold) {
    return;
}
鼠标事件
这里为了与用户有互动,加入了鼠标事件。当鼠标在canvas内移动时,第一个粒子nodes[0]的跟随鼠标移动。当鼠标静止或者在canvas外时,则按照原来的速度进行移动。
mouserEnter(e) {
    this.mouse = this.nodes[0];
}

mouseMove(e) {
    this.mouse.x = e.offsetX;
    this.mouse.y = e.offsetY;
}

mouseLeave() {
    this.mouse = null;
}
至于动画的更新,建议使用requestAnimationFrame()。
标签:user href sprite 开始 互动 避免 test 加速 判断
原文地址:http://www.cnblogs.com/zhangyubao/p/7003883.html