标签:space onresume name 带来 计数器 消息发布 进度 int csdn
广播机制在Android系统中,也不算是什么创新的东西。如果读者了解J2EE或者COM,就会知道,在J2EE中,提供了消息驱动Bean(Message-Driven Bean),用来实现应用程序各个组件之间的消息传递;而在COM中,提供了连接点(Connection Point)的概念,也是用来在应用程序各个组间间进行消息传递。无论是J2EE中的消息驱动Bean,还是COM中的连接点,或者Android系统的广播机制,它们的实现机理都是消息发布/订阅模式的事件驱动模型,消息的生产者发布事件,而使用者订阅感兴趣的事件。
在Android系统中,广播(Broadcast)是在组件之间传播数据(Intent)的一种机制;这些组件甚至是可以位于不同的进程中,这样它就像Binder机制一样,起到进程间通信的作用;本文通过一个简单的例子来学习Android系统的广播机制,为后续分析广播机制的源代码作准备。在Android系统中,为什么需要广播机制呢?广播机制,本质上它就是一种组件间的通信方式,如果是两个组件位于不同的进程当中,那么可以用Binder机制来实现,如果两个组件是在同一个进程中,那么它们之间可以用来通信的方式就更多了,这样看来,广播机制似乎是多余的。然而,广播机制却是不可替代的,它和Binder机制不一样的地方在于,广播的发送者和接收者事先是不需要知道对方的存在的,这样带来的好处便是,系统的各个组件可以松耦合地组织在一起,这样系统就具有高度的可扩展性,容易与其它系统进行集成。
在软件工程中,是非常强调模块之间的高内聚低耦合性的,不然的话,随着系统越来越庞大,就会面临着越来越难维护的风险,最后导致整个项目的失败。Android应用程序的组织方式,可以说是把这种高内聚低耦合性的思想贯彻得非常透彻,在任何一个Activity中,都可以使用一个简单的Intent,通过startActivity或者startService,就可以把另外一个Activity或者Service启动起来为它服务,而且它根本上不依赖这个Activity或者Service的实现,只需要知道它的字符串形式的名字即可,而广播机制更绝,它连接收者的名字都不需要知道。
分析案例:
我们通过具体的例子来介绍Android系统的广播机制。在这个例子中,有一个Service,它在另外一个线程中实现了一个计数器服务,每隔一秒钟就自动加1,然后将结果不断地反馈给应用程序中的界面线程,而界面线程中的Activity在得到这个反馈后,就会把结果显示在界面上。
为什么要把计数器服务放在另外一个线程中进行呢?
我们可以把这个计数器服务想象成是一个耗时的计算型逻辑,如果放在界面线程中去实现,那么势必就会导致应用程序不能响应界面事件,最后导致应用程序产生ANR(Application Not Responding)问题。计数器线程为了把加1后的数字源源不断地反馈给界面线程,这时候就可以考虑使用广播机制了。
首先在Android源代码工程中创建一个Android应用程序工程,名字就称为Broadcast吧。这个应用程序工程定义了一个名为shy.luo.broadcast的package,这个例子的源代码主要就是实现在这里了。下面,将会逐一介绍这个package里面的文件。
1. 计数器的服务接口ICounterServicce :src/shy/luo/broadcast/ICounterService.Java
package shy.luo.broadcast;public interface ICounterService {public void startCounter(int initVal);public void stopCounter();}co
package shy.luo.broadcast;import android.app.Activity;import android.content.BroadcastReceiver;import android.content.ComponentName;import android.content.Context;import android.content.Intent;import android.content.IntentFilter;import android.content.ServiceConnection;import android.os.Bundle;import android.os.IBinder;import android.util.Log;import android.view.View;import android.view.View.OnClickListener;import android.widget.Button;import android.widget.TextView;public class MainActivity extends Activity implements OnClickListener {private final static String LOG_TAG = "shy.luo.broadcast.MainActivity";private Button startButton = null;private Button stopButton = null;private TextView counterText = null;private ICounterService counterService = null;@Overridepublic void onCreate(Bundle savedInstanceState) {super.onCreate(savedInstanceState);setContentView(R.layout.main);startButton = (Button)findViewById(R.id.button_start);stopButton = (Button)findViewById(R.id.button_stop);counterText = (TextView)findViewById(R.id.textview_counter);startButton.setOnClickListener(this);stopButton.setOnClickListener(this);startButton.setEnabled(true);stopButton.setEnabled(false);Intent bindIntent = new Intent(MainActivity.this, CounterService.class);bindService(bindIntent, serviceConnection, Context.BIND_AUTO_CREATE);Log.i(LOG_TAG, "Main Activity Created.");}@Overridepublic void onResume() {super.onResume();IntentFilter counterActionFilter = new IntentFilter(CounterService.BROADCAST_COUNTER_ACTION);registerReceiver(counterActionReceiver, counterActionFilter);}@Overridepublic void onPause() {super.onPause();unregisterReceiver(counterActionReceiver);}@Overridepublic void onDestroy() {super.onDestroy();unbindService(serviceConnection);}@Overridepublic void onClick(View v) {if(v.equals(startButton)) {if(counterService != null) {counterService.startCounter(0);startButton.setEnabled(false);stopButton.setEnabled(true);}} else if(v.equals(stopButton)) {if(counterService != null) {counterService.stopCounter();startButton.setEnabled(true);stopButton.setEnabled(false);}}}private BroadcastReceiver counterActionReceiver = new BroadcastReceiver(){public void onReceive(Context context, Intent intent) {int counter = intent.getIntExtra(CounterService.COUNTER_VALUE, 0);String text = String.valueOf(counter);counterText.setText(text);Log.i(LOG_TAG, "Receive counter event");}};private ServiceConnection serviceConnection = new ServiceConnection() {public void onServiceConnected(ComponentName className, IBinder service) {counterService = ((CounterService.CounterBinder)service).getService();Log.i(LOG_TAG, "Counter Service Connected");}public void onServiceDisconnected(ComponentName className) {counterService = null;Log.i(LOG_TAG, "Counter Service Disconnected");}};}cop
1. MainActivity的实现也很简单,它在创建(onCreate)的时候,会调用bindService函数来把计数器服务(CounterService)启动起来。
2. 它的第二个参数serviceConnection是一个ServiceConnection实例, 计数器服务启动起来后,系统会调用这个实例的onServiceConnected函数将一个Binder对象传回来.
3. 通过调用这个Binder对象的getService函数,就可以获得计数器服务接口。这里,把这个计数器服务接口保存在MainActivity的counterService成员变量中。
4. 当我们调用unbindService停止计数器服务时,系统会调用这个实例的onServiceDisconnected函数告诉MainActivity,它与计数器服务的连接断开了。
注意,这里通过调用bindService函数来启动Service时,这个Service与启动它的Activity是位于同一个进程中,它不像我们在前面一篇文章Android系统在新进程中启动自定义服务过程(startService)的原理分析中所描述那样在新的进程中启动服务,后面我们再写一篇文章来分析bindService启动服务的过程。
1. 在MainActivity的onResume函数中,通过调用registerReceiver函数注册了一个广播接收器counterActionReceiver,它是一个BroadcastReceiver实例,并且指定了这个广播接收器只对CounterService.BROADCAST_COUNTER_ACTION类型的广播感兴趣。
2. 当CounterService发出一个CounterService.BROADCAST_COUNTER_ACTION类型的广播时,系统就会把这个广播发送到counterActionReceiver实例的onReceiver函数中去。在onReceive函数中,从参数intent中取出计数器当前的值,显示在界面上。
MainActivity界面上有两个按钮,分别是Start Counter和Stop Counter按钮,点击前者开始计数,而点击后者则停止计数。
计数器服务CounterService实现在src/shy/luo/broadcast/CounterService.java文件中:
package shy.luo.broadcast;import android.app.Service;import android.content.Intent;import android.os.AsyncTask;import android.os.Binder;import android.os.IBinder;import android.util.Log;public class CounterService extends Service implements ICounterService {private final static String LOG_TAG = "shy.luo.broadcast.CounterService";public final static String BROADCAST_COUNTER_ACTION = "shy.luo.broadcast.COUNTER_ACTION";public final static String COUNTER_VALUE = "shy.luo.broadcast.counter.value";private boolean stop = false;private final IBinder binder = new CounterBinder();public class CounterBinder extends Binder {public CounterService getService() {return CounterService.this;}}@Overridepublic IBinder onBind(Intent intent) {return binder;}@Overridepublic void onCreate() {super.onCreate();Log.i(LOG_TAG, "Counter Service Created.");}@Overridepublic void onDestroy() {Log.i(LOG_TAG, "Counter Service Destroyed.");}public void startCounter(int initVal) {AsyncTask<Integer, Integer, Integer> task = new AsyncTask<Integer, Integer, Integer>() {@Overrideprotected Integer doInBackground(Integer... vals) {Integer initCounter = vals[0];stop = false;while(!stop) {publishProgress(initCounter);try {Thread.sleep(1000);} catch (InterruptedException e) {e.printStackTrace();}initCounter++;}return initCounter;}@Overrideprotected void onProgressUpdate(Integer... values) {super.onProgressUpdate(values);int counter = values[0];Intent intent = new Intent(BROADCAST_COUNTER_ACTION);intent.putExtra(COUNTER_VALUE, counter);sendBroadcast(intent);}@Overrideprotected void onPostExecute(Integer val) {int counter = val;Intent intent = new Intent(BROADCAST_COUNTER_ACTION);intent.putExtra(COUNTER_VALUE, counter);sendBroadcast(intent);}};task.execute(0);}public void stopCounter() {stop = true;}}
函数onBind返回的Binder对象是一个自定义的CounterBinder实例,它实现了一个getService成员函数。当系统通知MainActivity,计数器服务已经启动起来并且连接成功后,并且将这个Binder对象传给MainActivity时,MainActivity就会把这个Binder对象强制转换为CounterBinder实例,然后调用它的getService函数获得服务接口。这样,MainActivity就通过这个Binder对象和CounterService关联起来了。
当MainActivity调用计数器服务接口的startCounter函数时,计数器服务并不是直接进入计数状态,而是通过使用异步任务(AsyncTask)在后台线程中进行计数。这里为什么要使用异步任务来在后台线程中进行计数呢?前面我们说过,这个计数过程是一个耗时的计算型逻辑,不能把它放在界面线程中进行,因为这里的CounterService启动时,并没有在新的进程中启动,它与MainActivity一样,运行在应用程序的界面线程中,因此,这里需要使用异步任务在在后台线程中进行计数。
异步任务AsyncTask的具体用法可以参考官方文档http://developer.android.com/reference/android/os/AsyncTask.html。它的大概用法是:
1. 当我们调用异步任务实例的execute(task.execute)方法时,当前调用线程就返回了,系统启动一个后台线程来执行这个异步任务实例的doInBackground函数
2. 这个函数就是我们用来执行耗时计算的地方了,它会进入到一个循环中,每隔1秒钟就把计数器加1,然后进入休眠(Thread.sleep),醒过来,再重新这个计算过程。
2. 在计算的过程中,可以通过调用publishProgress函数来通知调用者当前计算的进度,好让调用者来更新界面,调用publishProgress函数的效果最终就是直入到这个异步任务实例的onProgressUpdate函数中,这里就可以把这个进度值以广播的形式(sendBroadcast)发送出去了,这里的进度值就定义为当前计数服务的计数值。
当MainActivity调用计数器服务接口的stopCounter函数时,会告诉函数doInBackground停止执行计数(stop = true),于是,函数doInBackground就退出计数循环,然后将最终计数结果返回了,返回的结果最后进入到onPostExecute函数中,这个函数同样通过广播的形式(sendBroadcast)把这个计数结果广播出去。
计算器服务就介绍到这里了,下面我们看看应用程序的配置文件AndroidManifest.xml:
<?xml version="1.0" encoding="utf-8"?><manifest xmlns:android="http://schemas.android.com/apk/res/android"package="shy.luo.broadcast"android:versionCode="1"android:versionName="1.0"><application android:icon="@drawable/icon" android:label="@string/app_name"><activity android:name=".MainActivity"android:label="@string/app_name"><intent-filter><action android:name="android.intent.action.MAIN" /><category android:name="android.intent.category.LAUNCHER" /></intent-filter></activity><service android:name=".CounterService"android:enabled="true"></service></application></manifest>
案例:
这样,使用广播的例子就介绍完了。回顾一下,使用广播的两个步骤:
1. 广播的接收者需要通过调用registerReceiver函数告诉系统,它对什么样的广播有兴趣,即指定IntentFilter,并且向系统注册广播接收器,即指定BroadcastReceiver:
IntentFilter counterActionFilter = new IntentFilter(CounterService.BROADCAST_COUNTER_ACTION);registerReceiver(counterActionReceiver, counterActionFilter);
2. 广播的发送者通过调用sendBroadcast函数来发送一个指定的广播,并且可以指定广播的相关参数:
Intent intent = new Intent(BROADCAST_COUNTER_ACTION);intent.putExtra(COUNTER_VALUE, counter);sendBroadcast(intent)
1. 在第1步中,广播的接收者把广播接收器注册到AMS中;
2. 在第2步中,广播的发送者同样是把广播发送到AMS中,由AMS去查找注册了这个广播的接收者,然后把广播分发给它们。
3. 在第2步的分发的过程,其实就是把这个广播转换成一个消息,然后放入到接收器所在的线程消息队列中去,最后就可以在消息循环中调用接收器的onReceive函数了。
4. 由于ActivityManagerService把这个广播放进接收器所在的线程消息队列后,就返回了,它不关心这个消息什么时候会被处理,因此,对广播的处理是异步的,即调用sendBroadcast时,这个函数不会等待这个广播被处理完后才返回。
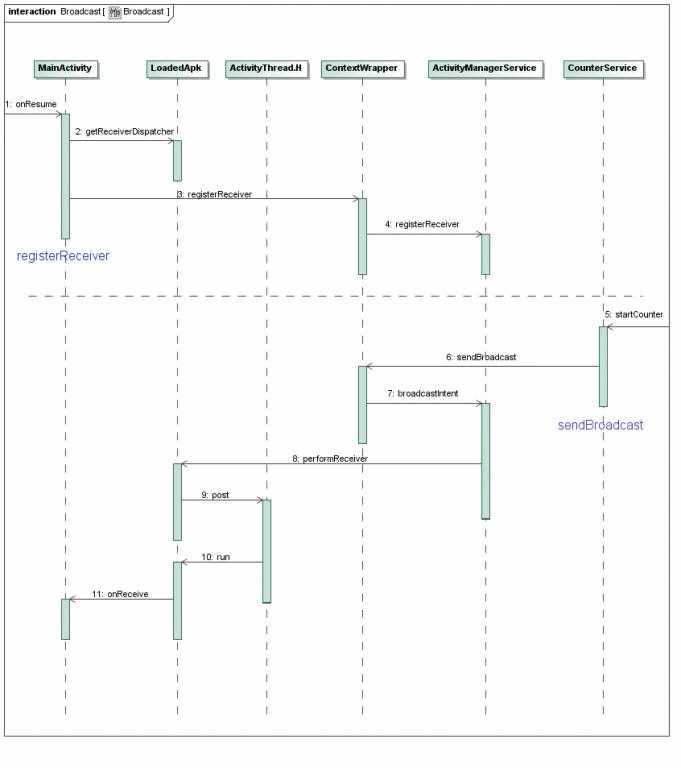
下面,我们以一个序列图来总结一下,广播的注册和发送的过程:

虚线上面Step 1到Step 4步是注册广播接收器的过程,
其中Step 2通过LoadedApk.getReceiverDispatcher在LoadedApk内部创建了一个IIntentReceiver接口,并且传递给ActivityManagerService;
虚线下面的Step 5到Step 11是发送广播的过程,
在Step 8中,ActivityManagerService利用上面得到的IIntentReceiver远程接口,调用LoadedApk.performReceiver接口,LoadedApk.performReceiver接口通过ActivityThread.H接口的post函数将这个广播消息放入到ActivityThread的消息队列中去
最后这个消息在LoadedApk的Args.run函数中处理,LoadedApk.Args.run函数接着调用MainActivity.BroadcastReceiver的onReceive函数来最终处理这个广播。
标签:space onresume name 带来 计数器 消息发布 进度 int csdn
原文地址:http://www.cnblogs.com/jiaoxiake/p/7042975.html