标签:请求 string sed 类的方法 parameter tco family 算法 cat
用池来管理Connection,这可以重复使用Connection。有了池,所以我们就不用自己来创建Connection,而是通过池来获取Connection对象。当使用完Connection后,调用Connection的close()方法也不会真的关闭Connection(因为连接池对Connection使用了装饰模式),而是把Connection“归还”给池。池就可以再利用这个Connection对象了。
Java为数据库连接池提供了公共的接口:javax.sql.DataSource,各个厂商可以让自己的连接池实现这个接口(必须)。这样应用程序可以方便的切换不同厂商的连接池。当我们不指定连接池参数时,会使用默认值
DBCP是Apache提供的一款开源免费的数据库连接池!
Hibernate3.0之后不再对DBCP提供支持!因为Hibernate声明DBCP有致命的缺欠!DBCP因为Hibernate的这一毁谤很是生气,并且说自己没有缺欠
在Java代码中配置:
    public void fun1() throws SQLException {
        BasicDataSource ds = new BasicDataSource();
        ds.setUsername("root");
        ds.setPassword("123");
        ds.setUrl("jdbc:mysql://localhost:3306/mydb1");
        ds.setDriverClassName("com.mysql.jdbc.Driver");

        ds.setMaxActive(20);
        ds.setMaxIdle(10);
        ds.setInitialSize(10);
        ds.setMinIdle(2);
        ds.setMaxWait(1000);

        Connection con = ds.getConnection();
        System.out.println(con.getClass().getName());
        con.close();
    }
这个BasicDataSource类就是DBCPjar包中的
C3P0也是开源免费的连接池,较为常用
C3P0连接池的配置可以使用在Java代码中硬编码的方式设置,但是为后期维护修改带来不便,这里我是用的是xml配置文件的方式
配置文件要求:
c3p0-config.xml :
<?xml version="1.0" encoding="UTF-8"?>
<c3p0-config>
<!--默认参数-->
    <default-config>
<!--四大参数-->
        <property name="jdbcUrl">jdbc:mysql://localhost:3306/mydb1</property>
        <property name="driverClass">com.mysql.jdbc.Driver</property>
        <property name="user">root</property>
        <property name="password">root</property>
        <property name="acquireIncrement">3</property>
        <property name="initialPoolSize">10</property>
        <property name="minPoolSize">2</property>
        <property name="maxPoolSize">10</property>
    </default-config>

<!--命名配置,这里还使用的是Mysql的四大参数,只是连接池配置有些修改-->
    <named-config name="mysql-config">
        <property name="jdbcUrl">jdbc:mysql://localhost:3306/mydb1</property>
        <property name="driverClass">com.mysql.jdbc.Driver</property>
        <property name="user">root</property>
        <property name="password">root</property>
        <property name="acquireIncrement">3</property>
        <property name="initialPoolSize">10</property>
        <property name="minPoolSize">2</property>
        <property name="maxPoolSize">10</property>
    </named-config>
</c3p0-config>
c3p0的配置文件中可以配置多个连接信息,可以给每个配置起个名字,这样可以方便的通过配置名称来切换配置信息。上面文件中有一个默认配置和一个名为mysql-config配置(在这里其实都一样)
使用默认配置:
    public void fun2() throws PropertyVetoException, SQLException {
        ComboPooledDataSource ds = new ComboPooledDataSource();      //不用定配置文件名称,因为配置文件名必须是c3p0-config.xml,这里使用的是默认配置
        Connection con = ds.getConnection();
        System.out.println(con);
        con.close();
    }
使用名为mysql-config的配置:
public void fun2() throws PropertyVetoException, SQLException {
        ComboPooledDataSource ds = new ComboPooledDataSource("mysql-config");   //使用名为mysql-config配置
        Connection con = ds.getConnection();
        System.out.println(con);
        con.close();
    }
JNDI(Java Naming and Directory Interface),Java命名和目录接口。JNDI的作用就是:在服务器上配置资源,然后通过统一的方式来获取配置的资源。
我们这里要配置的资源当然是连接池了,这样项目中就可以通过统一的方式来获取连接池对象
需要在Tomcat的apache-tomcat-8.5.12\conf\Catalina路径下放入配置文件,该配置文件是以项目名为名称的xml文件,只对当前项目有效
配置JNDI资源文件需要到<Context>元素中配置<Resource>子元素:
DBCP的配置:
<Context>
  <Resource name="mydbcp"
            type="org.apache.tomcat.dbcp.dbcp.BasicDataSource"
            factory="org.apache.naming.factory.BeanFactory"
            username="root"
            password="123"
            driverClassName="com.mysql.jdbc.Driver"
      <!--需改为实际项目的数据库名-->
            url="jdbc:mysql://localhost:3306/mydb1"
            maxIdle="3"
            maxWait="5000"
            maxActive="5"
            initialSize="3"/>
</Context>
C3P0的配置:
<Context>
  <Resource name="myc3p0"
            type="com.mchange.v2.c3p0.ComboPooledDataSource"
            factory="org.apache.naming.factory.BeanFactory"
            user="root"
            password="123"
            classDriver="com.mysql.jdbc.Driver"
        <!--需修改为实际项目的数据库-->
            jdbcUrl="jdbc:mysql://localhost:3306/mydb1"
            maxPoolSize="20"
            minPoolSize ="5"
            initialPoolSize="10"
            acquireIncrement="2"/>
</Context>
这就是以项目名为名称的xml文件的内容
配置资源的目的当然是为了获取资源了。只要你启动了Tomcat,那么就可以在项目中任何类中通过JNDI获取资源的方式来获取资源了
获取资源:
Context cxt = new InitialContext();
DataSource ds = (DataSource)cxt.lookup("java:/comp/env/myc3p0");           //使用的是myc3p0
Connection con = ds.getConnection(); System.out.println(con); con.close();
import java.sql.Connection;
import java.sql.SQLException;

import javax.sql.DataSource;

import com.mchange.v2.c3p0.ComboPooledDataSource;

/**
 * 使用本类的方法,必须提供c3p0-copnfig.xml文件
 */
public class JdbcUtils {
    private static DataSource ds = new ComboPooledDataSource();

    /**
     * 它为null表示没有事务
     * 它不为null表示有事务
     * 当开启事务时,需要给它赋值
     * 当结束事务时,需要给它赋值为null
     * 并且在开启事务时,让dao的多个方法共享这个Connection
     */
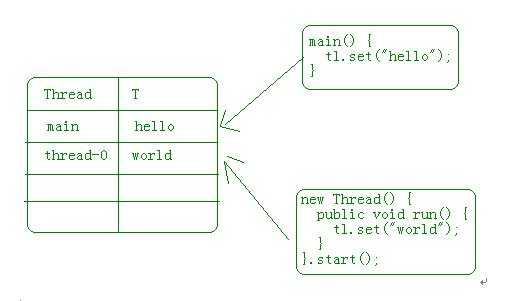
    private static ThreadLocal<Connection> tl = new ThreadLocal<Connection>();

    public static DataSource getDataSource() {
        return ds;
    }

    /**
     * dao使用本方法来获取连接
     * @return
     * @throws SQLException
     */
    public static Connection getConnection() throws SQLException {
        /*
         * 如果有事务,返回当前事务的con
         * 如果没有事务,通过连接池返回新的con
         */
        Connection con = tl.get();//获取当前线程的事务连接
        if(con != null) return con;
        return ds.getConnection();
    }

    /**
     * 开启事务
     * @throws SQLException
     */
    public static void beginTransaction() throws SQLException {
        Connection con = tl.get();//获取当前线程的事务连接
        if(con != null) throw new SQLException("已经开启了事务,不能重复开启!");
        con = ds.getConnection();//给con赋值,表示开启了事务
        con.setAutoCommit(false);//设置为手动提交
        tl.set(con);//把当前事务连接放到tl中
    }

    /**
     * 提交事务
     * @throws SQLException
     */
    public static void commitTransaction() throws SQLException {
        Connection con = tl.get();//获取当前线程的事务连接
        if(con == null) throw new SQLException("没有事务不能提交!");
        con.commit();//提交事务
        con.close();//关闭连接
        con = null;//表示事务结束!
        tl.remove();
    }

    /**
     * 回滚事务
     * @throws SQLException
     */
    public static void rollbackTransaction() throws SQLException {
        Connection con = tl.get();//获取当前线程的事务连接
        if(con == null) throw new SQLException("没有事务不能回滚!");
        con.rollback();
        con.close();
        con = null;
        tl.remove();
    }

    /**
     * 释放Connection
     * @param con
     * @throws SQLException
     */
    public static void releaseConnection(Connection connection) throws SQLException {
        Connection con = tl.get();//获取当前线程的事务连接
        if(connection != con) {//如果参数连接,与当前事务连接不同,说明这个连接不是当前事务,可以关闭!
            if(connection != null &&!connection.isClosed()) {//如果参数连接没有关闭,关闭之!
                connection.close();
            }
        }
    }
}
这个是标准JDK中的类,在lang包下
ThreadLocal类只有三个方法:

在介绍完使用commons-dbutils.jar后,会提供一个TxQueryRunner类方便操作(这是使用Jdbc的方式操作,使用框架操作数据库的时候就没有这么麻烦,毕竟这些东西框架都是封装好的)
在开始客户管理系统之前,我们先写一个工具类:BaseServlet。
我们知道,写一个项目可能会出现N多个Servlet,而且一般一个Servlet只有一个方法(doGet或doPost),如果项目大一些,那么Servlet的数量就会很惊人。
为了避免Servlet的“膨胀”,我们写一个BaseServlet。它的作用是让一个Servlet可以处理多种不同的请求。不同的请求调用Servlet的不同方法。我们写好了BaseServlet后,让其他Servlet继承BaseServlet。(注意在页面调用Servlet的时候,需要给个method值作为说明调用Servlet中的哪个方法,不论是通过hidden隐藏表单项,还是使用url传值,一定要给这个参数,因为我们的BaseServlet是这样设计的,有点类似Struts2的Action调用方式)
BaseServlet.java:
import java.io.IOException;
import java.lang.reflect.Method;

import javax.servlet.ServletException;
import javax.servlet.http.HttpServlet;
import javax.servlet.http.HttpServletRequest;
import javax.servlet.http.HttpServletResponse;

/**
 * BaseServlet用来作为其它Servlet的父类
 *
 *
 *         一个类多个请求处理方法,每个请求处理方法的原型与service相同! 原型 = 返回值类型 + 方法名称 + 参数列表
 */
@SuppressWarnings("serial")
public class BaseServlet extends HttpServlet {
    @Override
    public void service(HttpServletRequest request, HttpServletResponse response)
            throws ServletException, IOException {
        response.setContentType("text/html;charset=UTF-8");//处理响应编码
        request.setCharacterEncoding("UTF-8");

        /**
         * 1. 获取method参数,它是用户想调用的方法 2. 把方法名称变成Method类的实例对象 3. 通过invoke()来调用这个方法
         */
        String methodName = request.getParameter("method");
        Method method = null;
        /**
         * 2. 通过方法名称获取Method对象
         */
        try {
            method = this.getClass().getMethod(methodName,
                    HttpServletRequest.class, HttpServletResponse.class);
        } catch (Exception e) {
            throw new RuntimeException("您要调用的方法:" + methodName + "它不存在!", e);
        }

        /**
         * 3. 通过method对象来调用它
         */
        try {
            String result = (String)method.invoke(this, request, response);
            if(result != null && !result.trim().isEmpty()) {//如果请求处理方法返回不为空
                int index = result.indexOf(":");//获取第一个冒号的位置
                if(index == -1) {//如果没有冒号,使用转发
                    request.getRequestDispatcher(result).forward(request, response);
                } else {//如果存在冒号
                    String start = result.substring(0, index);//分割出前缀
                    String path = result.substring(index + 1);//分割出路径
                    if(start.equals("f")) {//前缀为f表示转发
                        request.getRequestDispatcher(path).forward(request, response);
                    } else if(start.equals("r")) {//前缀为r表示重定向
                        response.sendRedirect(request.getContextPath() + path);
                    }
                }
            }
        } catch (Exception e) {
            throw new RuntimeException(e);
        }
    }
}
这个BaseServlet还对forword和重定向进行了简化,可以在我们编写的Servlet中分别使用f:或r: 当然什么都不写,只给出页面路径是以forword方式转跳。注意:我们自己编写的Servlet继承BaseServlet还是需要在web.xml文件中配置的(或者你使用注解)
DBUtils是Apache Commons组件中的一员,开源免费!
DBUtils是对JDBC的简单封装,但是它还是被很多公司使用。
QueryRunner类:
QueryRunner的update()方法可以用来执行insert、update、delete语句
QueryRunner的query()方法用于查询
ResultSetHandler接口:
我们知道在执行select语句之后得到的是ResultSet,然后我们还需要对ResultSet进行转换,得到最终我们想要的数据。你可以希望把ResultSet的数据放到一个List中,也可能想把数据放到一个Map中,或是一个Bean中
DBUtils提供了一个接口ResultSetHandler,它就是用来ResultSet转换成目标类型的工具。你可以自己去实现这个接口,把ResultSet转换成你想要的类型
事实上DBUtils提供了很多个ResultSetHandler接口的实现,这些实现已经基本够用了,我们通常不用自己去实现ResultSet接口了。
配合使用DBUtils和上面的ThreadLocal类,编写一个TxQueryRunner类继承于QueryRunner,来简化操作:
TxQueryRunner.java:
import java.sql.Connection;
import java.sql.SQLException;

import org.apache.commons.dbutils.QueryRunner;
import org.apache.commons.dbutils.ResultSetHandler;

public class TxQueryRunner extends QueryRunner {

    @Override
    public int[] batch(String sql, Object[][] params) throws SQLException {
        Connection con = JdbcUtils.getConnection();
        int[] result = super.batch(con, sql, params);
        JdbcUtils.releaseConnection(con);
        return result;
    }

    @Override
    public <T> T query(String sql, ResultSetHandler<T> rsh, Object... params)
            throws SQLException {
        Connection con = JdbcUtils.getConnection();
        T result = super.query(con, sql, rsh, params);
        JdbcUtils.releaseConnection(con);
        return result;
    }

    @Override
    public <T> T query(String sql, ResultSetHandler<T> rsh) throws SQLException {
        Connection con = JdbcUtils.getConnection();
        T result = super.query(con, sql, rsh);
        JdbcUtils.releaseConnection(con);
        return result;
    }

    @Override
    public int update(String sql) throws SQLException {
        Connection con = JdbcUtils.getConnection();
        int result = super.update(con, sql);
        JdbcUtils.releaseConnection(con);
        return result;
    }

    @Override
    public int update(String sql, Object param) throws SQLException {
        Connection con = JdbcUtils.getConnection();
        int result = super.update(con, sql, param);
        JdbcUtils.releaseConnection(con);
        return result;
    }

    @Override
    public int update(String sql, Object... params) throws SQLException {
        Connection con = JdbcUtils.getConnection();
        int result = super.update(con, sql, params);
        JdbcUtils.releaseConnection(con);
        return result;
    }
}
UUID通过算法生成一个唯一的值(显示出来是32位),可以作为主键,即使在分布式环境中也可以保持id唯一。使用这个类的uuid()方法可生成
这个类还有一个toBean()方法,用于将页面传递的数据封装成Bean组件,注意,这个方法的第一个参数使用的是map,我们可以在Servlet中使用request.getParameterMap()方法将页面(表单)传递的数据生成map类型作为toBean的第一参数就行了,toBean()的第二个参数就是你想转换的类型(使用泛型)
CommonUtils.java(需要commons-beanutils.jar):
import java.util.Map;
import java.util.UUID;

import org.apache.commons.beanutils.BeanUtils;
import org.apache.commons.beanutils.ConvertUtils;
import org.apache.commons.beanutils.converters.DateConverter;

/**
 * 小工具
 *
 */
public class CommonUtils {
    /**
     * 返回一个不重复的字符串
     * @return
     */
    public static String uuid() {
        return UUID.randomUUID().toString().replace("-", "").toUpperCase();
    }

    /**
     * 把map转换成对象
     * @param map
     * @param clazz
     * @return
     *
     * 把Map转换成指定类型
     */
    @SuppressWarnings("rawtypes")
    public static <T> T toBean(Map map, Class<T> clazz) {
        try {
            /*
             * 1. 通过参数clazz创建实例
             * 2. 使用BeanUtils.populate把map的数据封闭到bean中
             */
            T bean = clazz.newInstance();
            ConvertUtils.register(new DateConverter(), java.util.Date.class);
            BeanUtils.populate(bean, map);
            return bean;
        } catch(Exception e) {
            throw new RuntimeException(e);
        }
    }
}
标签:请求 string sed 类的方法 parameter tco family 算法 cat
原文地址:http://www.cnblogs.com/lz2017/p/7045038.html