DevOps(英文Development(开发)和Operations(技术运营)的组合)是一组过程、方法与系统的统称,用于促进开发(应用程序/软件工程)、技术运营和质量保障(QA)部门之间的沟通、协作与整合。它的出现是由于软件行业日益清晰地认识到:为了按时交付软件产品和服务,开发和运营工作必须紧密合作
持续集成概念:
持续集成Continuous Integration
持续交付Continuous Delivery
持续部署Continuous Deployment
持续集成是指开发者在代码的开发过程中,可以频繁的将代码部署集成到主干,并进程自动化测试 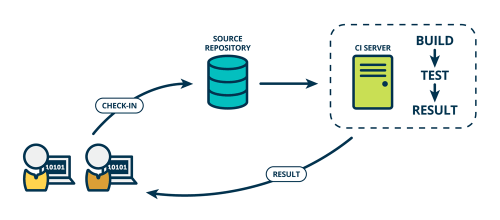
持续交付指的是在持续集成的环境基础之上,将代码部署到预生产环境 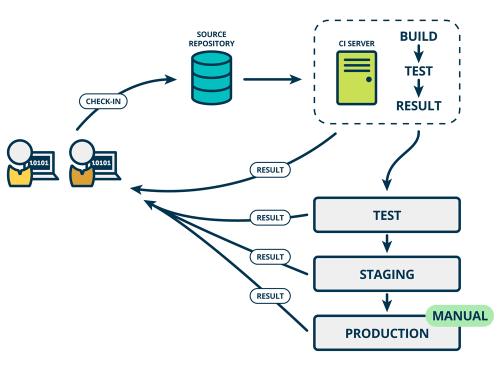
在持续交付的基础上,把部署到生产环境的过程自动化,持续部署和持续交付的区别就是最终部署到生产环境是自动化的。 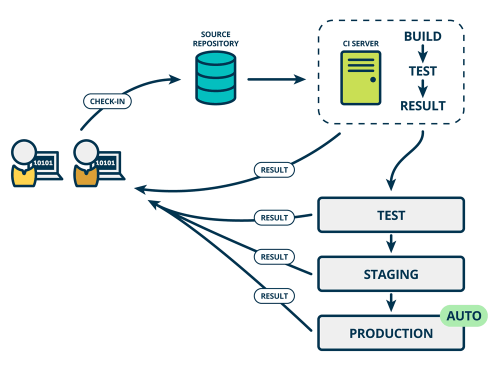
1.代码获取(直接了拉取)
2.编译      (可选)
3.配置文件放进去
4.打包
5.scp到目标服务器
6.将目标服务器移除集群
7.解压并放置到Webroot
8.Scp 差异文件
9.重启      (可选)
10.测试
11.加入集群
Jenkins上OWASP 插件介绍: 它是开放式Web应用程序安全项目
[OWASP,Open Web Application Secunity Project]
它每年会出一个top10的安全漏洞,我们需要知道当前top10的漏洞有哪些 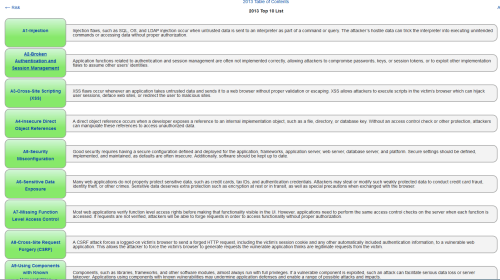
https://www.owasp.org/images/5/57/OWASP_Proactive_Controls_2.pdf
https://www.owasp.org/index.php/Top_10_2013-Top_10
GitLab是一个利用 Ruby on Rails 开发的开源应用程序,实现一个自托管的Git项目仓库,可通过Web界面进行访问公开的或者私人项目。
GitLab拥有与Github类似的功能,能够浏览源代码,管理缺陷和注释。可以管理团队对仓库的访问,它非常易于浏览提交过的版本并提供一个文件历史库。它还提供一个代码片段收集功能可以轻松实现代码复用,便于日后有需要的时候进行查找。
[root@linux-node1 ~]# cat /etc/redhat-release
CentOS Linux release 7.3.1611 (Core)
[root@linux-node1 ~]# uname -r
3.10.0-514.2.2.el7.x86_64
下载epel源
[root@linux-node1 ~]# wget http://mirrors.aliyun.com/epel/epel-release-latest-7.noarch.rpm
[root@linux-node1 ~]# wget -O /etc/yum.repos.d/CentOS-Base.repo http://mirrors.aliyun.com/repo/Centos-7.repo
关闭 NetworkManager 和防火墙
[root@linux-node1 ~]#systemctl stop firewalld.service
systemctl disable firewalld
systemctl disable NetworkManager
关闭SELinux并确认处于关闭状态
sed -i ‘s/SELINUX=enforcing/SELINUX=disabled/‘ /etc/selinux/config
grep SELINUX=disabled /etc/selinux/config
setenforce 0
更新系统并重启
[root@linux-node1 ~]# yum update -y && reboot
192.168.56.11和192.168.56.12我们安装在192.168.56.11上[root@linux-node1 /]# yum install curl policycoreutils openssh-server openssh-clients postfix -y [root@linux-node1 /]# systemctl start postfix [root@linux-node1 /]# curl -sS https://packages.gitlab.com/install/repositories/gitlab/gitlab-ce/script.rpm.sh | sudo bash [root@linux-node1 /]# yum install -y gitlab-ce
#由于网络问题,国内用户,建议使用清华大学的镜像源进行安装
[root@linux-node1 ~]# cat /etc/yum.repos.d/gitlab-ce.repo
[gitlab-ce]
name=gitlab-ce
baseurl=
repo_gpgcheck=0
gpgcheck=0
enabled=1
gpgkey=
[root@linux-node1 ~]# yum makecache
[root@linux-node1 /]#  yum install -y gitlab-ce
在安装一个git客户端
[root@linux-node1 /]# yum install -y git
配置并启动gitlab-ce
[root@linux-node1 ~]# gitlab-ctl reconfigure
#时间可能比较长,耐心你等待即可!----
gitlab常用命令:
关闭gitlab:[root@linux-node2 ~]# gitlab-ctl stop
启动gitlab:[root@linux-node2 ~]# gitlab-ctl start
重启gitlab:[root@linux-node2 ~]# gitlab-ctl restart
可以使用gitlab-ctl管理gitlab,例如查看gitlab状态:
[root@linux-node1 /]#  gitlab-ctl status
run: gitlab-workhorse: (pid 7437) 324s; run: log: (pid 7436) 324s
run: logrotate: (pid 7452) 316s; run: log: (pid 7451) 316s
run: nginx: (pid 8168) 2s; run: log: (pid 7442) 318s
run: postgresql: (pid 7293) 363s; run: log: (pid 7292) 363s
run: redis: (pid 7210) 369s; run: log: (pid 7209) 369s
run: sidekiq: (pid 7479) 265s; run: log: (pid 7426) 326s
run: unicorn: (pid 7396) 327s; run: log: (pid 7395) 327s
提示: 我们要保证80端口不被占用
我们可以查看一下端口
[root@linux-node1 /]# gitlab-ctl restart
ok: run: gitlab-workhorse: (pid 8353) 0s
ok: run: logrotate: (pid 8360) 1s
ok: run: nginx: (pid 8367) 0s
timeout: down: postgresql: 0s, normally up, want up
ok: run: redis: (pid 8437) 0s
ok: run: sidekiq: (pid 8445) 0s
ok: run: unicorn: (pid 8450) 0s

[root@linux-node1 /]# lsof -i:80
COMMAND  PID       USER   FD   TYPE DEVICE SIZE/OFF NODE NAME
nginx   8367       root    7u  IPv4  54972      0t0  TCP *:http (LISTEN)
nginx   8368 gitlab-www    7u  IPv4  54972      0t0  TCP *:http (LISTEN)
提示:启动gitlab需要时间!
Web页面提示我们需要设置一个账号密码(我们要设置最少8位数的一个账号密码)我们设置密码为:12345678
第一步:我们关闭自动注册,因为我们内部使用不需要用户自己注册,由运维分配用户即可 ![GM]KM%S0$]FBEAW{QGRG%8Q.png 技术分享](https://s2.51cto.com/wyfs02/M02/99/8E/wKioL1lJzASQIpp4AABdR-xgXoA237.png-wh_500x0-wm_3-wmp_4-s_1225182924.png)
提示:Save在页面最下放!!!!!! 记得点保存!!!!!!!!!!!!
现在在查看首页就没有注册页面了
第二步:我们创建一个用户,在创建一个项目
**提示:**gitlab上面有一个项目跟组的概念,我们要创建一个组,才可以在创建一个项目。因为gitlab的路径上首先是ip地址,其次是组 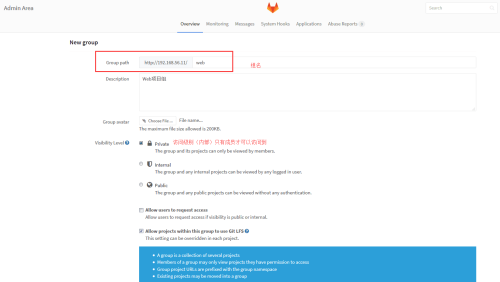
点击下方Create group
然后我们在组里面创建项目
创建完成之后它提示我们可以创建一个key对它进行管理
我们点击上面的README然后我们随便在里面写点东西 ![G`K{THU$FJKJAVE05{MK]{A.jpg 技术分享](https://s4.51cto.com/wyfs02/M02/99/8F/wKioL1lJz4qyDe36AAC3c-LNhTg126.jpg-wh_500x0-wm_3-wmp_4-s_454188293.jpg) 填写完成我们点击前面进行查看
填写完成我们点击前面进行查看
我们要做免密验证,现在去192.168.56.11复制下面的.ssh/id_rsa.pub
[www@linux-node1 ~]$ cat .ssh/id_rsa.pub
ssh-rsa AAAAB3NzaC1yc2EAAAADAQABAAABAQC8wfTSQcSyhlsGYDSUtuxZNb1Gl3VU56nAPuxAEF2wP2ZW
Z2yva354ZdKOOb6rZx2yZxqy5XIj7opBJPbhraXap+NtCH5qWyktR7dH19RBmCS7vUGgvk/5RQC0mVFrC8cz
tBp0M/5HxMuhVir6mD1rhbDvvaLL6S5y4gljzC1Gr2VRHIb4Et9go/38c2tqMjYCike7WWbFRyL9wTal6/14
6+9uREZ/r69TBTKrGuRqF44fROQP8/ly02XFjlXyl6J5NnGTk6AU855pwasX0W9aNPce3Ynrpe1TBTubmfQh
rH1BwteEmg+ZXNRupxjumA+tPWfBUX+u51r/w7W/d4PD www@linux-node1#提示:需要提前做秘钥认证
添加完之后我们就可以使用www用户,就可以拉了
点击Projects 选择SSH,我们要将代码拉去下来
[www@linux-node1 ~]$ cd /deploy/code/
[www@linux-node1 code]$ ls
web-demo
[www@linux-node1 code]$ rm -rf web-demo/
[www@linux-node1 ~]$ git clone  git@linux-node1:web/web-demo.git
Cloning into ‘web-demo‘...
The authenticity of host ‘linux-node1 (192.168.56.11)‘ can‘t be established.
ECDSA key fingerprint is b5:74:8f:f1:03:2d:cb:7d:01:28:30:12:34:9c:35:8c.
Are you sure you want to continue connecting (yes/no)? yes
Warning: Permanently added ‘linux-node1‘ (ECDSA) to the list of known hosts.
remote: Counting objects: 3, done.
remote: Compressing objects: 100% (2/2), done.
remote: Total 3 (delta 0), reused 0 (delta 0)
Receiving objects: 100% (3/3), done.
[www@linux-node1 ~]$ ls web-demo/
README.md
#git clone是克隆的意思
我们来模拟开发继续写代码提交
[www@linux-node1 ~]$ mkdir -p /web-demo
[www@linux-node1 ~]$ vim web-demo/index.html
[www@linux-node1 ~]$ cd web-demo/
[www@linux-node1 web-demo]$
[www@linux-node1 web-demo]$ ls
index.html  README.md
[www@linux-node1 web-demo]$ git add *
[www@linux-node1 web-demo]$ git commit -m "add index.html"
*** Please tell me who you are.
Run
  git config --global user.email "you@example.com"
  git config --global user.name "Your Name"
to set your account‘s default identity.
Omit --global to set the identity only in this repository.
fatal: empty ident name (for <www@linux-node1.(none)>) not allowed
需要身份验证:
[www@linux-node1 web-demo]$ git config --global user.email "you@example.com"
[www@linux-node1 web-demo]$   git config --global user.name "Your Name"
[www@linux-node1 web-demo]$ git commit -m "add index.html"
[master be8a547] add index.html
 1 file changed, 169 insertions(+)
 create mode 100644 index.html
git push命令用于将本地分支的更新,推送到远程主机。它的格式与git pull命令相仿。
[www@linux-node1 web-demo]$ git push
warning: push.default is unset; its implicit value is changing in
Git 2.0 from ‘matching‘ to ‘simple‘. To squelch this message
and maintain the current behavior after the default changes, use:
  git config --global push.default matching
To squelch this message and adopt the new behavior now, use:
  git config --global push.default simple
See ‘git help config‘ and search for ‘push.default‘ for further information.
(the ‘simple‘ mode was introduced in Git 1.7.11. Use the similar mode
‘current‘ instead of ‘simple‘ if you sometimes use older versions of Git)
Counting objects: 4, done.
Delta compression using up to 4 threads.
Compressing objects: 100% (3/3), done.
Writing objects: 100% (3/3), 7.66 KiB | 0 bytes/s, done.
Total 3 (delta 0), reused 0 (delta 0)
To git@linux-node1:web/web-demo.git
   0c1d357..be8a547  master -> master
我们的gitlab安装在opt/gitlab
gitlab配置文件存放在etc/gitlab/gitlab.rb ![J)~253(QRS(T8GL795]DCDX.jpg 技术分享](https://s1.51cto.com/wyfs02/M01/99/8F/wKiom1lJ0t_RMOiDAAChvFKkmGM065.jpg-wh_500x0-wm_3-wmp_4-s_1086221377.jpg) #现在git 需要加上主机名,我们可以修改配置文件,让它使用IP进行访问
#现在git 需要加上主机名,我们可以修改配置文件,让它使用IP进行访问
编辑配置文件
[root@linux-node1 ~]# vim /etc/gitlab/gitlab.rb
external_url ‘

[root@linux-node1 ~]# gitlab-ctl reconfigure
#提示:修改完需要从新配置才会生效
我们从新登陆进行查看 ![48YOI3]8J5%6@TZ})`E)I$H.png 技术分享](https://s4.51cto.com/wyfs02/M02/99/8F/wKiom1lJ0yXyWo_8AABOToLKb0Q162.png-wh_500x0-wm_3-wmp_4-s_2781852605.png) 咦! 为啥还没改呢! 我们从新创建一个项目在试一下
咦! 为啥还没改呢! 我们从新创建一个项目在试一下
友情提示:
关于Git可以查看徐布斯博客 or 廖雪峰Git
DevOps(英文Development(开发)和Operations(技术运营)的组合)是一组过程、方法与系统的统称,用于促进开发(应用程序/软件工程)、技术运营和质量保障(QA)部门之间的沟通、协作与整合。
它的出现是由于软件行业日益清晰地认识到:为了按时交付软件产品和服务,开发和运营工作必须紧密合作
简单的来说DevOps是一种文化,是让开发开发、运维、测试能够之间沟通和交流
自动化运维工具:saltstack、jenkins、等。因为他们的目标一样,为了我们的软件、构建、测试、发布更加的敏捷、频繁、可靠
如果运维对git不熟,是无法做自动化部署。因为所有的项目都受制于开发
Jenkins只是一个平台,真正运作的都是插件。这就是jenkins流行的原因,因为jenkins什么插件都有 Hudson是Jenkins的前身,是基于Java开发的一种持续集成工具,用于监控程序重复的工作,Hudson后来被收购,成为商业版。后来创始人又写了一个jenkins,jenkins在功能上远远超过hudson
Jenkins官网:https://jenkins.io/
安装
安装JDK
Jenkins是Java编写的,所以需要先安装JDK,这里采用yum安装,如果对版本有需求,可以直接在Oracle官网下载JDK。
[root@linux-node1 ~]# yum install -y java-1.8.0
安装jenkins
[root@linux-node1 ~]# cd /etc/yum.repos.d/
[root@linux-node1 yum.repos.d]# wget http://pkg.jenkins.io/redhat/jenkins.repo
[root@linux-node1 ~]# rpm --import http://pkg.jenkins.io/redhat/jenkins.io.key
[root@linux-node1 ~]# yum install -y jenkins
[root@linux-node1 ~]# systemctl start jenkins
#本文使用yum进行安装,大家也可以使用编译安装。
新版本的jenkins为了保证安全,在安装之后有一个锁,需要设置密码之后才可以解锁
Jenkins Web访问地址:192.168.56.11:8080
友情提示:jenkins如果跟gitlab在一台服务器需要将jenkins的端口进行修改,需要将jenkins的8080修改为8081 ![FN30R}[{ZLS5_WKT2Y03]FA.jpg 技术分享](https://s1.51cto.com/wyfs02/M00/99/8F/wKiom1lJ04HSOUpvAACk6sT720k191.jpg-wh_500x0-wm_3-wmp_4-s_285668236.jpg)
[root@linux-node1 ~]# cat /var/lib/jenkins/secrets/initialAdminPassword
490a2f35a2df49b6b8787ecb27122a3a
复制这个文件下面的ID,否则不可以进行安装。
我们选择推荐安装即可
这里就是构建一个项目
可以看到当前登陆用户及用户权限等
任务历史:可以查看到所有构建过的项目的历史 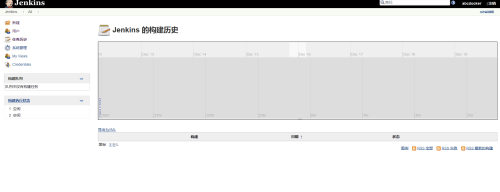 #之所以叫构建,是因为都是java,因为如果不是java程序就没有构建这个词。但是我们也可以把一些工作称之为构建
系统管理:-系统设置
设置Jenkins全局设置&路径
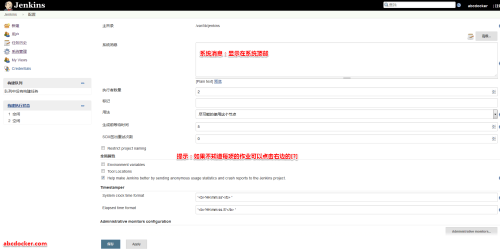
C]3O(JL`ZAQQ7NXD06.png 技术分享](https://s4.51cto.com/wyfs02/M01/99/8F/wKiom1lJ1NGjHUFhAAAnz40yiqQ133.png-wh_500x0-wm_3-wmp_4-s_578733058.png) Jenkins系统管理比较重要的就是
Jenkins系统管理比较重要的就是插件管理了 ![XIXGM@T%$[A`C8]]`[6HOXY.png 技术分享](https://s2.51cto.com/wyfs02/M01/99/90/wKioL1lJ1OGQ1KOWAACy8lOhmyY054.png-wh_500x0-wm_3-wmp_4-s_1101122112.png) #因为jenkins所有的东西都需要靠插件来完成,
#因为jenkins所有的东西都需要靠插件来完成,
我们想安装什么插件,我们可以选择可选插件
查看还可以去jenkins官网下载,然后上传插件 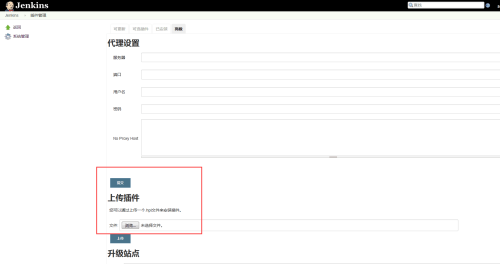 因为很多插件需要翻墙才可以继续下载,jenkins还提供了代理的设置
还是在服务器目录下进行上传插件
目录路径= /var/lib/jenkins/plugins/
这个目录下是我们安装所有的插件
本文出自 “一盏烛光” 博客,谢绝转载!
原文地址:http://yw666.blog.51cto.com/11977292/1940391