标签:des style blog http color os 使用 io strong
[Unity3D入门]入门级游戏项目"坦克狙击手"更新
在上一篇中我分享了一个尚未完全写好的入门级unity3d项目"坦克狙击手"。
本文介绍最新版的"坦克狙击手"相关情况。
需要源代码和发布的Windows版、网页版程序的同学麻烦点个赞留下你的邮箱~

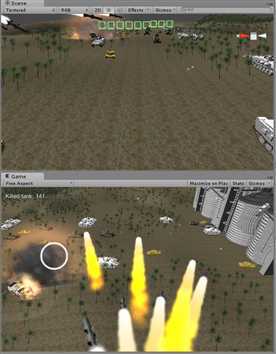
如你所见,我对导弹尾焰的粒子效果进行了调节。这里学到的一个经验是,分析然后模仿现实生活中的物理化学现象,才能做出逼真的效果。一个粒子就是火焰中的一个点。我们都知道蜡烛的火焰分为内焰中焰外焰三层。符合一个粒子从诞生到熄灭、从中心位置到边沿位置、从白色到黄色到金色(颜色方面我就不细琢磨了,毕竟 导弹和蜡烛不完全一样)的变化过程。根据这些知识去设定粒子系统的参数就可以得到比较好的效果。
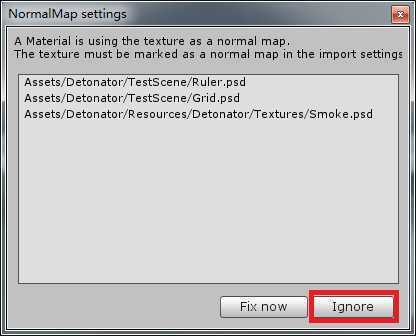
本篇更新的导弹爆炸效果用的是Detonator提供的示例prefab,只稍微调节了一下大小和爆炸时间。Detonator很好用,其效果很赞,包内自带的示例场景Detonator-TestWall和PDF说明文档一目了然。唯一需注意的一点是,导入Detonator包时,在"NormalMap settings"窗口中一定要选择"Ignore"按钮,否则,你会看到爆炸烟雾的正方形边沿,爆炸效果就显得假了。

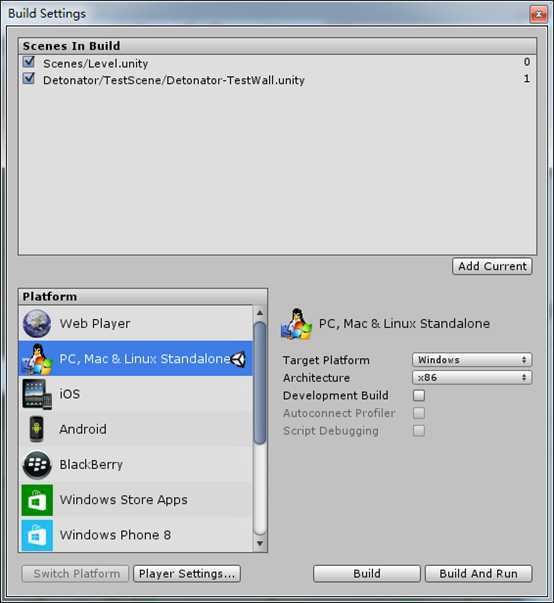
哦对了,发布的时候也要注意一点,就是必须把示例场景Detonator-TestWall也加入到发布列表,否则爆炸效果是无法显示的。原因,暂时不知道。

上一篇中,导弹只能对命中的坦克造成杀伤。这一篇中通过使用"Physics.OverlapSphere()"方法,导弹可以对一定半径范围内的所有坦克造成杀伤,更具真实性。
 1     public float explosionRadius = 10;
 2     public float maxPower = 100;
 3     public float maxForce = 10000;
 4     void OnCollisionEnter(Collision collision) {
 5         var point = collision.contacts[0].point;//获取导弹击中(爆炸)的位置
 6         Collider[] colliders = Physics.OverlapSphere(point, explosionRadius);//获取导弹爆炸范围内所有的碰撞体
 7         Destroy(this.gameObject);//导弹已经不复存在
 8         foreach (Collider hit in colliders) {
 9             if (hit == null) { continue; }
10             if (hit.rigidbody == null) { continue; }
11             if (hit.gameObject.tag != "Tank") { continue; }
12             var tank = hit.gameObject.GetComponent<TankMove>();
13             if (tank != null) {//这个碰撞体是一个坦克
14                 tank.Damage(maxPower);//坦克被杀伤(暂时认为杀伤半径内的杀伤力是相同的,简化计算)
15                 if (tank.hp <= 0) {//坦克挂掉了
16                     hit.rigidbody.AddExplosionForce(maxForce, point, explosionRadius);//坦克被爆炸冲击波冲走
17                 }
18             }
19         }
20         ExplosionEffectHelper.Instance.Explode(ExplosionEffectHelper.ExplosionEffect.MissileExplosion, point);//Detonator爆炸效果
21         SoundEffectHelper.Instance.MakeExplosionSound();//爆炸声音
22     }
PS:在我知道"Physics.OverlapSphere()"这个方法前,我在导弹爆炸后创建了一个Sphere,让它代表导弹爆炸的球形冲击波,通过这个Sphere在膨胀过程中与周边坦克的OnCollisionEnter事件对坦克计算杀伤。这样虽然也有周边杀伤的能力,但是计算冲击波的力量有点繁琐;且爆炸瞬间的杀伤变成了Sphere膨胀若干个帧之后的杀伤,不太真实。
上一篇中,后面速度快的坦克撞上前面速度慢的坦克,它俩就可能飞起来。本篇解决了这个问题。方法如下:

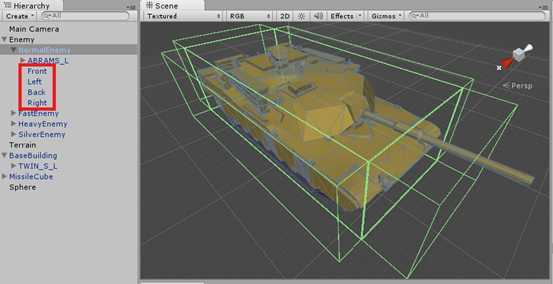
如图所示,在坦克prefab中,在其前后左右分别放置一个Cube,将其包围起来(并取消勾选Cube的Mesh Renderer,选中Is Trigger),做成"围墙"。在坦克prefab前方的Cube(命名为Front)中设置OnTriggerEnter()等方法。
 1     TankMove tankMoveScript;
 2     void Awake() {
 3         this.tankMoveScript = this.GetComponentInParent<TankMove>();
 4     }
 5
 6     void OnTriggerEnter(Collider other)
 7     {    if (other.gameObject.tag == "Back")//other是前面的一辆坦克的“围墙”
 8         {
 9             this.tankMoveScript.SetForward(false);//撞到了前面的坦克的“围墙”,就暂时不要继续走了
10         }
11     }
12
13     void OnTriggerExit(Collider other)
14     {
15         if (other.gameObject.tag == "Back")//other是前面的一辆坦克的“围墙”
16         {
17             this.tankMoveScript.SetForward(true);//前面的坦克走开了,那么我也继续走
18         }
19     }
在坦克prefab后方的Cube(命名为Back)中也设置OnTriggerEnter()等方法。
 1     private GameObject other;
 2     void OnTriggerEnter(Collider other)
 3     {   if (other.gameObject.tag == "Front")//other是后面的一辆坦克的“围墙”
 4         {
 5             this.other = other.gameObject;//我挡住后面的一辆坦克了
 6         }
 7     }
 8
 9     void OnTriggerExit(Collider other)
10     {
11         if (other.gameObject.tag == "Front")
12         {
13             this.other = null;//我不再继续挡着后面那辆坦克了
14         }
15     }
16
17     void OnDestroy() {
18         var o = other;
19         if (o != null) {//要是在我挡住后面一辆坦克的时候,我挂了,我得通知人家
20             o.GetComponentInParent<TankMove>().SetForward(true);
21         }
22     }
例如,我想在屏幕上显示出当前我击杀了多少坦克。
很简单,创建一个脚本"DisplayKilledTankCount.cs",编写代码如下。
1     public int killedTank = 0;
2     void OnGUI() {
3         GUI.Label(new Rect(10, 10, 200, 20), string.Format("Killed tank: {0}", killedTank));
4     }
将这个脚本作为一个component添加到Main Camera上。
在"TankMove.cs"的"Damage()"方法中添加2行代码:
 1     public float hp = 100;
 2     public void Damage(float damageCount) {
 3         hp -= damageCount;
 4         if (hp <= 0) {
 5             this.gameObject.rigidbody.freezeRotation = false;//挂掉了,可以被导弹冲击到任何角度
 6             var display = Camera.main.GetComponent<DisplayKilledTankCount>();
 7             display.killedTank += 1;//击杀的坦克增加1
 8             Destroy(gameObject, 20);
 9         }
10     }
布娃娃效果就是人死的时候会呈现各种姿式,不会像以前一样,跟一棍似的直不楞登一倒~
坦克挂掉了,不应该立即被Destroy()掉,那样太突兀了。我想做的效果是坦克在挂掉时被导弹冲击波击飞,落地,然后掉入地面下消失,然后才Destroy()。
实际上上文中的代码已经顺带显示了如果实现这一效果。
首先,导弹击杀掉坦克的时候,在Damage()方法中设定20秒(经验值)后被Destroy()。
然后,在TankMove.cs中添加字段"deadTime",记录坦克挂掉后经过了多久。在坦克挂掉10秒(经验值)后,我们让坦克具备陷入地下的能力。
 1     private float deadTime = 0;
 2     private bool sinking = false;
 3     // 每帧调用一次,用于更新游戏场景和状态(和物理状态有关的更新应放在FixedUpdate里)
 4     void Update () {
 5         if ((!sinking) && (hp <= 0)) {
 6             deadTime += Time.deltaTime;
 7             if (deadTime >= 10) {
 8                 this.gameObject.collider.isTrigger = true;//这样,物理引擎就不会对坦克生效。(当然,仍会触发OnTriggerXxx()事件)
 9                 sinking = true;
10             }
11         }
12     }
最后,坦克挂掉之后就不应该有动力了。
 1     // 每个固定物理时间间隔(physics time step)调用一次,用于物理状态的更新
 2     void FixedUpdate() {
 3         if (hp <= 0) { return; }//挂了,就别自己动了,随遇而安吧。
 4         if (this.forward) {
 5             this.rigidbody.velocity = new Vector3(0, rigidbody.velocity.y, zSpeed);
 6         }
 7         else {
 8             this.rigidbody.velocity = new Vector3(0, rigidbody.velocity.y, 0);
 9         }
10     }
需要源代码和发布的Windows版、网页版程序的同学麻烦点个赞留下你的邮箱~
感谢美媳妇的理解支持~
标签:des style blog http color os 使用 io strong
原文地址:http://www.cnblogs.com/bitzhuwei/p/unity3d-tank-sniper2.html