标签:activity 调用 font tle 注册 alter margin ted out

一、引入布局
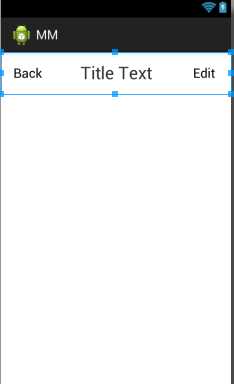
chuangjianyi8ge标题栏布局只需要加入两个Button和TextView,然后在布局中摆放好就可以了。可是这样做却存在一个问题,一般我们的程序中可能有很多活动都需要这样的标题栏,如果在每个活动的布局中都编写一遍同样的代码,明显会导致大量的代码重复,这时可以使用引用布局的方式来解决这个问题
 1 <?xml version="1.0" encoding="utf-8"?>
 2 <LinearLayout xmlns:android="http://schemas.android.com/apk/res/android"
 3     android:layout_width="match_parent"
 4     android:layout_height="wrap_content"
 5      >
 6
 7     <Button
 8         android:id="@+id/layout_diy_button1"
 9         android:layout_width="wrap_content"
10         android:layout_height="wrap_content"
11         android:layout_gravity="center"
12         android:layout_margin="5dip"
13         android:background="@drawable/white"
14         android:text="Back" />
15
16     <TextView
17         android:id="@+id/layout_diy_textView1"
18         android:layout_width="0dp"
19         android:layout_height="wrap_content"
20         android:layout_weight="1"
21         android:layout_gravity="center"
22         android:gravity="center"
23          android:background="@drawable/white"
24         android:textSize="24sp"
25         android:text="Title Text"
26        />
27
28     <Button
29         android:id="@+id/layout_diy_button2"
30         android:layout_width="wrap_content"
31         android:layout_height="wrap_content"
32         android:layout_margin="5dip"
33         android:background="@drawable/white"
34         android:text="Edit" />
35
36 </LinearLayout>
android:layout_margin可以指定此控件距离父View的上下左右距离,如果要单独指定距离父View在某个方向上的偏移距离的话可以使用layout_marginLeft,layout_marginRight
,标题栏布局已经写好了,现在就是如何在程序中使用这个标题栏了
1 <?xml version="1.0" encoding="utf-8"?>
2 <LinearLayout xmlns:android="http://schemas.android.com/apk/res/android"
3     android:layout_width="match_parent"
4     android:layout_height="match_parent">
5   <include layout="@layout/layout_diy"/>
6
7
8 </LinearLayout>
只需要一行<include layout="@layout/xxxx"/>就可以将标题栏导入了,但是别忘了在MainActivity中把系统自带的标题栏隐藏掉,代码如下
1     @Override
2     protected void onCreate(Bundle savedInstanceState) {
3
4         super.onCreate(savedInstanceState);
5         requestWindowFeature(Window.FEATURE_NO_TITLE);
6         setContentView(R.layout.activity_main);
7     }
8

使用这种方式,不论多少布局使用标题栏,只需要一行include语句就可以了。
二、创建自定义控件
引入布局虽然解决了编写重复布局代码的问题,但是如果布局中的控件需要有响应事件,还是需要在不同activity中编写重复的响应事件代码,这种情况最好是使用自定义控件的方式来解决。
新建一个TitleLayout,让它继承自LinearLayout
首先我们重写了LinearLayout 中的带有两个构造参数的构造函数,在TitleLayout控件就会调用这个构造函数,然后在构造函数中需要对标题栏布局进行动态加载,这就要借助LayoutInflater来实现的。通过LayoutInflaterduixiang ,然后调用Infalter()方法就可以动态加载一个布局文件,inflater()方法接受两个参数,第一个参数是要加载的布局文件的id,这里我们传入R.layout.layout_diy,第二个参数是给加载好的布局再添加一个父布局,这里我们想要指定为TileLayout,于是直接传入this
1 public class TitleLayout extends LinearLayout{
2
3     public TitleLayout(Context context, AttributeSet attrs)
4     {
5         super(context, attrs);
6         // TODO Auto-generated constructor stub
7         LayoutInflater.from(context).inflate(R.layout.layout_diy_test  , this);
8 }
9 }
现在自定义控件已经创建好了,然后我们需要在布局文件中添加这个自定义控件,修改activity_main.xml中的代码,如下所示:
 1 <LinearLayout xmlns:android="http://schemas.android.com/apk/res/android"
 2     android:layout_width="match_parent"
 3     android:layout_height="match_parent"
 4     android:orientation="vertical" >
 5
 6      <com.example.mm.TitleLayout
 7         android:layout_width="match_parent"
 8         android:layout_height="wrap_content" >
 9     </com.example.mm.TitleLayout>
10
11 </LinearLayout>
重新运行程序,你会发现此时效果和使用引入布局方式的效果是一样
然后尝试为标题栏中的按钮注册点击事件,修改TitleLayout中的代码,如图
 1 public class TitleLayout extends LinearLayout{
 2
 3     public TitleLayout(Context context, AttributeSet attrs)
 4     {
 5         super(context, attrs);
 6         // TODO Auto-generated constructor stub
 7         LayoutInflater.from(context).inflate(R.layout.layout_diy_test  , this);
 8         Button titleBack=(Button)findViewById(R.id.layout_diy_button1);
 9         Button titleEdit=(Button)findViewById(R.id.layout_diy_button2);
10         titleBack.setOnClickListener(new OnClickListener(){
11
12             @Override
13             public void onClick(View v) {
14
15                 // TODO Auto-generated method stub
16                 ((Activity) getContext()).finish();
17             }
18
19         });
20         titleEdit.setOnClickListener(new OnClickListener(){
21
22             @Override
23             public void onClick(View v) {
24
25                 // TODO Auto-generated method stub
26                 Toast.makeText(getContext(), "You Click Edit button",Toast.LENGTH_SHORT).show();
27             }
28
29         });
30     }
31 }
这样的话,每当们在一个布局中引入TitleLayout,返回按钮和编辑按钮的点击事件就已经自动实现好了,也是省去了很多编写重复代码额工作。
标签:activity 调用 font tle 注册 alter margin ted out
原文地址:http://www.cnblogs.com/yanhuchu/p/7079172.html