标签:target 成功 .so space rest des ges cti pre
zephir-安装和初体验:http://blog.csdn.net/u011142688/article/details/51619811
需要切到工作目录下,也就是utils下,开始编写代码,新建一个文件夹converted,在该文件下执行命令:
zephir init openresty

进入openresty 目录修改json文件
/mnt/hgfs/Linux-Share/thinkphp5-study-line/converted/openresty$ vim config.json

"description": "php openresty extend",
"author": "Tinywan",
当前目录

进入Openresty 目录新建文件

namespace Openresty;
class Redis
{
    public static function init()
    {
        echo "hello Openresty !";
    }
}
当前的目录结构

现在,需要告诉Zephir把我们的项目编译成扩展,这一步要在项目目录下执行:zephir build (要切换到:/mnt/hgfs/Linux-Share/thinkphp5-study-line/converted/openresty 目录下)

编译好的扩展文件在那里来?

修改PHP配置文件:sudo vim /opt/php-7.0.9/etc/php.ini
添加内容:extension=/mnt/hgfs/Linux-Share/thinkphp5-study-line/converted/openresty/ext/modules/openresty.so
重启Nginx和php-fmp 服务器,查看配置信息,以下表示编译成功了
public function test(){
    phpinfo();
}

如何使用?
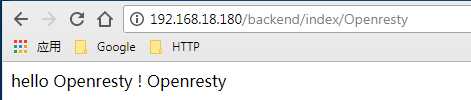
public function Openresty(){
    echo \Openresty\Redis::init(), "\r\n";
    echo "Openresty";
}
标签:target 成功 .so space rest des ges cti pre
原文地址:http://www.cnblogs.com/tinywan/p/7117309.html