为了协助管理系统,Cobbler 可通过 fence scripts 连接到各种电源管理环境。Cobbler 支持 apc_snmp、bladecenter、bullpap、drac、ether_wake、ilo、integrity、ipmilan、ipmitool、lpar、rsa、virsh 和 wti。
除了这些特性,还可使用一个配置管理系统 (CMS)。您有两种选择:该工具内的一个内部系统,或者集成一个现有的外部 CMS,比如 Chef 或 Puppet。借助内部系统,您可以指定文件模板,这些模板会依据配置参数进行处理(与 kickstart 模板的处理方式一样),然后复制到您指定的位置。如果必须自动将配置文件部署到特定机器,那么此功能很有用。
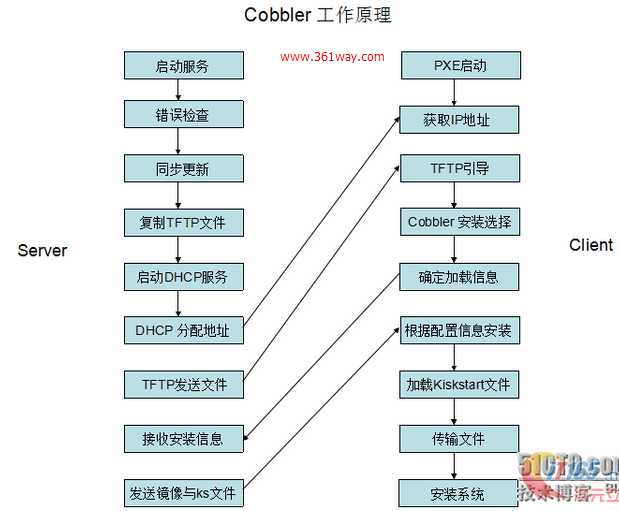
安装环境
3.10.0-514.el7.x86_64
ip: 1.1.1.5
关闭selinux
vi /etc/selinux/config
SELINUX=disabled #修改
:wq! #保存退出
setenforce 0 #使配置立即生效或者重启系统
设置防火墙
开启TCP:80端口、TCP:25151端口、UDP:69端口
[root@localhost app]# firewall-cmd --zone=public --add-port=80/tcp --permanent
success
[root@localhost app]# firewall-cmd --zone=public --add-port=25151/tcp --permanent
success
[root@localhost app]# firewall-cmd --zone=public --add-port=69/udp --permanent
success
[root@localhost cobbler]# firewall-cmd --zone=public --add-port=67/udp --permanent
success
[root@localhost cobbler]# firewall-cmd --zone=public --add-port=68/udp --permanent
success
[root@localhost cobbler]# firewall-cmd --zone=public --add-port=546/udp --permanent
success
[root@localhost cobbler]# firewall-cmd --reload
success
下面开始安装cobbler 依赖的组件有
DHCP xinetd(tftp rsync) http cobbler cobbler_web
安装所需要的组件
添加yum源:
[root@localhost src]# rpm -Uvh epel-release-latest-7.noarch.rpm
安装组件:
[root@localhost src]# yum -y install cobbler tftp tftp-server xinetd dhcp httpd rsync pykickstart debmirror python-ctypes cman cobbler-web fence-agents
配置http服务
[root@localhost dhcp]# systemctl start httpd
[root@localhost dhcp]# systemctl enabled httpd
配置tftp和rsync服务
tftp和rsync服务由xinetd管理
[root@localhost cobbler]# cd /etc/xinetd.d/
[root@localhost xinetd.d]# ls
chargen-dgram daytime-dgram discard-dgram echo-dgram tcpmux-server time-dgram
chargen-stream daytime-stream discard-stream echo-stream tftp time-stream
[root@localhost xinetd.d]# vim tftp
修改
disable = no
理论上这个目录下也该有个rsync文件,并修改disable= no,这里没有也不用理会。
[root@localhost xinetd.d]# systemctl start xinetd
[root@localhost xinetd.d]# systemctl enable xinetd
[root@localhost xinetd.d]# systemctl start tftp
[root@localhost xinetd.d]# systemctl enable tftp
[root@localhost xinetd.d]# systemctl start rsyncd
[root@localhost xinetd.d]# systemctl enable rsyncd
[root@localhost xinetd.d]# ps -ef | grep xinetd
[root@localhost xinetd.d]# ps -ef |grep tftp
[root@localhost xinetd.d]# ps -ef |grep rsync
配置dhcp服务
[root@localhost xinetd.d]# cd /etc/dhcp/
[root@localhost dhcp]# ls
dhclient.d dhcpd6.conf dhcpd.conf
[root@localhost dhcp]# vim dhcpd.conf
[root@localhost dhcp]# mkdir -p backup
[root@localhost dhcp]# cp -a dhcpd.conf backup/
[root@localhost dhcp]# cp -a /usr/share/doc/dhcp*/dhcpd.conf.example ./dhcpd.conf
cp: overwrite ‘./dhcpd.conf’? y
[root@localhost dhcp]# vim dhcpd.conf
这里的配置要和cobbler里的dhcp.template 配置一致
修改如下,删除其他subnet:
subnet 1.1.1.0 netmask 255.255.255.0 { #网段和子网掩码
option routers 1.1.1.5; #网管关
option domain-name-servers 202.106.0.20; #dns服务器
option subnet-mask 255.255.255.0;
range dynamic-bootp 1.1.1.10 1.1.1.30; #分配的地址范围
}
[root@localhost dhcp]# vim dhcpd.conf
[root@localhost dhcp]# systemctl start dhcpd
[root@localhost dhcp]# systemctl enable dhcpd
[root@localhost dhcp]# ps -ef |grep dhcp
配置cobbler
修改配置
# vi /etc/cobbler/setting
‘next_server: 127.0.0.1‘ 替换本机IP地址 (DHCP服务地址)
‘server: 127.0.0.1‘ 替换本机IP地址(cobbler服务地址)
‘manage_dhcp: 0‘ 替换为 1(cobbler管理dhcp,后面用于同步更新配置信息[cobbler sync])
‘manage_rsync: 0‘ 替换为 1 (cobbler管理rsync功能)
修改DHCP模板,确保DHCP分配的地址和Cobbler在同一网段
[root@localhost cobbler]# vim dhcp.template
修改如下,其他暂时默认:
subnet 1.1.1.0 netmask 255.255.255.0 {
option routers 1.1.1.5;
option domain-name-servers 202.106.0.20;
option subnet-mask 255.255.255.0;
range dynamic-bootp 1.1.1.10 1.1.1.30;
[root@localhost cobbler]# systemctl start cobblerd
[root@localhost cobbler]# systemctl enable cobblerd
Created symlink from /etc/systemd/system/multi-user.target.wants/cobblerd.service to /usr/lib/systemd/system/cobblerd.service.
[root@localhost cobbler]# ps -ef |grep cobbler
root 2624 1 3 05:48 ? 00:00:00 /usr/bin/python2 -s /usr/bin/cobblerd -F
root 2651 2437 0 05:48 pts/1 00:00:00 grep --color=auto cobbler
加载部分缺失的网络boot-loaders
此命令需要cobbler和http已经正常启动,否则执行错误
[root@localhost dhcp]# cobbler get-loaders
task started: 2017-07-04_055352_get_loaders
task started (id=Download Bootloader Content, time=Tue Jul 4 05:53:52 2017)
downloading https://cobbler.github.io/loaders/README to /var/lib/cobbler/loaders/README
...省略
downloading https://cobbler.github.io/loaders/grub-0.97-x86_64.efi to /var/lib/cobbler/loaders/grub-x86_64.efi
*** TASK COMPLETE ***
修改debmirror
[root@localhost dhcp]# vim /etc/debmirror.conf
#@dists="sid";
@sections="main,main/debian-installer,contrib,non-free";
#@arches="i386";
修改cobbler的默认密码
用 openssl 生成一串密码后加入到 cobbler 的配置文件(/etc/cobbler/settings)里,替换 default_password_crypted 字段:
# openssl passwd -1 -salt ‘random-phrase-here‘ ‘1234567890‘
$1$random-p$RkqDMTpuNlZZhJ7moLn3Q.
# vi /etc/cobbler/settings
default_password_crypted: "$1$random-p$RkqDMTpuNlZZhJ7moLn3Q."
[root@localhost dhcp]# systemctl restart cobblerd
注意:这里保存的密码,将会用于批量部署机器中,root账户的登录密码。
检查
[root@localhost dhcp]# cobbler check
The following are potential configuration items that you may want to fix:
1 : fencing tools were not found, and are required to use the (optional) power management features. install cman or fence-agents to use them
Restart cobblerd and then run ‘cobbler sync‘ to apply changes.
这个cman总是安装不上,根据提示 安装fence-agents也可以
yum -y install fence-agents
安装完毕后再次检查
[root@localhost dhcp]# cobbler check
No configuration problems found. All systems go. ##一定是检查什么问题都没了才行
[root@localhost dhcp]# cobbler sync
task started: 2017-07-04_061812_sync
task started (id=Sync, time=Tue Jul 4 06:18:12 2017)
running pre-sync triggers
cleaning trees
removing: /var/lib/tftpboot/grub/images
copying bootloaders
trying hardlink /var/lib/cobbler/loaders/pxelinux.0 -> /var/lib/tftpboot/pxelinux.0
trying hardlink /var/lib/cobbler/loaders/menu.c32 -> /var/lib/tftpboot/menu.c32
trying hardlink /var/lib/cobbler/loaders/yaboot -> /var/lib/tftpboot/yaboot
trying hardlink /usr/share/syslinux/memdisk -> /var/lib/tftpboot/memdisk
trying hardlink /var/lib/cobbler/loaders/grub-x86.efi -> /var/lib/tftpboot/grub/grub-x86.efi
trying hardlink /var/lib/cobbler/loaders/grub-x86_64.efi -> /var/lib/tftpboot/grub/grub-x86_64.efi
copying distros to tftpboot
copying images
generating PXE configuration files
generating PXE menu structure
rendering DHCP files
generating /etc/dhcp/dhcpd.conf
rendering TFTPD files
generating /etc/xinetd.d/tftp
cleaning link caches
rendering Rsync files
running post-sync triggers
running python triggers from /var/lib/cobbler/triggers/sync/post/*
running python trigger cobbler.modules.sync_post_restart_services
running: dhcpd -t -q
received on stdout:
received on stderr:
running: service dhcpd restart
received on stdout:
received on stderr: Redirecting to /bin/systemctl restart dhcpd.service
running shell triggers from /var/lib/cobbler/triggers/sync/post/*
running python triggers from /var/lib/cobbler/triggers/change/*
running python trigger cobbler.modules.scm_track
running shell triggers from /var/lib/cobbler/triggers/change/*
*** TASK COMPLETE ***
导入镜像
[root@localhost dhcp]# mkdir -p /systemctl/ios
[root@localhost dhcp]# mkdir -p /systemctl/ios/centos6.8
[root@localhost dhcp]# mkdir -p /systemctl/ios/win7
[root@localhost sources]# mount -o loop CentOS-6.8-x86_64-bin-DVD1.iso /system/ios/centos6.8/
mount: /dev/loop0 is write-protected, mounting read-only
[root@localhost sources]# mount -o loop cn_windows_7_ultimate_with_sp1_x64_dvd_u_677408.iso /system/ios/win7/
mount: /dev/loop1 is write-protected, mounting read-only
[root@localhost sources]# cobbler import --path=/system/ios/centos6.8/ --name=centos6.8 --arch=x86_64
task started: 2017-07-04_070641_import
task started (id=Media import, time=Tue Jul 4 07:06:41 2017)
...省略
*** TASK COMPLETE ***
这里 我想导入多个镜像 也好安装的时候选择安装那个系统 但是总是导入第二个的时候错误,也不知为啥
[root@localhost sources]# cobbler sync
task started: 2017-07-04_073632_sync
task started (id=Sync, time=Tue Jul 4 07:36:32 2017)
...省略
*** TASK COMPLETE ***
[root@localhost sources]# cobbler list
distros:
centos6.8-x86_64
profiles:
centos6.8-x86_64
systems:
repos:
images:
mgmtclasses:
packages:
files:
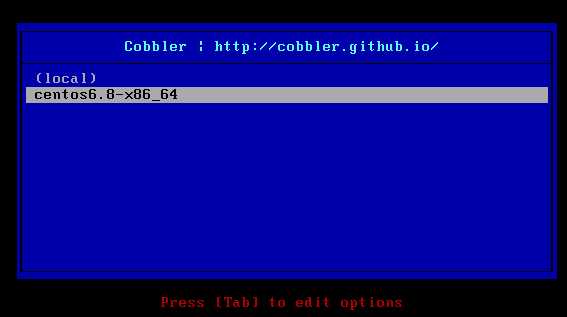
测试
理想的就是导入多个镜像,然后这里可以显示多个镜像,可以进行选择,我想的是如此,有些模糊,或许web页面管理更方便吧
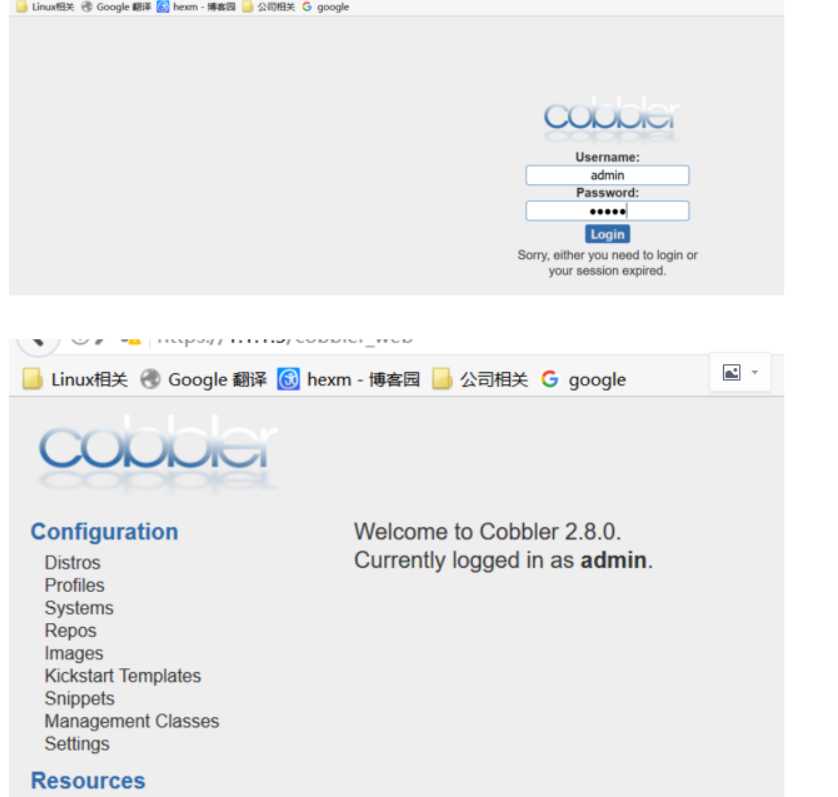
web管理
Cobbler的Web管理模块和命令行模块是可以分开工作的,没有依赖关系。
1. yum -y install django cobbler-web
2.修改配置文件
Web页面默认不允许任何人登录,需要手动修改认证相关配置。
# vim /etc/cobbler/modules.conf
[authentication]
#module = authn_denyall
module = authn_pam
3.创建账户,使其能够登录CobblerWeb页面。
# useradd Cadmin
[root@web tmp]# passwd admin
Changing password for user admin.
New password:
BAD PASSWORD: it is too simplistic/systematic
BAD PASSWORD: is too simple
修改Cobbler的用户配置文件,添加进Cobbler管理组。
# vim /etc/cobbler/users.conf
[admins]
admin = "admin"
cobbler = "admin"
[root@localhost cobbler]# systemctl restart cobblerd
[root@localhost cobbler]# systemctl restart httpd
5.访问 登录
kickstart 自定义安装方法
主要有以下几个步骤:
镜像名:centos6.8-x86_64
自定义文件:/var/lib/cobbler/kickstarts/centos6.8.ks
1. 安装所需组件
yum -y install system-config-kickstart
2.查看要修改的镜像默认使用的自动安装文件
cobbler distro report --name centos6.8-x86_64
3.编辑默认使用的文件或者自定义自动安装文件(我这里是自定义)
自动安装文件样例在后边展示
4.语法检查自定义的自动安装文件
kickstart文件的位置 /var/lib/cobbler/kickstarts
ksvalidator centos6.8.ks(文件名)
5.移除默认自动安装文件
cobbler profile remove --name=centos6.8-x86_64
6.添加自定义的文件
cobbler profile add --name=centos6.8-x86_64 --distro=centos6.8-x86_64 --kickstart=/var/lib/cobbler/kickstarts/centos6.8.ks
cobbler distro report --name centos6.8-x86_64#查看是否修改成功
7.cobbler check && cobbler sync
8.systemctl restart cobblerd
一些小知识点
几个查看的命令
#查看Cobbler列表
cobbler list
cobbler report
cobbler profile report
cobbler distro list # 查看导入列表
cobbler profile report --name CentOS-6.6-x86_64 #查看profile设置
cobbler distro report --name CentOS-6.6-x86_64 #查看安装镜像文件信息
cobbler profile remove --name=CentOS-6.6-x86_64 #移除profile
下面展示 每个查看命令查看的信息
[root@localhost kickstarts]# cobbler list
distros:
centos6.8-x86_64
profiles:
centos6.8-x86_64
systems:
repos:
images:
mgmtclasses:
packages:
fies:
[root@localhost kickstarts]# cobbler distro list
centos6.8-x86_64
[root@localhost kickstarts]# cobbler report
distros:
==========
Name : centos6.8-x86_64
Architecture : x86_64
TFTP Boot Files : {}
Breed : redhat
Comment :
Fetchable Files : {}
Initrd : /var/www/cobbler/ks_mirror/centos6.8-x86_64/images/pxeboot/initrd.img
Kernel : /var/www/cobbler/ks_mirror/centos6.8-x86_64/images/pxeboot/vmlinuz
Kernel Options : {}
Kernel Options (Post Install) : {}
Kickstart Metadata : {‘tree‘: ‘http://@@http_server@@/cblr/links/centos6.8-x86_64‘}
Management Classes : []
OS Version : rhel6
Owners : [‘admin‘]
Red Hat Management Key : <<inherit>>
Red Hat Management Server : <<inherit>>
Template Files : {}
profiles:
==========
Name : centos6.8-x86_64
TFTP Boot Files : {}
Comment :
DHCP Tag : default
Distribution : centos6.8-x86_64
Enable gPXE? : 0
Enable PXE Menu? : 1
Fetchable Files : {}
Kernel Options : {}
Kernel Options (Post Install) : {}
Kickstart : /var/lib/cobbler/kickstarts/sample_end.ks
Kickstart Metadata : {}
Management Classes : []
Management Parameters : <<inherit>>
Name Servers : []
Name Servers Search Path : []
Owners : [‘admin‘]
Parent Profile :
Internal proxy :
Red Hat Management Key : <<inherit>>
Red Hat Management Server : <<inherit>>
Repos : []
Server Override : <<inherit>>
Template Files : {}
Virt Auto Boot : 1
Virt Bridge : xenbr0
Virt CPUs : 1
Virt Disk Driver Type : raw
Virt File Size(GB) : 5
Virt Path :
Virt RAM (MB) : 512
Virt Type : kvm
systems:
==========
repos:
==========
images:
==========
mgmtclasses:
==========
packages:
==========
files:
==========
下面的命令列出了 可用的镜像对应的自动安装文件
可以自定义这个文件,或者自己指定用那个文件自动安装
[root@localhost kickstarts]# cobbler profile report
Name : centos6.8-x86_64
TFTP Boot Files : {}
Comment :
DHCP Tag : default
Distribution : centos6.8-x86_64
Enable gPXE? : 0
Enable PXE Menu? : 1
Fetchable Files : {}
Kernel Options : {}
Kernel Options (Post Install) : {}
Kickstart : /var/lib/cobbler/kickstarts/sample_end.ks
Kickstart Metadata : {}
Management Classes : []
Management Parameters : <<inherit>>
Name Servers : []
Name Servers Search Path : []
Owners : [‘admin‘]
Parent Profile :
Internal proxy :
Red Hat Management Key : <<inherit>>
Red Hat Management Server : <<inherit>>
Repos : []
Server Override : <<inherit>>
Template Files : {}
Virt Auto Boot : 1
Virt Bridge : xenbr0
Virt CPUs : 1
Virt Disk Driver Type : raw
Virt File Size(GB) : 5
Virt Path :
Virt RAM (MB) : 512
Virt Type : kvm
cobbler profile add --name=CentOS-6.6-x86_64 --distro=CentOS-6.6-x86_64 --kickstart=/var/lib/cobbler/kickstarts/CentOS-6.6-x86_64.ks #添加
cobbler profile edit --name=CentOS-6.6-x86_64 --distro=CentOS-6.6-x86_64 --kickstart=/var/lib/cobbler/kickstarts/CentOS-6.5-x86_64.ks #编辑
命令:cobbler profile add|edit|remove --name=安装引导名 --distro=系统镜像名 --kickstart=kickstart自动安装文件路径
参数说明:
--name:自定义的安装引导名,注意不能重复
--distro:系统安装镜像名,用cobbler distro list可以查看
--kickstart:与系统镜像文件相关联的kickstart自动安装文件(此文件必须预先准备好 )
更多命令参数可执行cobbler --help查看
以下有借鉴网上的
kickstart文件示例详解
Linux安装过程详解及kickstart文件示例详解
linux安装大致可以分为2个阶段
第一阶段:anaconda
第二阶段:installinstall阶段系统会按照anaconda阶段设定的参数自动安装,这里主要要说的是anaconda阶段,此阶段是linux的预安装环境,提供linux安装选项的一个接口,可以将它比作是window中的PE环境
anaconda有两种模式:交互式和非交互式
交互式就和普通安装一样,按照提示选择选项一步步的安装
非交互式则通过读取kickstart文件的配置,进行自动安装,这和window中的无人值守安装差不多的,这个文件即是ks.cfg文件(相当于window中的wi2k3.sif应答文件)
而在安装linux过程中,获取ks.cfg文件的方式有多种,如直接在cdrom中获取,常见的形式还有http,ftp,nfs等方式
格式有三种:
cdrom和硬盘
ks=cdrom:/dir/ks.cfg(硬盘的话把cdrom换成hd即可,下面的类似)
http和ftp
ks=http://domain.com/dir/ks.cfg
NFS
ks=nfs:domain.com:/dir/ks.cfg
三种格式主要区分在于后面的斜杠,这里要注意区分
在使用ks.cfg之前,需要先引导启动环境
引导方式有很多,cdromkeyboard us # 键盘类型设定 lang en_US # 语言设定 timezone [--utc] Asia/Shanghai # 时区选择 reboot | poweroff | halt # 系统安装完成后的操作(重启或关机) selinux --disabled | --permissive # 是否启用 selinux authconfig --useshadow --passalgo=sha512 # 系统的认证方式,这里选择密码认证,加密算法为 sha512 rootpw --iscrypted .... # 加密后的 root 密码 bootloader --location=mbr --driveorder=sda # bootloader 的安装位置,这里选择安装至 mbr 中,usb,PXE等。
在引导进入anaconda后,即可通过读取ks.cfg来进行系统的自动安装
这里开始说说kickstart文件的大致内容
ks.cfg文件组成大致分为3段
1.命令段:
键盘类型,语言,安装方式等系统的配置,有必选项和可选项,如果缺少某项必选项,安装时会中断并提示用户选择此项的选项
2.软件包段:
%packages
@groupname:指定安装的包组
package_name:指定安装的包
-package_name:指定不安装的包
在安装过程中默认安装的软件包,安装软件时会自动分析依赖关系。
3.脚本段(可选):
%pre:预安装脚本(由于只依赖于启动镜像,支持的命令很少)
%post:后安装脚本(基本支持所有命令)
而具体的ks.cfg文件的配置,我们只需要在已经安装好的linux的root家目录找到anaconda_ks.cfg(这个ks文件就是在安装linux后,根据用户的安装选项自动生成的)
命令段
命令段分为必备命令和可选命令。
必选命令
keyboard us # 键盘类型设定 lang en_US # 语言设定 timezone [--utc] Asia/Shanghai # 时区选择 reboot | poweroff | halt # 系统安装完成后的操作(重启或关机) selinux --disabled | --permissive # 是否启用 selinux authconfig --useshadow --passalgo=sha512 # 系统的认证方式,这里选择密码认证,加密算法为 sha512 rootpw --iscrypted .... # 加密后的 root 密码 bootloader --location=mbr --driveorder=sda # bootloader 的安装位置,这里选择安装至 mbr 中
可选命令
install | upgrade # 安装/升级 操作系统 url --url=.... # 指明通过远程主机的 FTP 或 HTTP 路径来安装系统 firewall --disabled | --enabled # 是否开启防火墙 firstboot --disabled | --enabled # 系统第一次启动后是否进行用户配置 text | graphical # 安装界面为 文本/图形 clearpart --linux | --all # 安装前清除系统的哪些分区,--all 表示清除所有分区 zerombr # 使用 clearpart --all 时,需要加上这个选项,否则安装过程会被暂停,需要手动选择 part # 分区设定 part swap --size=2048 # 对 swap 进行分区的示例 part /boot --fstype ext4 --size=100000 # 对 /boot 进行分区的示例 part pv.<id> --size=... # 创建一个 PV volgroup vgname pvname # 创建 VG logval /home --fstype ext4 --name=home --vgname=vgname --size=1024 # 创建一个逻辑卷的示例 %include # 可以将其他文件的内容包含进 kickstart 文件中来,包含的文件必须是安装系统过程中能够访问的
软件包选择段
这里定义安装系统需要安装的软件包,@开头的表示包组,也可以指定单个包名,如:
%packages @Base @Core @base @basic-desktop @chinese-support @client-mgmt-tools @core @desktop-platform @fonts @general-desktop @graphical-admin-tools @legacy-x @network-file-system-client @perl-runtime @remote-desktop-clients @x11 lftp tree %end
脚本段
脚本分配安装前脚本和安装后脚本
%pre 表示安装前脚本,此时的 Linux 系统环境为微缩版环境,脚本应尽可能简单
这里的脚本通常用于查询一些系统信息,然后根据这些信息动态的设定安装配置,例如使用下面的脚本
%pre # 设置分区的配置,配置 swap 大小为和 内存大小一样 #!/bin/sh act_mem=`cat /proc/meminfo | grep MemTotal | awk ‘{printf("%d",$2/1024)}‘` echo "" > /tmp/partition.ks echo "clearpart --all --initlabel" >> /tmp/partition.ks echo "part /boot --fstype=ext3 --asprimary --size=200" >> /tmp/partition.ks echo "part swap --fstype=swap --size=${act_mem}" >> /tmp/partition.ks echo "part / --fstype=ext3 --grow --size=1" >> /tmp/partition.ks %end
这个脚本在安装系统之前执行,它查询了系统的内存大小,并根据内存大小生成分区指令,存放在 /tmp/partitoin.ks 文件中。
然后在 kickstart 文件中包含这个 partition.ks 文件,就可以动态的设置分区大小了:
%include /tmp/partitions.ks
%post 表示安装后脚本,此时的 Linux 系统环境为已经安装完成的系统。