标签:force replica 创建 nbsp 登陆 收缩 服务 port 删除
第一:安装依赖包:
yum install libibverbs librdmacm xfsprogs nfs-utils rpcbind libaio liblvm2app lvm2-devel libevent-devel nfs-utils-lib-devel tcl-devel libsysfs-devel userspace-rcu atop iozone fio iperf
yum install glusterfs glusterfs-server glusterfs-fuse
# yum install glusterfs-3.7.9-12 glusterfs-server-3.7.8-1.el7.x86_64
yum -y install glusterfs glusterfs-client
/etc/init.d/glusterd start
chkconfig glusterd on
登陆服务器server1,执行命令
[root@server1 yum.repos.d]# gluster peer probe server2
[root@server1 yum.repos.d]# gluster peer probe server3
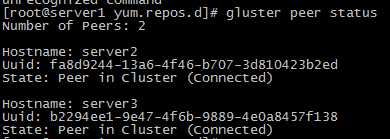
使用 gluster peer status 查看状态
1.确定创建卷的类型
2.去创建卷的brick列表
3.确定创建卷的网络类型(TCP/RDMA)
4.gluster volume create 创建复制卷,至少2台主机
卷里使用2台主机
gluster volume create testvol replica 3 server1:/brick1/images server2:/brick1/images
#分布式复制glusterfs卷,至少4台主机
#gluster volume create fengvol replica 2 transport tcp judge1:/data/feng judge2:/data/feng graph1:/data/feng graph2:/data/feng force
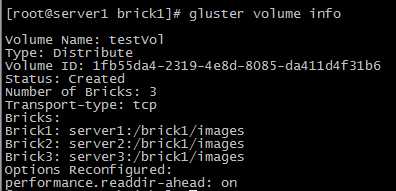
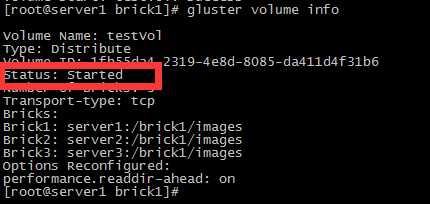
查看volume 卷信息
为硬盘访问设置权限:
Gluster volume set testVol auth.allow 172.16.1.*
启动创建的卷
gluster volume start testVol
查看卷的扩展属性
getfattr -d -m . -e hex /brick1/images

客户端挂载
mount -t glusterfs glusterfs1:/testvol /data
cat /etc/fstab
glusterfs1:/testvol /data glusterfs defaults 0 0
查看卷
Gluster volume info
删除卷
gluster volume stop testvol
gluster volume delete testvol
将机器移出集群
gluster peer detach 172.28.26.102
只允许172.28.0.0的网络访问glusterfs
gluster volume set testvol auth.allow 172.28.26.*
加入新的机器并添加到卷里(由于副本数设置为2,至少要添加2(4、6、8..)台机器)
gluster peer probe 172.28.26.105
gluster peer probe 172.28.26.106
gluster volume add-brick testvol 172.28.26.105:/data/gluster 172.28.26.106:/data/gluster
收缩卷
# 收缩卷前gluster需要先移动数据到其他位置
gluster volume remove-brick testvol 172.28.26.101:/data/gluster/testvol 172.28.26.102:/data/gluster/testvol start
# 查看迁移状态
gluster volume remove-brick testvol 172.28.26.101:/data/gluster/testvol 172.28.26.102:/data/gluster/testvol status
# 迁移完成后提交
gluster volume remove-brick testvol 172.28.26.101:/data/gluster/testvol 172.28.26.102:/data/gluster/testvol commit
迁移卷
# 将172.28.26.101的数据迁移到,先将172.28.26.107加入集群
gluster peer probe 172.28.26.107
gluster volume replace-brick testvol 172.28.26.101:/data/gluster/testvol 172.28.26.107:/data/gluster/testvol start
# 查看迁移状态gluster volume replace-brick testvol 172.28.26.101:/data/gluster/testvol 172.28.26.107:/data/gluster/testvol status
# 数据迁移完毕后提交gluster volume replace-brick testvol 172.28.26.101:/data/gluster/testvol 172.28.26.107:/data/gluster/testvol commit
# 如果机器172.28.26.101出现故障已经不能运行,执行强制提交然后要求gluster马上执行一次同步
gluster volume replace-brick testvol 172.28.26.101:/data/gluster/testvol 172.28.26.102:/data/gluster/testvol commit -force
gluster volume heal testvol s full
移除集群 gluster peer detach server3
标签:force replica 创建 nbsp 登陆 收缩 服务 port 删除
原文地址:http://www.cnblogs.com/fengjian2016/p/7155155.html