标签:pre exp image demo1 ice 创建 输入 报价 中间人
一、输入属性(父组件与子组件通信)
1. 创建工程
ng new demo1
2.创建order组件
ng g component corder
3. 在order组件里定义输入属性
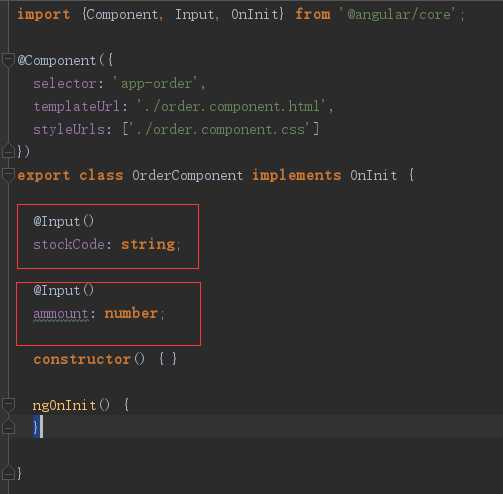
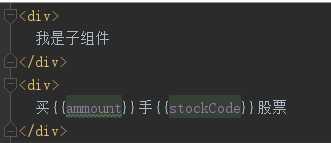
order组件的html
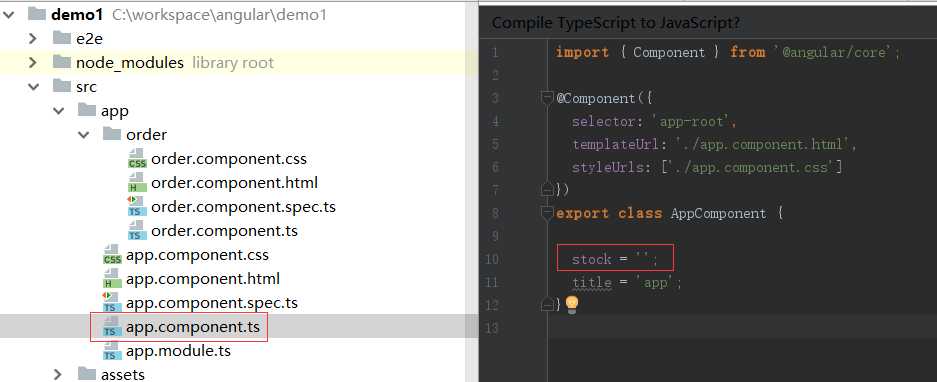
4. 父组件
app.component.ts中定义stock
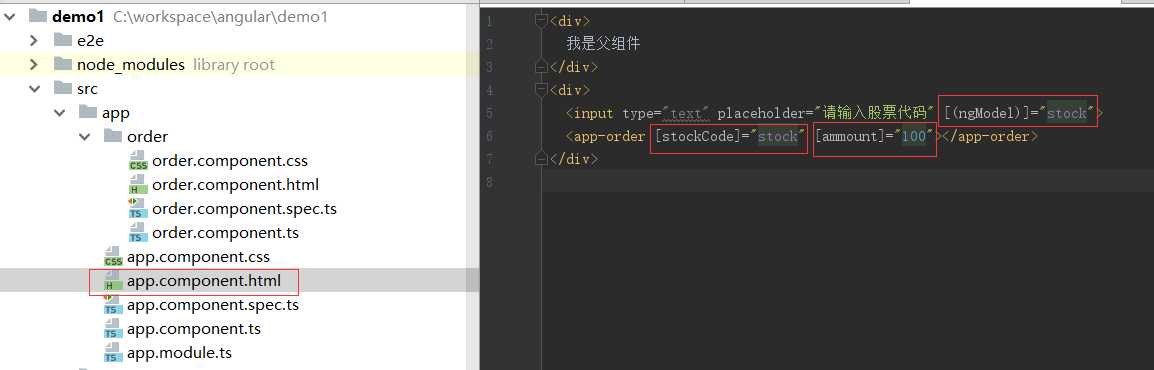
app.component.html, 采用双向绑定
效果图
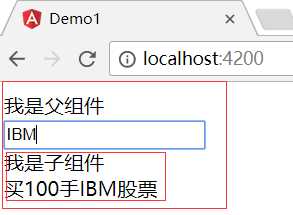
最终父组件IBM的值,通过输入属性,把值传递给了子组件
二、输出属性(子组件与父组件通信)
1. ng g component priceQutoe 创建报价组件
2. 定义报价组件控制器
import {Component, EventEmitter, OnInit, Output} from ‘@angular/core‘;


@Component({
  selector: ‘app-price-quote‘,
  templateUrl: ‘./price-quote.component.html‘,
  styleUrls: [‘./price-quote.component.css‘]
})
export class PriceQuoteComponent implements OnInit {

  stockCode: string = ‘IBM‘;
  price: number;

  @Output(‘priceChange‘)
  lastPrice: EventEmitter<PriceQuote> = new EventEmitter();

  constructor() {
    setInterval(() => {
      let priceQuote: PriceQuote = new PriceQuote(this.stockCode, 100 * Math.random());
      this.price = priceQuote.lastPrice;
      this.lastPrice.emit(priceQuote);
    }, 1000);
  }

  ngOnInit() {
  }

}

export class PriceQuote {
  constructor(public  stockCode: string,
              public  lastPrice: number) {
  }
}
3. 定义报价组件html
<p>
  这里是报价组件
</p>
<div>
  股票代码是{{stockCode}}, 股票价格是{{price | number:‘2.2-2‘}}
</div>
4. 父组件控制器
import { Component } from ‘@angular/core‘;
import {PriceQuote} from ‘./price-quote/price-quote.component‘;

@Component({
  selector: ‘app-root‘,
  templateUrl: ‘./app.component.html‘,
  styleUrls: [‘./app.component.css‘]
})
export class AppComponent {

  stock = ‘‘;
  title = ‘app‘;

  priceQuote: PriceQuote = new PriceQuote(‘‘, 0);

  priceQutoehandler(event: PriceQuote){
    this.priceQuote = event;
  }
}
5. 父组件html
<div>
  我是父组件
</div>
<app-price-quote (priceChange)="priceQutoehandler($event)"></app-price-quote>
<div>
  这是在报价组件外部,股票代码是{{priceQuote.stockCode}},
  股票价格是{{priceQuote.lastPrice | number:‘2.2-2‘}}
</div>
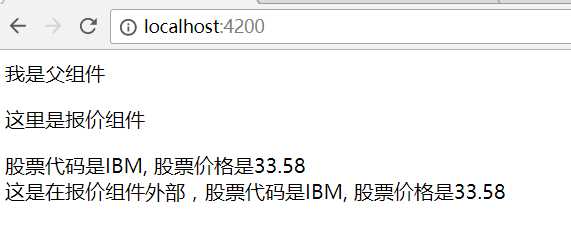
6.效果图
三、中间人模式
当另个组件不是父子组件关系时,需要两个共同的父组件,这个父组件就是中间人模式
中间人模式同时使用了输入属性和输出属性
1. 报价组件定义
import {Component, EventEmitter, OnInit, Output} from ‘@angular/core‘;


@Component({
  selector: ‘app-price-quote‘,
  templateUrl: ‘./price-quote.component.html‘,
  styleUrls: [‘./price-quote.component.css‘]
})
export class PriceQuoteComponent implements OnInit {

  stockCode: string = ‘IBM‘;
  price: number;

  //@Output(‘priceChange‘)
  //lastPrice: EventEmitter<PriceQuote> = new EventEmitter()

  @Output()
  buy: EventEmitter<PriceQuote> = new EventEmitter();

  constructor() {
    setInterval(() => {
      const priceQuote: PriceQuote = new PriceQuote(this.stockCode, 100 * Math.random());
      this.price = priceQuote.lastPrice;
      //this.lastPrice.emit(priceQuote);
    }, 1000);
  }

  buyStock(event) {
      this.buy.emit(new PriceQuote(this.stockCode, this.price));
  }


  ngOnInit() {
  }

}

export class PriceQuote {
  constructor(public  stockCode: string,
              public  lastPrice: number) {
  }
}
2. 报价组件html
<p>
  这里是报价组件
</p>
<div>
  股票代码是{{stockCode}}, 股票价格是{{price | number:‘2.2-2‘}}
</div>
<div>
  <input type=‘button‘ value=‘立即购买‘ (click)="buyStock($event)">
</div>
3.订单组件控制器
import {Component, Input, OnInit} from ‘@angular/core‘;
import {PriceQuote} from "../price-quote/price-quote.component";

@Component({
  selector: ‘app-order‘,
  templateUrl: ‘./order.component.html‘,
  styleUrls: [‘./order.component.css‘]
})
export class OrderComponent implements OnInit {

  @Input()
  priceQutoe: PriceQuote;

  constructor() { }

  ngOnInit() {
  }

}
4. 订单组件html
<div>
  我下单组件
</div>
<div>
  买100手{{priceQutoe.stockCode}}股票,买入价为{{priceQutoe.lastPrice | number:‘2.2-2‘}}
</div>
5. 父组件的控制器
import { Component } from ‘@angular/core‘;
import {PriceQuote} from ‘./price-quote/price-quote.component‘;

@Component({
  selector: ‘app-root‘,
  templateUrl: ‘./app.component.html‘,
  styleUrls: [‘./app.component.css‘]
})
export class AppComponent {

  stock = ‘‘;

  priceQuote: PriceQuote = new PriceQuote(‘‘, 0);

  priceQutoehandler(event: PriceQuote){
    this.priceQuote = event;
  }

  buyHandler(event: PriceQuote) {
    this.priceQuote = event;
  }
}
6.父组件的html
<div>
  我是父组件
</div>
<app-price-quote (buy)="buyHandler($event)"></app-price-quote>
<app-order [priceQutoe]="priceQuote"></app-order>
7.效果图
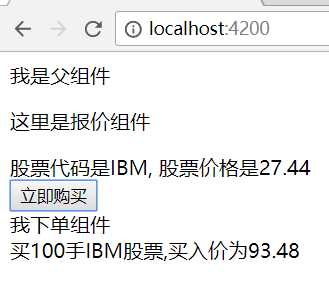
当点击“立即购买”时,显示当时的显示价格。
标签:pre exp image demo1 ice 创建 输入 报价 中间人
原文地址:http://www.cnblogs.com/linlf03/p/7257929.html