标签:通过 本地仓库 cal 配置系统 images blog host work 快速
1、maven安装
首先下载apache-maven-3.3.3-bin.zip(版本可以自己根据自己想要的下载)。
解压后如下:

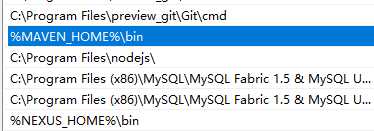
接下来配置系统环境变量:


到此,maven安装好了,接下来输入 mvn -v查看maven是否安装成功。

2、settings.xml文件与实际项目中pom.xml文件配置的关联讲解
在settings.xml文件中
//这是本地仓库路径,管理本地的jar包
<localRepository>D:\SPOC\repository</localRepository>
//这是访问私服的账户配置
<servers>
<server>
<id>nexus-releases</id>
<username>deployment</username>
<password>deployment123</password>
</server>
<server>
<id>nexus-snapshots</id>
<username>deployment</username>
<password>deployment123</password>
</server>
</servers>
<profiles>
<profile>
<id>lifeng</id>
<activation>
<activeByDefault>false</activeByDefault>
<!-- 我这里采用的是JDK1.8,请根据自己本地的版本配置相应的参数 -->
<jdk>1.8</jdk>
</activation>
<repositories>
<!--私有库地址-->
<repository>
<id>nexus</id>
<url>http://localhost:8081/nexus/content/groups/public</url>
<releases>
<enabled>true</enabled>
</releases>
<snapshots>
<enabled>true</enabled>
</snapshots>
</repository>
</repositories>
<pluginRepositories>
<!--插件库地址-->
<pluginRepository>
<id>nexus</id>
<url>http://localhost:8081/nexus/content/groups/public</url>
<releases>
<enabled>true</enabled>
</releases>
<snapshots>
<enabled>true</enabled>
</snapshots>
</pluginRepository>
</pluginRepositories>
</profile>
</profiles>
3、接下来主要说一下项目中pom.xml文件的配置:
<distributionManagement>
<repository>
<id>releases</id>
<name>Nexus Release Repository</name>
<url>http://localhost:8081/nexus/content/repositories/releases/</url>
</repository>
<snapshotRepository>
<id>snapshots</id>
<name>Nexus Snapshot Repository</name>
<url>http://localhost:8081/nexus/content/repositories/snapshots/</url>
</snapshotRepository>
</distributionManagement>
此配置中的两个id标签名称需要与settings.xml文件中<servers>标签中的两个id标签名称对应一致,因为这是对应登录私服的账户,否则在把maven工程打成jar包的过程中会失败。并且通过此配置可以把工程打成jar包后对应的发布到私服中。
4、maven工程打jar包
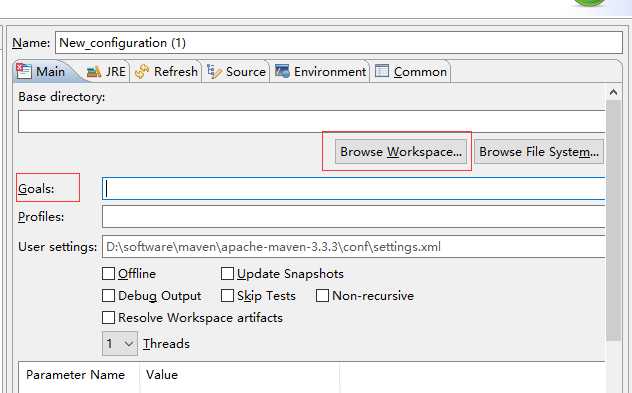
右键工程---->run as ----> run configurations
然后选择 maven build, 右键-->新建

点击Beswse Workspace选择需要打包的maven工程, 在Golas 中输入 clean install deploy ,
然后点击apply应用,最后点击run进行运行。成功后就会把此jar包打到私服中去。
标签:通过 本地仓库 cal 配置系统 images blog host work 快速
原文地址:http://www.cnblogs.com/liysoftware/p/7274868.html