标签:端口 padding alias https github 开发环境 更新 一点 组件
上一篇《Vue开发环境搭建及热更新》,我们讲解了vue开发环境的搭建还有一些小问题,接下来我们来讲解一下这个界面是如何形成的。
在开始讲之前,我们先来看看我们上一篇所谓的项目目录里面到底放着什么。
1.index.html文件入口 ;
2.src放置组件和入口文件 ;
3.node_modules为依赖的模块 ;
4.config中配置了路径端口值等;
5.dist是存放打包之后的东西;
6.build中配置了webpack的基本配置、开发环境配置、生产环境配置等。
我们先从src文件夹开始说起

我们先进入src,在src目录下输入ls,ls是查看当前目录的命令行。我们发现src文件夹里面有App.vue文件,assets文件夹,components文件夹,main.js文件,还有router文件夹。
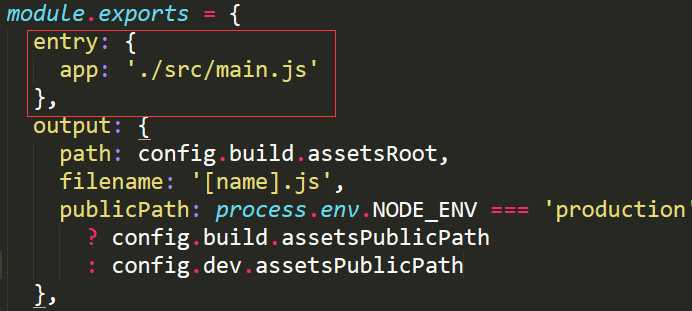
看过前一篇推荐的慕课网视频我们就知道,项目的打包需要一个入口文件,那这个入口文件在哪里呢?在build目录下,有一个webpack.base.conf.js文件,里面有这么一段代码。

entry定义的就是入口文件,我们可以看到src目录下的main.js文件就是入口文件。App.vue是主组件,所有组件都是在App.vue下进行切换的。components文件夹就是存放组件的地方,像我们这个项目,里面就只是存放着一个Hello组件(关于vue组件的相关知识,这里推荐一位大神keepfool的博客,有两篇,这里链接的是上篇),assets文件夹存放的是图片,router文件夹存放的是路由(关于vue-router的相关知识,keepfool大神也有相关的文章)。
该文件夹下面只有Hello.vue这个文件。一个.vue文件包含三个部分<template><script><stype>。现在的项目基本都用ES6的写法(ES6的优势在于模块化Module,当然这只是其中一个优势,估计以后会慢慢的变ES6为主流),虽然vue的官方文档还是用ES5的语法,但是这种ES6写法慢慢看还是看得懂的。
Hello.vue
<template>
  <div class="hello">
    <h1>{{ msg }}</h1>
    <h2>Essential Links</h2>
    <ul>
      <li><a href="https://vuejs.org" target="_blank">Core Docs</a></li>
      <li><a href="https://forum.vuejs.org" target="_blank">Forum</a></li>
      <li><a href="https://gitter.im/vuejs/vue" target="_blank">Gitter Chat</a></li>
      <li><a href="https://twitter.com/vuejs" target="_blank">Twitter</a></li>
      <br>
      <li><a href="http://vuejs-templates.github.io/webpack/" target="_blank">Docs for This Template</a></li>
    </ul>
    <h2>Ecosystem</h2>
    <ul>
      <li><a href="http://router.vuejs.org/" target="_blank">vue-router</a></li>
      <li><a href="http://vuex.vuejs.org/" target="_blank">vuex</a></li>
      <li><a href="http://vue-loader.vuejs.org/" target="_blank">vue-loader</a></li>
      <li><a href="https://github.com/vuejs/awesome-vue" target="_blank">awesome-vue</a></li>
    </ul>
  </div>
</template>

<script>
export default {
  name: ‘hello‘,
  data () {
    return {
      msg: ‘Welcome to Your Vue.js App‘
    }
  }
}
</script>

<!-- Add "scoped" attribute to limit CSS to this component only -->
<style scoped>
h1, h2 {
  font-weight: normal;
}

ul {
  list-style-type: none;
  padding: 0;
}

li {
  display: inline-block;
  margin: 0 10px;
}

a {
  color: #42b983;
}
</style>
<template>标签里面有个class为hello的div,在<script>里面的name也为hello,在这里这两者之间没有什么联系,就算把class=“hello”删掉,结果还是一样(可以试试看)。
在ES5中,有一种写法和<template>类似,那就是<script>标签:
<!--HTML-->
<div id="app">
    <my-component></my-component>
</div>
<script type="text/x-template" id="myComponent">
    <div>Hello world</div>
</script>
<!--Js-->
Vue.component(‘my-component‘,{template:‘#myComponent‘})
new Vue({el:‘#app‘})//挂载到id为app的div上
<script>将<div>Hello world</div>替换到<my-component>的位置。使用<script>标签时,设置type意在告诉浏览器这不是一段js脚本,然后将这个元素的HTML作为模板进行编译。用<template>的写法是这样的
<!--HTML-->
<div id="app">
    <my-component></my-component>
</div>
<template id="myComponent">
    <div>Hello world</div>
</template>
<!--Js-->
Vue.component(‘my-component‘,{template:‘#myComponent‘})
new Vue({el:‘#app‘})//挂载到id为app的div上
用起来其实差不多。
组件里面的data,要写为函数的形式
data () {
    return {
      msg: ‘Welcome to Your Vue.js App‘
    }
  }
否则写成以下的形式会出错
data:{
    msg: ‘Welcome to Your Vue.js App‘
  }
这一点在vue的官网中,data必须是函数小节也有提到。
我们会发现<style>标签里面还有个小东西,叫做scoped,加入这个词有什么作用呢?
在vue组件中我们我们经常需要给style添加scoped来使得当前样式只作用于当前组件的节点。
<template>
  <div id="app">
    <img src="./assets/logo.png">
    <router-view></router-view>
  </div>
</template>

<script>
export default {
  name: ‘app‘
}
</script>

<style>
#app {
  font-family: ‘Avenir‘, Helvetica, Arial, sans-serif;
  -webkit-font-smoothing: antialiased;
  -moz-osx-font-smoothing: grayscale;
  text-align: center;
  color: #2c3e50;
  margin-top: 60px;
}
</style>
在<template>里面,我们发现了一个标签<router-view>,通过我们在网页上的比对,我们可以知道<img>图片下面就是我们刚刚分析得半死的hello组件。那为什么它会变成了<router-view>,这就是路由的作用。在页面上使用<router-view></router-view>标签,它用于渲染匹配的组件。那怎么知道<router-view>代表的就是hello组件。接着下一点就是原因。
import Vue from ‘vue‘
import Router from ‘vue-router‘
import Hello from ‘@/components/Hello‘

Vue.use(Router)

export default new Router({
  routes: [
    {
      path: ‘/‘,
      name: ‘Hello‘,
      component: Hello
    }
  ]
})
首先它导入了vue模块,引入了vue-router插件,还有components目录下的Hello.vue(此处省略了.vue后缀,效果一样)。从export default开始都是配置使用路由的,当途径为“/”的时候,就显示hello组件(这些语法在keepfool大神的博客都有提到)。我们刚刚打开时候的页面,地址栏显示的地址是http://localhost:8080/#/,后面这个横杠,匹配的就是hello组件,所以前一节<router-view>代表的就是hello组件。在地址栏中,“/”是默认加上去的,也就是说,就算你在输入地址的时候,不给它加上“/”,只有http://localhost:8080/#这样,回车之后也会自动加上。
前面我们知道了,入口文件是main.js
// The Vue build version to load with the `import` command
// (runtime-only or standalone) has been set in webpack.base.conf with an alias.
import Vue from ‘vue‘
import App from ‘./App‘
import router from ‘./router‘

Vue.config.productionTip = false

/* eslint-disable no-new */
new Vue({
  el: ‘#app‘,
  router,
  template: ‘<App/>‘,
  components: { App }
})
首先导入vue模块,导入App.vue(App.vue已经把components文件夹里面的组件都整合在一起了,所以在入口文件我们导入它就行了),最后是导入router目录下的index.js。如果import xx form ‘一个文件夹’,打包的时候会自动查找文件夹里面的index.js文件。之前我挺纳闷为什么new Vue里面有router这种只有键没有值的写法,其实它相当于router:routers,这个其实我们开头已经导入并赋值给router了。关于template键,其实它的值写成<App></App>也是可以的。
接下来就是组件的挂载,如果一个组件没有挂载,那就相当声明了之后却没有使用它。我们将它挂载到id为app的div上,这个id为app又是在哪里?很简单,就在src同级目录下的index.html文件里。
前一篇文章第八点我们说到,最后打包完生成了一些东西,其中有一个就是app.js

这个app.js就是以main.js 为入口文件打包之后生成的。最后渲染页面的文件,就是导入了app.js 的index.html文件。看到这里相信大家对这个项目有了新的认识,但是有个小问题很多人容易混淆。
export default {} 跟 var vm = new Vue({}) 完全不是同一回事,前者是ES6的module中的语法,后者是创建一个vue实例。export的相关问题,大家可以点击一下这个链接。
标签:端口 padding alias https github 开发环境 更新 一点 组件
原文地址:http://www.cnblogs.com/nangxi/p/7307080.html