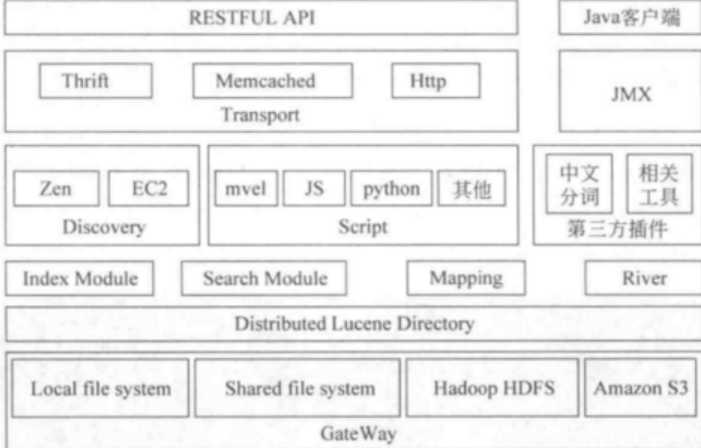
标签:测试 href 查询 工具 策略 环境变量 处理 环境 下载地址

(1)二者安装都很简单。
(2)Solr 利用 Zookeeper 进行分布式管理,而 Elasticsearch 自身带有分布式协调管理功能。
(3)Solr 支持更多格式的数据,比如JSON、XML、CSV,而 Elasticsearch 仅支持json文件格式。
(4)Solr 官方提供的功能更多,而 Elasticsearch 本身更注重于核心功能,高级功能多有第三方插件提供
(5)Solr 在传统的搜索应用中表现好于 Elasticsearch,但在处理实时搜索应用时效率明显低于 Elasticsearch。
(6)Solr 是传统搜索应用的有力解决方案,但 Elasticsearch 更适用于新兴的实时搜索应用。
三台机器做集群:192.168.80.30、192.168.80.32、192.168.80.33
CentOS7.0
Java1.8
下载地址:https://www.elastic.co/products/elasticsearch
下载后上传到CentOS中的/usr/local/ 文件夹中,并解压到当前文件中重命名为elasticsearch530 /usr/local/elasticsearch530
tar -zxvf elasticsearch-5.3.0.tar.gz
groupadd elsearch #添加elsearch组
useradd -g elsearch elsearch -s /bin/false
更改elasticsearch文件夹及内部文件的所属用户及组为elsearch:elsearch
chown -R elsearch:elsearch elasticsearch530
cluster.name: es-application #这是集群名字,我们 起名为 es-application。es启动后会将具有相同集群名字的节点放到一个集群下。
node.name: "es-node1" #节点名字。
covery.zen.minimum_master_nodes: 1 #指定集群中的节点中有几个有master资格的节点。对于大集群可以写3个以上。
discovery.zen.ping.timeout: 40s #默认是3s,这是设置集群中自动发现其它节点时ping连接超时时间,为避免因为网络差而导致启动报错,我设成了40s。
discovery.zen.ping.multicast.enabled: false #设置是否打开多播发现节点,默认是true。
network.host: 0.0.0.0
http.port: 9200
node.master: true #节点从可作为选举为主节点
node.data: true #也用来存储数据,可作为负载器
discovery.zen.ping.unicast.hosts: ["192.168.80.32","192.168.80.33","192.168.80.30"]  #discovery.zen.ping.unicast.hosts:["节点1的 ip","节点2 的ip","节点3的ip"] 指明集群中其它可能为master的节点ip,以防es启动后发现不了集群中的其他节点。第一对引号里是node1,默认端口是9300。第二个是 node2 ,在另外一台机器上。
node.name: "es-node2"和 node.name: "es-node3"
su elsearch
cd /usr/local/elasticsearch530 目录
bin/elasticsearch -d  #后台运行
此时启动服务会发现报错:max virtual memory areas vm.max_map_count [65530] is too low, increase to at least [262144]
[root@H32 ~]# cat /etc/sysctl.conf | grep -v "vm.max_map_count" > /tmp/system_sysctl.conf
[root@H32 ~]# echo "vm.max_map_count=262144" >> /tmp/system_sysctl.conf
[root@H32 ~]# mv /tmp/system_sysctl.conf /etc/sysctl.conf
mv:是否覆盖"/etc/sysctl.conf"? y
[root@H32 ~]# cat /etc/sysctl.conf
# System default settings live in /usr/lib/sysctl.d/00-system.conf.
# To override those settings, enter new settings here, or in an /etc/sysctl.d/<name>.conf file
#
# For more information, see sysctl.conf(5) and sysctl.d(5).
vm.max_map_count=262144
[root@H32 ~]# sysctl -p
vm.max_map_count = 262144
修改后再次启动,可通过下命令查看启动后是否有进程
ps -ef |grep elasticsearch
ES的安装就此完成,接下来安装Head插件来监控Elasticsearch
fs.file-max=65536
vm.max_map_count=262144
elsearch soft nofile 65536
elsearch hard nofile 65536

sysctl -p
# 增加新的参数,这样head插件可以访问es
http.cors.enabled: true
http.cors.allow-origin: "*"
在5.X版本中不支持直接安装head插件,需要启动一个服务
git clone git://github.com/mobz/elasticsearch-head.git
下载 elasticsearch-head 或者 git clone 到 /usr/local/elasticsearch-head
 cd elasticsearch-head

 npm install
yum -y install xz
xz -d node*.tar.xz tar -xvf node*.tar
解压完node的安装文件后,需要配置下环境变量,编辑/etc/profile,添加
# set node environment
export NODE_HOME=/usr/local/node790
export PATH=$PATH:$NODE_HOME/bin
别忘记立即执行以下
[root@H32 node790]# echo $NODE_HOME
/usr/local/node790
[root@H32 node790]# node -v
[root@H32 node790]# npm -v
cd elasticsearch-head
npm install grunt-cli
npm install grunt --save-dev
[root@H32 elasticsearch-head]# grunt -version
grunt-cli v1.2.0
grunt v1.0.1
/usr/local/elasticsearch-head/node_modules/grunt/bin/gruntserver
connect: { server: { options: { port: 9100, hostname: ‘*‘, base: ‘.‘, keepalive: true } } }
this.base_uri = this.config.base_uri || this.prefs.get("app-base_uri") || "http://192.168.80.32:9200";
cd /usr/local/elasticsearch-head
grunt server -d

现在可以在此页面操作ES数据了,但这只是一个开始。
标签:测试 href 查询 工具 策略 环境变量 处理 环境 下载地址
原文地址:http://www.cnblogs.com/zhangs1986/p/7299307.html