标签:nginx负载均衡
扩展:
针对请求的uri来代理 http://ask.apelearn.com/question/1049
根据访问的目录来区分后端web http://ask.apelearn.com/question/920
12.17 Nginx负载均衡
1. 安装dig命令:
[root@hao-01 ~]# yum install -y bind-utils
2. 用dig获取qq.com的ip地址:
[root@hao-01 ~]# dig qq.com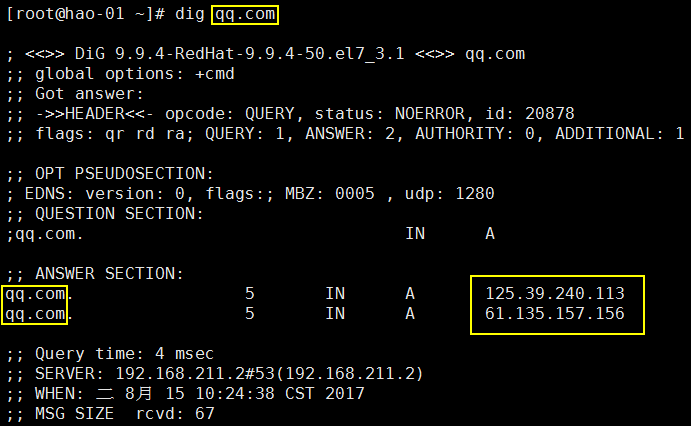
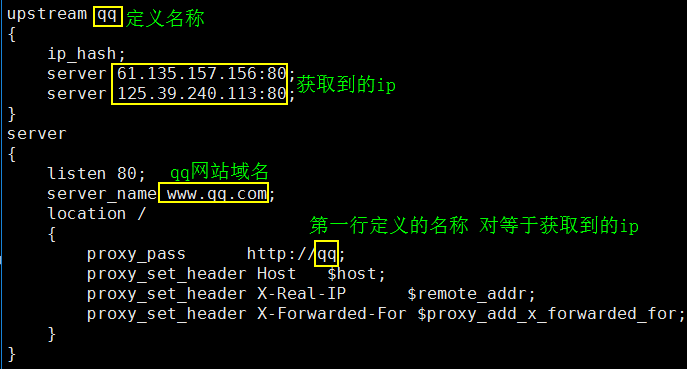
 3. 创建ld.conf文件,并添加如下内容:
[root@hao-01 ~]# vi /usr/local/nginx/conf/vhost/ld.conf
添加内容(upstream指定多个web server ip):
upstream qq
{
ip_hash;
server 61.135.157.156:80;
server 125.39.240.113:80;
}
server
{
listen 80;
server_name www.qq.com;
location /
{
proxy_pass http://qq;
proxy_set_header Host $host;
proxy_set_header X-Real-IP $remote_addr;
proxy_set_header X-Forwarded-For $proxy_add_x_forwarded_for;
}
}
 4. 检测nginx配置文件是否有错?
[root@hao-01 ~]# /usr/local/nginx/sbin/nginx -t
5. 重新加载nginx配置文件(非重启!):
[root@hao-01 ~]# /usr/local/nginx/sbin/nginx -s reload
6. curl 通过本地ip127.0.0.1访问www.qq.com,访问到了qq网站主页:
[root@hao-01 ~]# curl -x127.0.0.1:80 www.qq.com
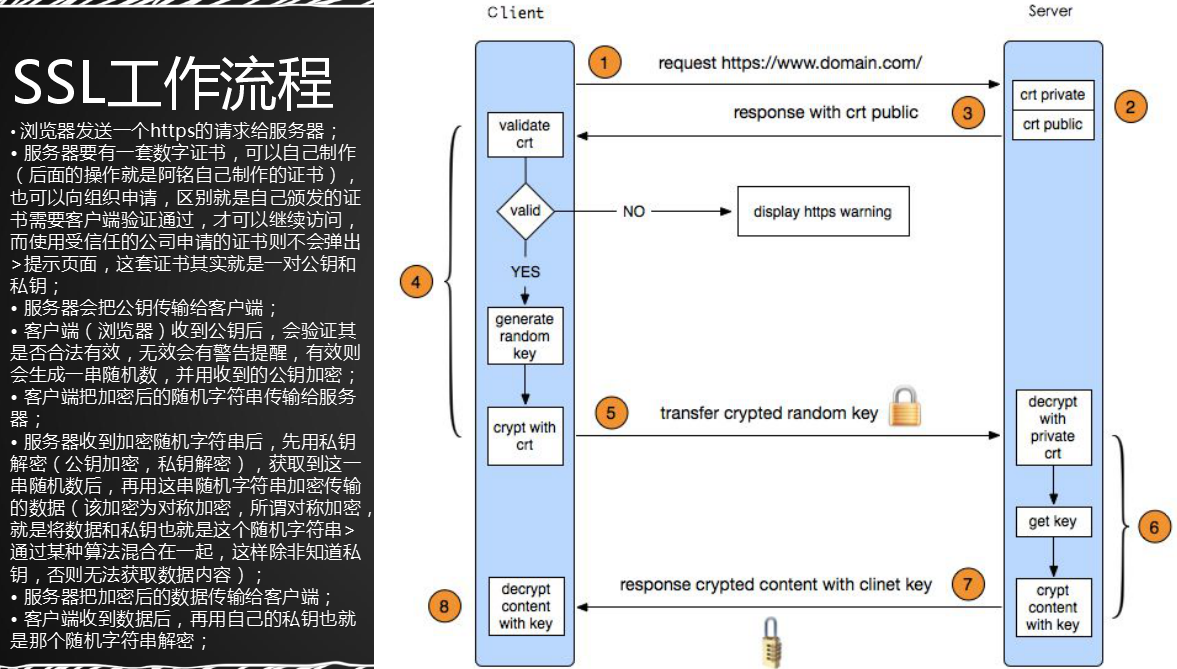
12.18 ssl原理

12.19 生产ssl密钥对
1. 进入...conf目录下:
[root@hao-01 ~]# cd /usr/local/nginx/conf
2. 安装 openssl命令:
[root@hao-01 ~]# yum install -y which openssl
3. 当前目录下生成tmp.key私钥:
[root@hao-01 conf]# openssl genrsa -des3 -out tmp.key 2048

 4. 转换tmp.key私钥并取消密码,生成一个新的文件haosy.key私钥:
[root@hao-01 conf]# openssl rsa -in tmp.key -out haosy.key

 5. 删除 tmp.key私钥:
[root@hao-01 conf]# rm -f tmp.key
6. 生成证书请求文件hao.csr:
[root@hao-01 conf]# openssl req -new -key haosy.key -out hao.csr
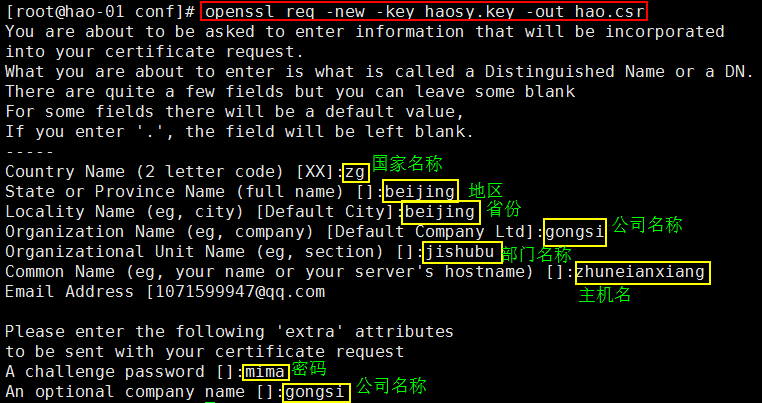
 7. 生成公钥,hao.csr证书请求文件和haosy.key私钥一起生产出haogy.crt公钥:
[root@hao-01 conf]# openssl x509 -req -days 365 -in hao.csr -signkey haosy.key -out haogy.crt

 12.20 Nginx配置ssl
1. 创建 .../hao1.com网站目录:
[root@hao-01 ~]# mkdir /data/wwwroot/hao1.com
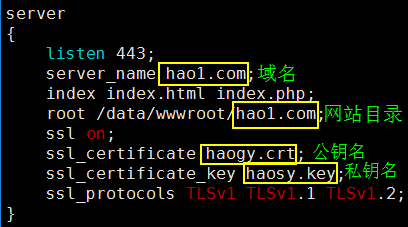
2. 创建ssl.conf文件,并添加如下内容:
[root@hao-01 ~]# vim /usr/local/nginx/conf/vhost/ssl.conf
添加内容:
server
{
listen 443;
server_name hao1.com;
index index.html index.php;
root /data/wwwroot/hao1.com;
ssl on;
ssl_certificate haogy.crt;
ssl_certificate_key haosy.key;
ssl_protocols TLSv1 TLSv1.1 TLSv1.2;
}
 3. 进入nginx-1.12.1源码包目录下:
[root@hao-01 ~]# cd /usr/local/src/nginx-1.12.1/
4. 编译with-http_ssl_module :
[root@hao-01 nginx-1.12.1]# ./configure --prefix=/usr/local/nginx --with-http_ssl_module
5. make :
[root@hao-01 nginx-1.12.1]# make
6. make install :
[root@hao-01 nginx-1.12.1]# make install
7. 检测nginx配置文件是否有错?
[root@hao-01 ~]# /usr/local/nginx/sbin/nginx -t
8. 重启nginx服务:
[root@hao-01 nginx-1.12.1]# /etc/init.d/nginx restart
9. 查看监听端口:
[root@hao-01 nginx-1.12.1]# netstat -lntp

 10. 进入 .../hao1.com网站目录下:
[root@hao-01 nginx-1.12.1]# cd /data/wwwroot/hao1.com/
11. 在 .../hao1.com网站目录下,创建index.html测试文件并添加内容:
[root@hao-01 hao1.com]# vim index.html
添加内容:
This is ssl.
12. 在host文件中,另起一行,添加本地ip 跟指定的域名:
[root@hao-01 hao1.com]# vim /etc/hosts
添加内容:
127.0.0.1 hao1.com
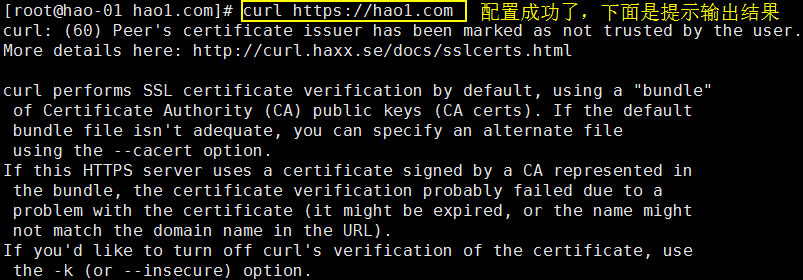
13. curl 访问hao1.com设定的域名网站:
[root@hao-01 hao1.com]# curl https://hao1.com
 14. 打开windows系统找到hosts文件:
路径:C:\Windows\System32\drivers\etc

 15. 编辑windows下的hosts文件:
添加一条内容:
192.168.211.128 hao1.com
16. 临时关闭防火墙(不想全部清空,把443端口添加一个规则)
[root@hao-01 hao1.com]# iptables -F
17. windows下的游览器访问https://hao1.com:

本文出自 “主内安详” 博客,请务必保留此出处http://zhuneianxiang.blog.51cto.com/11621252/1956411
12.17 Nginx负载均衡;12.18 ssl原理;12.19 生产ssl密钥对;12.20 Nginx配置ssl
标签:nginx负载均衡
原文地址:http://zhuneianxiang.blog.51cto.com/11621252/1956411