标签:strong 事件 smtp mapping field pid stash pre start
logstash使用一个名为 filewatch的 ruby gem库来监听文件变化, 这个库记录一个 .sincedb的数据文件跟踪监听日志文件的当前位置
input {
    file {
        path => ["/var/log/*.log", "/var/log/message"]
        type => "system"
        start_position => "beginning"
    }
}
output {
    stdout{
        codec=>rubydebug
    }
}
其他配置
discover_interval: 每隔多久检查path下是否有新文件, 默认15s
exclude: 不行呗监听的文件排除
close_older: 被监听的文件多久没更新就关闭监听, 默认3600s
ignore_older: 检查文件列表时, 如果最后修改时间超过这个值, 就虎烈
logstash最简单最基本的输入方式
在 {LH}/下, 新建 stdin.conf, 并输入以下内容:
input{
    stdin{
        add_field=>{"key"=>"value"}
        codec=>"plain"
        tags=>["add"]
        type=>"std"
    }
}
output {
    stdout{
        codec=>rubydebug
    }
}
使用命令运行
./bin/logstash -f ./stdin.conf
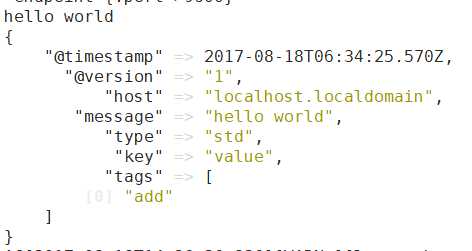
启动后输入 helloworld, 可以看到如下输出
这儿的 type 和tags 是logstash的两个特俗字段, 通常会在输入区域通过type标记事件类型, tags则在数据处理阶段, 由具体的插件来添加或删除的
从设备上收集日志的时候可用
input {
  syslog {
    port => "514"
  }
}
output {
    stdout{
        codec=>rubydebug
    }
}
此时, 系统的日志都会到logstash中来, 建议使用使用LogStash::Inputs::TCP和 LogStash::Filters::Grok 配合实现同样的 syslog 功能! 具体可见: https://kibana.logstash.es/content/logstash/plugins/input/syslog.html
input {
  tcp {
    port => "8514"
  }
}
filter {
  grok {
    match => ["message", "%{SYSLOGLINE}" ]
  }
  syslog_pri { }
}
可被redis,等替代作为 logstash broker 的角色, 但logstash又自己的tcp插件
input {
    tcp {
        port => 8888
        mode => "server"
        ssl_enable => false
    }
}
最佳使用是: 配合 nc 命令导入就数据
# nc 127.0.0.1 8888 < olddata
导入完毕后, nc命令会结束, 如果使用file会一直监听新数据
使用codec可以处理不同类型的数据, 使得logstash 形成 input | decode | filter | encode | output 的数据流, codec就是用来 encode 和 decode的
将nginx的日志导入为json格式: nginx需要配置 conf, 在 http{} 下进行配置, 所有server共享
logformat json ‘{"@timestamp":"$time_iso8601",‘
               ‘"@version":"1",‘
               ‘"host":"$server_addr",‘
               ‘"client":"$remote_addr",‘
               ‘"size":$body_bytes_sent,‘
               ‘"responsetime":$request_time,‘
               ‘"domain":"$host",‘
               ‘"url":"$uri",‘
               ‘"status":"$status"}‘;
access_log /var/log/nginx/access.log_json json;
修改stdin.conf
input {
    file {
        path => "/var/log/nginx/access.log_json"
        codec => "json"
    }
}
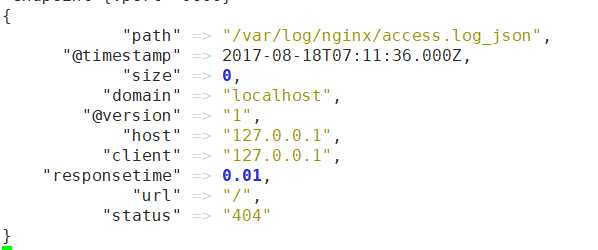
然后访问本地nginx, 可以看到logstash输出:

一个事件打印多行内容, 很难通过命令行解析分析, 因此需要:
input {
    stdin {
        codec => multiline {
            pattern => "^\["
            negate => true
            what => "previous"
        }
    }
}
将当前的数据添加到下一行后面, 知道新匹配 ^[ 位置
扩展了进入过滤器的原始数据,进行复杂的逻辑处理,甚至可以无中生有的添加新的 logstash 事件到后续的流程中去!
logstash内部使用了java的 joda 时间库来处理时间
filter {
    grok {
        match => ["message", "%{HTTPDATE:logdate}"]
    }
    date {
        match => ["logdate", "dd/MMM/yyyy:HH:mm:ss Z"]
    }
}
可以将输入的文本匹配到字段中去:
input {stdin{}}
filter {
    grok {
        match => {
            "message" => "\s+(?<request_time>\d+(?:\.\d+)?)\s+"
        }
    }
}
output {stdout{codec => rubydebug}}
然后输入 begin 123.456 end

grok支持预定义的grok表达式:
%{PATTERN_NAME:capture_name:data_type}所以上例可改成:
filter {
    grok {
        match => {
            "message" => "%{WORD} %{NUMBER:request_time:float} %{WORD}"
        }
    }
}
重新运行后, request_time的值变为float类型的,
实际使用中: 建议把所有的fork表达式统一写在一个地方, 然后patterns_dir指明. 如果将message中的所有信息都grok到不通字段了, 数据就存储重复了, 因此可以用remove_filed或者 overwrite来重写message
filter {
    grok {
        patterns_dir => ["/path/to/your/own/patterns"]
        match => {
            "message" => "%{SYSLOGBASE} %{DATA:message}"
        }
        overwrite => ["message"]
    }
}
跟grok类似, 但资源消耗较小. 当日志格式有比较简明的分隔标志位,而且重复性较大的时候,我们可以使用 dissect 插件更快的完成解析工作
filter {
    dissect {
        mapping => {
            "message" => "%{ts} %{+ts} %{+ts} %{src} %{} %{prog}[%{pid}]: %{msg}"
        }
        convert_datatype => {
            pid => "int"
        }
    }
}
比如配置: http://rizhiyi.com/index.do?id=123
http://%{domain}/%{?url}?%{?arg1}=%{&arg1}

匹配后
{
  domain => "rizhiyi.com",
  id => "123"
}
解释
%{+key} 这个 + 表示,前面已经捕获到一个 key 字段了,而这次捕获的内容,自动添补到之前 key 字段内容的后面。
%{+key/2} 这个 /2 表示,在有多次捕获内容都填到 key 字段里的时候,拼接字符串的顺序谁前谁后。/2 表示排第 2 位。
%{?string} 这个 ? 表示,这块只是一个占位,并不会实际生成捕获字段存到 Event 里面。
%{?string} %{&string} 当同样捕获名称都是 string,但是一个 ? 一个 & 的时候,表示这是一个键值对。
input {stdin{}}
filter {
    geoip {
        source => "message"
    }
}
output {stdout{codec => rubydebug}}
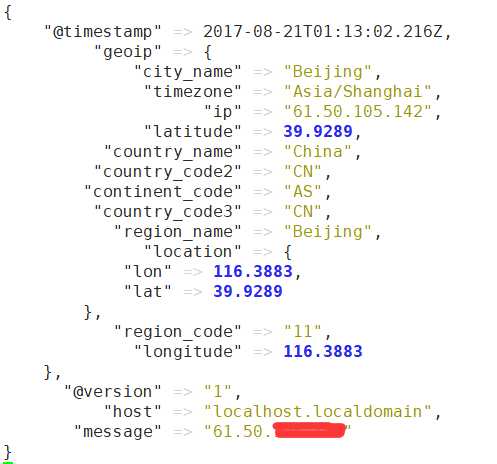
运行结果

如果只想要其中某些字段, 可以通过fileds来指定
geoip {
        fields => ["city_name", "continent_code", "country_code2", "country_code3", "country_name", "dma_code", "ip", "latitude", "longitude", "postal_code", "region_name", "timezone"]
    }
最近一分钟 504 请求的个数超过 100 个就报警:
filter {
    metrics {
        timer => {"rt" => "%{request_time}"}
        percentiles => [25, 75]
        add_tag => "percentile"
    }
    if "percentile" in [tags] {
        ruby {
            code => "l=event.get(‘[rt][p75]‘)-event.get(‘[rt][p25]‘);event.set(‘[rt][low]‘, event.get(‘[rt][p25]‘)-l);event.set(‘[rt][high]‘,event.get(‘[rt][p75]‘)+l)"
        }
    }
}
output {
    if "percentile" in [tags] and ([rt][last] > [rt][high] or [rt][last] < [rt][low]) {
        exec {
            command => "echo \"Anomaly: %{[rt][last]}\""
        }
    }
}
可转换的类型包括 integer, float, string
filter {
    mutate {
        convert => ["request_time", "float"]
    }
}
字符串处理: , sub
gsub => ["urlparams", "[\\?#]", "_"]
split:
filter {
    mutate {
        split => ["message", "|"]
    }
}
join, 将split切分的在join回去
filter {
    mutate {
        split => ["message", "|"]
    }
    mutate {
        join => ["message", ","]
    }
}
rename: 字段重命名:
filter {
    mutate {
        rename => ["syslog_host", "host"]
    }
}
是multiline插件的反向, 将一行数据切分到多个事件中去
filter {
    split {
        field => "message"
        terminator => "#"
    }
}
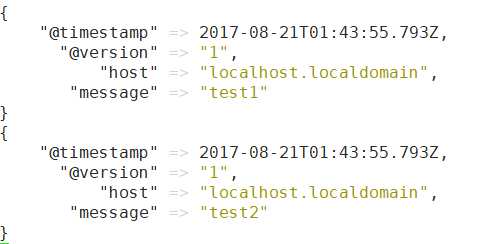
然后输入 "test1#test2", 可以看到被输出到2个事件中

output {
    stdout {
        codec => rubydebug
        workers => 2
    }
}
output {
    elasticsearch {
        hosts => ["192.168.0.2:9200"]
        index => "logstash-%{type}-%{+YYYY.MM.dd}"
        document_type => "%{type}"
        flush_size => 20000
        idle_flush_time => 10
        sniffing => true
        template_overwrite => true
    }
}
注意索引名中不能有大写字母,否则 ES 在日志中会报 InvalidIndexNameException,但是 Logstash 不会报错,这个错误比较隐晦,也容易掉进这个坑中。
3), email
126邮箱发送到 qq邮箱的示例
output {
    email {
        port           =>    "25"
        address        =>    "smtp.126.com"
        username       =>    "test@126.com"
        password       =>    ""
        authentication =>    "plain"
        use_tls        =>    true
        from           =>    "test@126.com"
        subject        =>    "Warning: %{title}"
        to             =>    "test@qq.com"
        via            =>    "smtp"
        body           =>    "%{message}"
    }
}
标签:strong 事件 smtp mapping field pid stash pre start
原文地址:http://www.cnblogs.com/wenbronk/p/7392305.html