标签:char 技术分享 poi wait hold open bin nbsp bsd


 1 #include<opencv2/opencv.hpp>
 2 using namespace cv;
 3
 4 void main()
 5 {
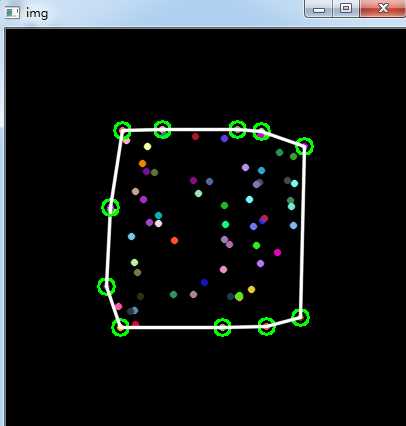
 6     //---绘制点集的凸包
 7     Mat img(400, 400, CV_8UC3, Scalar::all(0));  //定义绘制图像
 8     RNG rng;  //定义随机数对象
 9     while(1)
10     {
11         char key;
12         int count = (unsigned int)rng % 100;  //定义点的个数
13         vector<Point> points;  //定义点集
14         for(int i=0; i<count; i++)
15         {
16             Point pt;
17             pt.x = rng.uniform(img.cols/4, img.cols*3/4);  //设定点的x范围
18             pt.y = rng.uniform(img.rows/4, img.rows*3/4);  //设定点的y范围
19             points.push_back(pt);
20         }
21
22         //检测凸包
23         vector<int> hull;
24         convexHull(Mat(points), hull, true);
25
26         img = Scalar::all(0);
27         for(int i = 0; i < count; i++ )
28             circle(img, points[i], 3, Scalar(rng.uniform(0, 255), rng.uniform(0, 255), rng.uniform(0, 255)), CV_FILLED, CV_AA);
29
30         //准备参数
31         int hullcount = (int)hull.size(); //凸包的边数
32         Point point0 = points[hull[hullcount-1]]; //连接凸包边的坐标点
33
34         //绘制凸包的边
35         for(int  i = 0; i < hullcount; i++ )
36         {
37             Point point = points[hull[i]];
38             circle(img, point, 8, Scalar(0, 255, 0), 2, 8);
39             line(img, point0, point, Scalar(255, 255, 255), 2, CV_AA);
40             point0 = point;
41         }
42
43         //显示效果图
44         imshow("img", img);
45
46         //按下ESC,Q,或者q,程序退出
47         key = (char)waitKey();
48         if( key == 27 || key == ‘q‘ || key == ‘Q‘ )
49             break;
50     }
51}

 1 #include<opencv2/opencv.hpp>
 2 using namespace cv;
 3
 4 void main()
 5 {
 6     Mat srcImg = imread("E://12.jpg");
 7     imshow("src", srcImg);
 8     Mat dstImg2 = srcImg.clone();
 9     Mat tempImg(srcImg.rows, srcImg.cols, CV_8UC3, Scalar::all(0));  //用于绘制凸包
10     Mat dstImg(srcImg.rows, srcImg.cols, CV_8UC3, Scalar::all(0));  //用于绘制轮廓
11     cvtColor(srcImg, srcImg, CV_BGR2GRAY);
12     threshold(srcImg, srcImg, 100, 255, CV_THRESH_BINARY); //二值化
13
14     vector<vector<Point>> contours;
15     vector<Vec4i> hierarcy;
16     findContours(srcImg, contours, hierarcy, CV_RETR_EXTERNAL, CV_CHAIN_APPROX_NONE);
17     vector<vector<Point>> hull(contours.size());
18     for(int i=0; i<contours.size(); i++)
19     {
20         convexHull(Mat(contours[i]), hull[i], true);     //查找凸包
21         drawContours(dstImg, contours, i, Scalar(255, 255, 255), -1, 8);  //绘制轮廓
22         //drawContours(dstImg, hull, i, Scalar(rand()%255, rand()%255, rand()%255), 2, 8);
23         drawContours(tempImg, hull, i, Scalar(255, 255, 255), -1, 8);
24     }
25     imshow("hull", tempImg);
26     imshow("contours", dstImg);
27
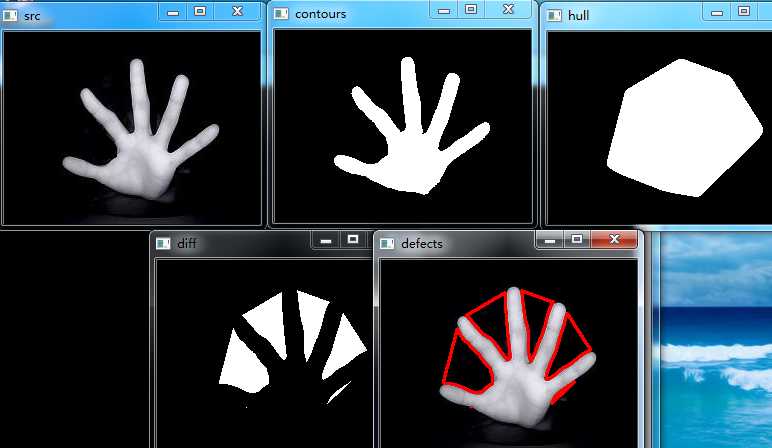
28     Mat diffImg;
29     absdiff(tempImg, dstImg, diffImg);  //图像相减
30     Mat element = getStructuringElement(MORPH_RECT, Size(3, 3), Point(-1, -1));
31     erode(diffImg, diffImg, element);
32     imshow("diff", diffImg);
33
34     vector<vector<Point>> contours2;
35     vector<Vec4i> hierarcy2;
36     cvtColor(diffImg, diffImg, CV_BGR2GRAY); //转为灰度图
37     threshold(diffImg, diffImg, 100, 255, CV_THRESH_BINARY); //二值化
38     findContours(diffImg, contours2, hierarcy2, CV_RETR_EXTERNAL, CV_CHAIN_APPROX_NONE);
39     drawContours(dstImg2, contours2, -1, Scalar(0, 0, 255), 2, 8);  //红色绘制缺陷轮廓
40     imshow("defects", dstImg2);
41     waitKey(0);
42 }

标签:char 技术分享 poi wait hold open bin nbsp bsd
原文地址:http://www.cnblogs.com/little-monkey/p/7424951.html