标签:xcode 组合 any learn nec 返回 前端开发 last new
本系列是基于React Native版本号0.44.3写的,最初学习React Native的时候,完全没有接触过React和JS,本文的目的是为了给那些JS和React小白提供一个快速入门,让你们能够在看React Native语法的时候不那么费劲,有过前端开发经验的可以直接忽略。
React是一个JavaScript框架,用来开发web应用。Web应用开发中,比较流行的有三个框架:
从名字上,就能看到react native是基于React(都是Facebook出品)。React的设计思想是:
Declarative(交互式的)
应用都是基于状态的,应用会随着数据的变化切换到不同的状态,
React
将这种状态抽象为一个个View,这样状态改变后,利用React就在不同
的View之间切换。这样,让代码更清晰可预测,也方便测试。
Component-Based(基于组件的)
把管理状态的
View封装成Component,然后再把这些Component
组合到一起来实现复杂的UI。
Learn Once, Write Anywhere(一次编写,多处编译)
React支持Web开发,Server开发(Node),同样也支持本文提到的App开发(React Native)。
JSX是JavaScript语言的扩展,它并不改变JS本身语法。使用起来类型XML,React会对JSX的代码进行编译,生成JavaScript代码,用来描述React中的Element如何渲染。
上篇文章创建的项目中,index.ios.js里面的这段代码就是JSX语法:
render() {
    return (
      <View style={styles.container}>
        <Text style={styles.welcome}>
          Welcome to React Native!
        </Text>
      </View>
    );
  }
其中,
<Text style={styles.welcome}>
    Welcome to React Native!
</Text>
会被编译成
React.createElement(
    Text,
    {style: styles.welcom},
    ‘Welcome to React Native!‘
)注意:使用JSX,一定要在scope中,能够访问到React和对应的Element。比如刚刚的例子,在代码的最上面看到了这样的import:
import React, { Component } from ‘react‘;
import {
    AppRegistry,
    StyleSheet,
    Text,
    View,
    TouchableHighlight
} from ‘react-native‘;
tips: jsx编译结果在线查看
如果你的标签是空的,可以用/>进行close,比如:<CustomComponent style={styles.welcome} />
JSX对大小写开头是敏感的
html内置的标签。比如divimport的component所以,自定义的component必须是大写字母开头
举个??:
如果上文中的Text改成小写,
<text style={styles.welcome}>
    Welcome to React Native!
</text>
会被编译成:
React.createElement(
    "text",
    { style: styles.welcome },
    "Welcome to React Native!"
);React在解析的时候,会认为这和div类似,是html内置标签,引起错误。
JSX中的JS表达式要用{}括起来,不要加引号,加引号后React会认为是字符串。
比如,你可以这么写:
<Text style={styles.welcome}>
    {"Welcome" + "to" + "React Native"}
</Text>根据以下的代码:
<View style={styles.container}>
    <Text style={styles.welcome}>
        Welcome to React Native!
    </Text>
</View>可以看出,在JSX中可以嵌套Element形成一种层次结构,这种层次结构可以动态生成,例如:
render() {
    var textElement = <Text style={styles.welcome}>{mainText}</Text>

    return (
        <View style={styles.container}>
          {textElement}
        </View>
    );
}Element是你在屏幕上想看到的东西,在React中,一个element就是一个对象。
在
React中,element是不变的。如果用户想要看到变化,就需要渲染下一帧。
那么你可能会问,这样效率不是很低么?
事实上,
React只会更新变化的部分,对于不变的视图,是不会重新渲染的。
React强调函数式编程,不可变状态是函数式编程的核心思想之一。不可变状态能够让你的代码更容易编写,测试和维护。一个不可变的函数,在输入一定的时候,输出一定是一样的。
在React Native开发中,component是一个非常重要的概念,它类似于iOS的UIView或者Android中的view,将视图分成一个个小的部分。React Native中,我们通常采用ES6 class来定义一个Component。
比如上面的代码:
export default class Hello extends Component {
    render(){
        // ...
    }
}其中,render()是实际的渲染函数,通常,使用JSX来返回想要看到的视图。React Native中的Component都是原生的Component,通过JS bridge来调用原生的Component来渲染。
这些Component分为两种:
Navigator、Text、Image等等;NavigatorIOS、ProgressBarAndroid等等;React的Component有两个内置参数对象
props,由React自动初始化,包含了传递给一个Component的参数。state,包含的参数对象应当用在render函数中,用作渲染。调用this.setState()会触发上文提到的Component重新渲染。比如,我们对本文代码进行修改,新建一个Component:
class Scott extends Component {
  render(){
    return (
        <Text style={styles.welcome}>
            欢迎来到{this.props.name}博客学习RN
        </Text>
    );
  }
}然后,我们使用这个自定义的Component:
export default class Hello extends Component {
  render() {
    return (
        <View style={styles.container}>
            <Scott name={"scott"}/>
        </View>
    );
  }
}保存文件,选中模拟器,command + R刷新一下,就能看到如下界面:
通过这个例子,如何对Component初始化进行传值就已经很清楚了:
<Scott name={"scott"}/>初始化的时候,通过JSX的参数来传值Scott内部,通过this.props.name来访问这个值React中,修改视图状态是通过this.setState触发render重新调用,进而修改视图状态。
我们继续修改上述代码,添加一个构造函数,对state进行初始化,然后在Scott初始化的时候,通过this.state.name获取到值。
在最上面的import中,我们导入TouchableOpacity,然后在点击事件中,我们调用this.setState更新显示的文字:
export default class Hello extends Component {

  // 构造
  constructor(props) {
    super(props);
    // 初始状态
    this.state = {name: "Jack"};
  }

  _onPressText(){
    this.setState({name: "scott"})
  }

  render() {
    return (
        <View style={styles.container}>
          <TouchableOpacity onPress={() => this._onPressText()}>
            <Scott name={this.state.name}/>
          </TouchableOpacity>
        </View>
    );
  }
}保存,选中模拟器,command + R刷新一下,点击屏幕文字,效果如下:
不要直接修改state
这样并不会触发重新渲染:
this.setState.name = "scott"
setState修改可能是异步的
React有可能会对多个this.setState进行收集,然后一起更新UI。所以,不要直接依赖上一个状态的结果。所以,这样是不对的:
this.setState({
    counter: this.state.counter + this.props.number
});如果要依赖于上一个状态,使用this.setState第二个模式:
this.setState(function(prevState, props){
    return {
        counter: prevState.counter + props.number
    };
});setState是增量更新
比如:
class Scott extends Component {
    render(){
        return (
            <Text style={styles.welcome}>
                点击注意看Lucy是否变成Scott:
                {this.props.name}
            </Text>
        );
    }
}

export default class Hello extends Component {

    // 构造
    constructor(props) {
        super(props);
        // 初始状态
        this.state = {firstName:"Lucy", lastName:"Tom"};
    }

    _onPressText(){
        this.setState({firstName:"Scott"})
    }

    render() {
        return (
            <View style={styles.container}>
                <TouchableOpacity onPress={() => this._onPressText()}>
                    <Scott name={this.state.firstName + this.state.lastName}/>
                </TouchableOpacity>
            </View>
        );
    }
}
可以看到,点击文字之后,通过
this.setState({firstName:"Scott"})只是修改了firstName,lastName没有做任何变化。
tips: 上文的
onPress采用了js中的箭头函数,除了箭头函数之外,也可以用function本身传入:
export default class Hello extends Component {

    // 构造
    constructor(props) {
        super(props);
        // 初始状态
        this.state = {firstName:"Lucy", lastName:"Tom"};
        this._onPressText = this._onPressText.bind(this);
    }

    _onPressText(){
        this.setState({firstName:"Scott"})
    }

    render() {
        return (
            <View style={styles.container}>
                <TouchableOpacity onPress={this._onPressText}>
                    <Scott name={this.state.firstName + this.state.lastName}/>
                </TouchableOpacity>
            </View>
        );
    }
}
注意这一行:
this._onPressText = this._onPressText.bind(this);因为JS中,class的函数默认没有bind。需要调用bind来把this传入_onPressText。
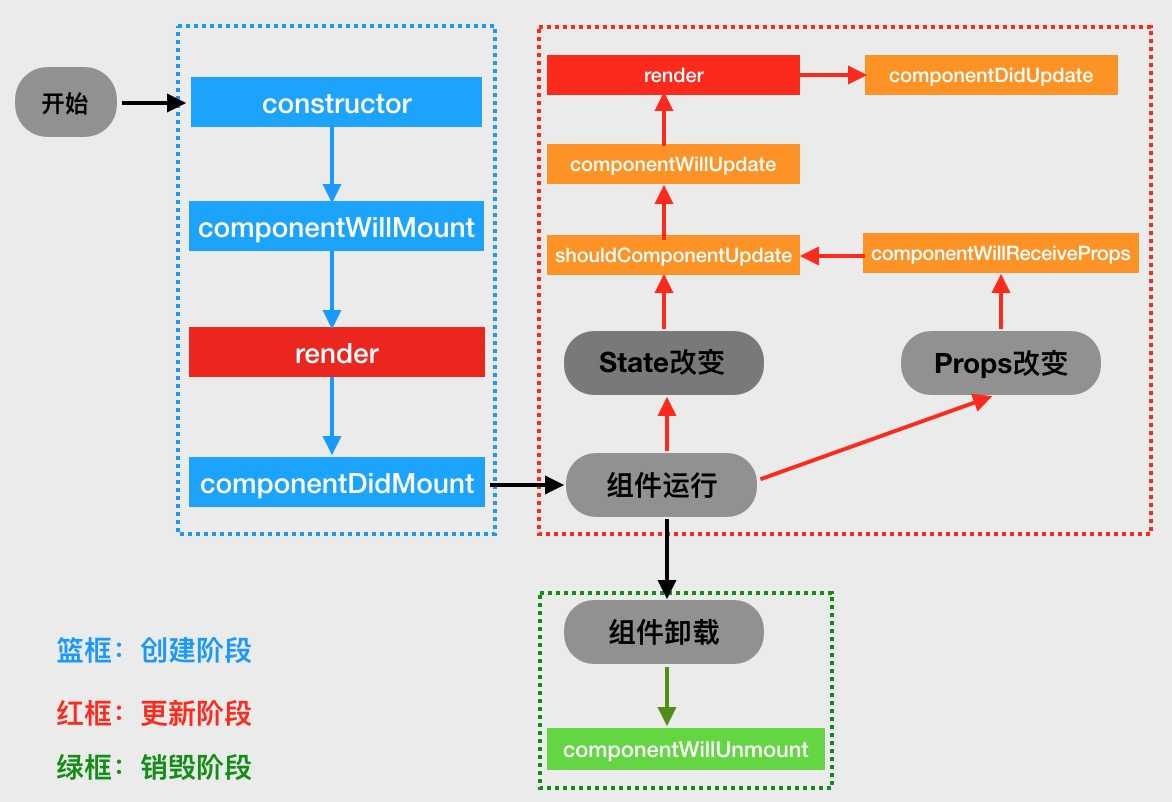
constructor
componentWillMount
render
componentDidMount
tip:**注意点:
constructor、componentWillMount、componentDidMount只会调用一次**
componentWillReceiveProps
Props的时候就会调用PropsshouldComponentUpdate
Props或者State改变就会调用componentWillUpdate
render更新前做事情componentDidUpdate
render更新后做事情tips:注意点:绝对不要在
componentWillUpdate,componentDidUpdate中调用this.setState方法,否则将导致无限循环调用,在componentWillReceiveProps,shouldComponentUpdate可以。
componentWillUnmount
我们依旧修改以前的代码,给Scott这个Component添加上这些方法,最后代码是这样:
class Scott extends Component {

    // 构造
    constructor(props) {
        super(props);

        console.log("constructor")
    }

    componentWillMount() {
        console.log("componentWillMount")
    }

    componentDidMount() {
        console.log("componentDidMount")
    }

    shouldComponentUpdate() {
        console.log("shouldComponentUpdate")
        return true
    }

    componentWillReceiveProps() {
        console.log("componentWillReceiveProps")
    }

    componentWillUpdate(){
        console.log("componentWillUpdate")
    }

    componentDidUpdate() {
        console.log("componentDidUpdate")
    }

    componentWillUnmount() {
        console.log("componentWillUnmount")
    }

    render() {
        console.log("render")
        return (
            <Text style={styles.welcome}>
                点击注意看Lucy是否变成Scott:
                {this.props.name}
            </Text>
        );
    }
}

export default class Hello extends Component {

    // 构造
    constructor(props) {
        super(props);

        // 初始状态
        this.state = {firstName:"Lucy", lastName:"Tom"};
        this._onPressText = this._onPressText.bind(this);
    }


    _onPressText(){
        this.setState({firstName:"Scott"})
    }


    render() {
        return (
            <View style={styles.container}>
                <TouchableOpacity onPress={this._onPressText}>
                    <Scott name={this.state.firstName + this.state.lastName}/>
                </TouchableOpacity>
            </View>
        );
    }
}保存代码,选择模拟器,command + R刷新一下界面,然后到Xcode控制台看输出结果,应该是如下图:
我们点击屏幕,触发一下更新,然后可以看到控制台输出结果:
tips:
xcode控制台会每隔一秒输出__nw_connection_get_connected_socket_block_invoke 2 Connection has no connected handler, 解决办法:edit scheme->Run->Arguments->Environment Variables->Add->Name: "OS_ACTIVITY_MODE",Value:"disable"
如果发现有错误的地方,欢迎各位指出,谢谢!
标签:xcode 组合 any learn nec 返回 前端开发 last new
原文地址:http://www.cnblogs.com/yujihaia/p/7425870.html