标签:背景色 弊端 底部导航 bind 步骤 params 进入 动画 导航栏
本系列是基于React Native版本号0.44.3写的。我们都知道,一个App不可能只有一个不变的界面,而是通过多个界面间的跳转来呈现不同的内容。那么这篇文章将介绍RN中的导航。
什么是导航? 其本质就是视图之间的界面跳转,例如首页跳转到详情页。
在RN中有两个组件负责实现这样的效果,它们是:
你可能在很多地方听说过Navigator,这个老组件会逐渐被React Navigation代替。笔者在最后也会讲解一下Navigator的使用,并实战演练一番。
从
0.44版本开始,Navigator被从react native的核心组件库中剥离到了一个名为react-native-deprecated-custom-components的单独模块中。如果你需要继续使用Navigator,则需要先yarn add react-native-deprecated-custom-components安装,然后从这个模块中import,即import { Navigator } from ‘react-native-deprecated-custom-components‘。
讲解NavigatorIOS之前,先说说NavigatorIOS的弊端和优势吧。
NavigatorIOS 弊端:
NavigatorIOS 优势:
barTintColor : 导航条的背景颜色
navigationBarHidden : 为true , 隐藏导航栏。
shadowHidden : 是否隐藏阴影,true/false。
tintColor : 导航栏上按钮的颜色设置。
titleTextColor : 导航栏上字体的颜色 。
translucent : 导航栏是否是半透明的,true/false。push(route) : 加载一个新的页面(视图或者路由)并且路由到该页面。
pop():返回到上一个页面。
popN(n):一次性返回N个页面。当 N=1 时,相当于 pop() 方法的效果。
replace(route):替换当前的路由。
replacePrevious(route):替换前一个页面的视图并且回退过去。
resetTo(route):取代最顶层的路由并且回退过去。
popToTop():回到最上层视图。初始化路由
component,需要传入组件,自定义组件NavigatorIOS上的按钮图片,默认会被渲染成蓝色NavigatorIOS上的按钮,只能放一张图片flex: 1,否则看不到子控件// 用于初始化路由。其参数对象中的各个属性如下:
initialRoute: {
component: function, //加载的视图组件
title: string, //当前视图的标题
passPros: object, //传递的数据
backButtonIcon: Image.propTypes.source, // 后退按钮图标
backButtonTitle: string, //后退按钮标题
leftButtonIcon: Image.propTypes.soruce, // 左侧按钮图标
leftButtonTitle: string, //左侧按钮标题
onLeftButtonPress: function, //左侧按钮点击事件
rightButtonIcon: Image.propTypes.soruce,// 右侧按钮图标
rightButtonTitle: string, //右侧按钮标题
onRightButtonPress: function, //右侧按钮点击事件
}<NavigatorIOS
style={{flex: 1}}
initialRoute={{
component: HelloView,
title: ‘首页‘,
}}
/> 获取Navigator,实现跳转
this.props.navigator.push()跳转界面方法
this.props.navigator.push({
component: Detail,
title: ‘详细信息‘,
passProps: {name: ‘scott‘},
rightButtonTitle: "完成",
onRightButtonPress: ()=> {
this.props.navigator.pop()
},
})效果图:
我们先创建一个HelloViewComponent.js组件,然后布局成上面效果图中的首页,它看起来是样子的:
export default class HelloViewCompnent extends Component {
render() {
return (
<View style={styles.container}>
<Text style={styles.welcome}>
欢迎光临Scott博客,点击我跳转
</Text>
</View>
);
}
}
const styles = StyleSheet.create({
container: {
flex: 1,
justifyContent: ‘center‘,
alignItems: ‘center‘,
backgroundColor: ‘white‘,
},
welcome: {
fontSize: 20,
textAlign: ‘center‘,
margin: 10,
},
});然后我们在index.ios.js文件初始化一个路由,指定Component为HelloViewComponent,我们需要先导入HelloViewComponent.js文件到index.ios.js中,因此,index.ios.js看起来像这样:
import React, { Component, PropTypes } from ‘react‘;
import {
AppRegistry,
StyleSheet,
Text,
View,
NavigatorIOS,
} from ‘react-native‘;
import HelloView from ‘./HelloViewCompnent‘
export default class RNDemoOne extends Component {
render() {
return (
<NavigatorIOS
    style={{flex: 1}}
    initialRoute={{
        component: HelloView,
        title: ‘首页‘,
    }}
/>
);
}
}
AppRegistry.registerComponent(‘RNDemoOne‘, () => RNDemoOne);运行项目,可以看到现在界面上有一个导航栏了。
接下来我们来实现界面跳转,以及传递值到下一个界面。
我们来给HelloViewComponent.js中的<Text></Text>添加点击事件,主要代码:
constructor(props, context) {
super(props, context);
this._onPressed = this._onPressed.bind(this);
}
_onPressed(){
AlertIOS.alert("点击了")
}
render() {
return (
<View style={styles.container}>
<TouchableOpacity onPress={this._onPressed} activeOpacity={1}>
<Text style={styles.welcome}>
欢迎光临Scott博客,点击我跳转
</Text>
</TouchableOpacity>
</View>
);
}我们再创建一个Detail.js组件,它看来像这样:
render() {
return (
<View style={styles.container}>
<Text style={styles.welcome}>
这是上个界面传递过来的数据: {this.props.name}
</Text>
</View>
);
}然后修改HelloViewComponent.js里面的_onPressed()方法,
_onPressed(){
this.props.navigator.push({
    component: Detail,
    title: ‘详细信息‘,
    passProps: {name: ‘scott‘},
    rightButtonTitle: "完成",
    onRightButtonPress: ()=> {
        this.props.navigator.pop()
    },
})
}到此为止,保存代码,选中模拟器,command + R 刷新界面,看起来和效果图是一样的。
由于NavigatorIOS的弊端,通常我们在RN不使用NavigatorIOS来实现导航。而是采用React Navigation来实现。
首先需要在项目中导入,在项目目录下,终端执行
sudo yarn add react-navigation该库包含三类组件:
由于篇幅以及本文标题,在这里,我们只讲述StackNavigator。
navigationOptions:配置StackNavigator的一些属性。
    title:标题,如果设置了这个导航栏和标签栏的title就会变成一样的,不推荐使用
    header:可以设置一些导航的属性,如果隐藏顶部导航栏只要将这个属性设置为null
    headerTitle:设置导航栏标题,推荐
    headerBackTitle:设置跳转页面左侧返回箭头后面的文字,默认是上一个页面的标题。可以自定义,也可以设置为null
    headerTruncatedBackTitle:设置当上个页面标题不符合返回箭头后的文字时,默认改成"返回"
    headerRight:设置导航条右侧。可以是按钮或者其他视图控件
    headerLeft:设置导航条左侧。可以是按钮或者其他视图控件
    headerStyle:设置导航条的样式。背景色,宽高等
    headerTitleStyle:设置导航栏文字样式
    headerBackTitleStyle:设置导航栏‘返回’文字样式
    headerTintColor:设置导航栏颜色
    headerPressColorAndroid:安卓独有的设置颜色纹理,需要安卓版本大于5.0
    gesturesEnabled:是否支持滑动返回手势,iOS默认支持,安卓默认关闭


screen:对应界面名称,需要填入import之后的页面

mode:定义跳转风格
    card:使用iOS和安卓默认的风格
    modal:iOS独有的使屏幕从底部画出。类似iOS的present效果

headerMode:返回上级页面时动画效果
    float:iOS默认的效果
    screen:滑动过程中,整个页面都会返回
    none:无动画

cardStyle:自定义设置跳转效果
    transitionConfig: 自定义设置滑动返回的配置
    onTransitionStart:当转换动画即将开始时被调用的功能
    onTransitionEnd:当转换动画完成,将被调用的功能

path:路由中设置的路径的覆盖映射配置

initialRouteName:设置默认的页面组件,必须是上面已注册的页面组件

initialRouteParams:初始路由参数 由于篇幅原因,就不做太多说明了,直接上代码吧,如果有不懂的问题,可以评论里面讨论。
我们先创建一个HelloViewComponent.js文件,然后在index.ios.js文件导入,并且修改index.ios.js的代码,如下:
import HelloView from ‘./HelloViewComponent‘

export default class RNDemoTwo extends Component {
    render() {
        return (
            <HelloView/>
        );
    }
}接下来,我们修改HelloViewComponent.js里面的代码。
最终代码类似这样:
import {
    AppRegistry,
    StyleSheet,
    Text,
    View,
    TouchableOpacity,
    Button,
    AlertIOS,
} from ‘react-native‘;

import {StackNavigator} from ‘react-navigation‘
import DetailComponent from ‘./DetailComponent‘
import ThreeComponent from ‘./Three‘

class HelloViewCompnent extends Component {

    // 配置导航栏属性
    static navigationOptions = {
        headerTitle: "首页",
        headerBackTitle: null,
        headerRight: <Button title={"右侧按钮"} onPress={()=>{AlertIOS.alert("点击右侧按钮")}}/>
    }

    render() {
        return (
            <View style={styles.container}>
                <TouchableOpacity onPress={()=>{
                    this.props.navigation.navigate(‘Detail‘, {name: ‘scott‘})
                }} activeOpacity={1}>
                    <Text style={styles.welcome}>
                        欢迎光临Scott博客,点击我跳转
                    </Text>
                </TouchableOpacity>
            </View>
        );
    }
}

const SimpleApp = StackNavigator({
    Home: {
        screen: HelloViewCompnent,
    },
    Detail: {
        screen: DetailComponent,
    },
    Three: {
        screen: ThreeComponent,
    }
},{
    headerMode : ‘screen‘,
})

export default SimpleApp

const styles = StyleSheet.create({
    container: {
        flex: 1,
        justifyContent: ‘center‘,
        alignItems: ‘center‘,
        backgroundColor: ‘white‘,
    },
    welcome: {
        fontSize: 20,
        textAlign: ‘center‘,
        margin: 10,
    },
});注意点:此处向外提供出去的组件是SimpleApp,需要把HelloViewComponent默认的export default删除
接下来,我们创建DetailComponent.js和Three.js文件。DetailComponent.js最终应该是这样:
export default class Detail extends Component {
    static navigationOptions = {
        headerTitle: ‘详情‘,
    }

    render() {
        return (
            <View style={styles.container}>
                <TouchableOpacity activeOpacity={0.5} onPress={this._onPress.bind(this)}>
                    <Text style={styles.welcome}>
                        这是上个界面传递过来的数据: {this.props.navigation.state.params.name}
                        点击我pop
                    </Text>
                </TouchableOpacity>
            </View>
        );
    }

    _onPress(){
        this.props.navigation.navigate("Three")
    }
}

const styles = StyleSheet.create({
    container: {
        flex: 1,
        justifyContent: ‘center‘,
        alignItems: ‘center‘,
        backgroundColor: ‘white‘,
    },
    welcome: {
        fontSize: 20,
        textAlign: ‘center‘,
        margin: 10,
    },
});Three.js文件,只是赋值了index.android.js里面的代码。
然后,运行项目,可以看到效果:

哈哈,是不是很有成就感了。
Navigator作用:只提供跳转功能,支持 iOS 和 android
Navigator就能获取跳转功能在之前的版本可以直接导入:
import {
    AppRegistry,
    StyleSheet,
    Text,
    View,
    Navigator,
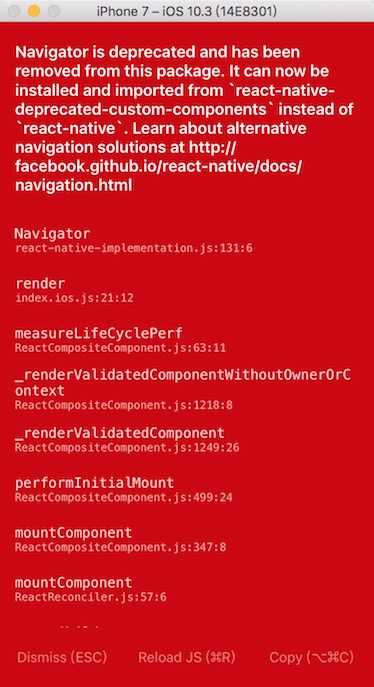
} from ‘react-native‘;但是从0.44这个版本开始在RN中直接导入的话,运行起来会报错
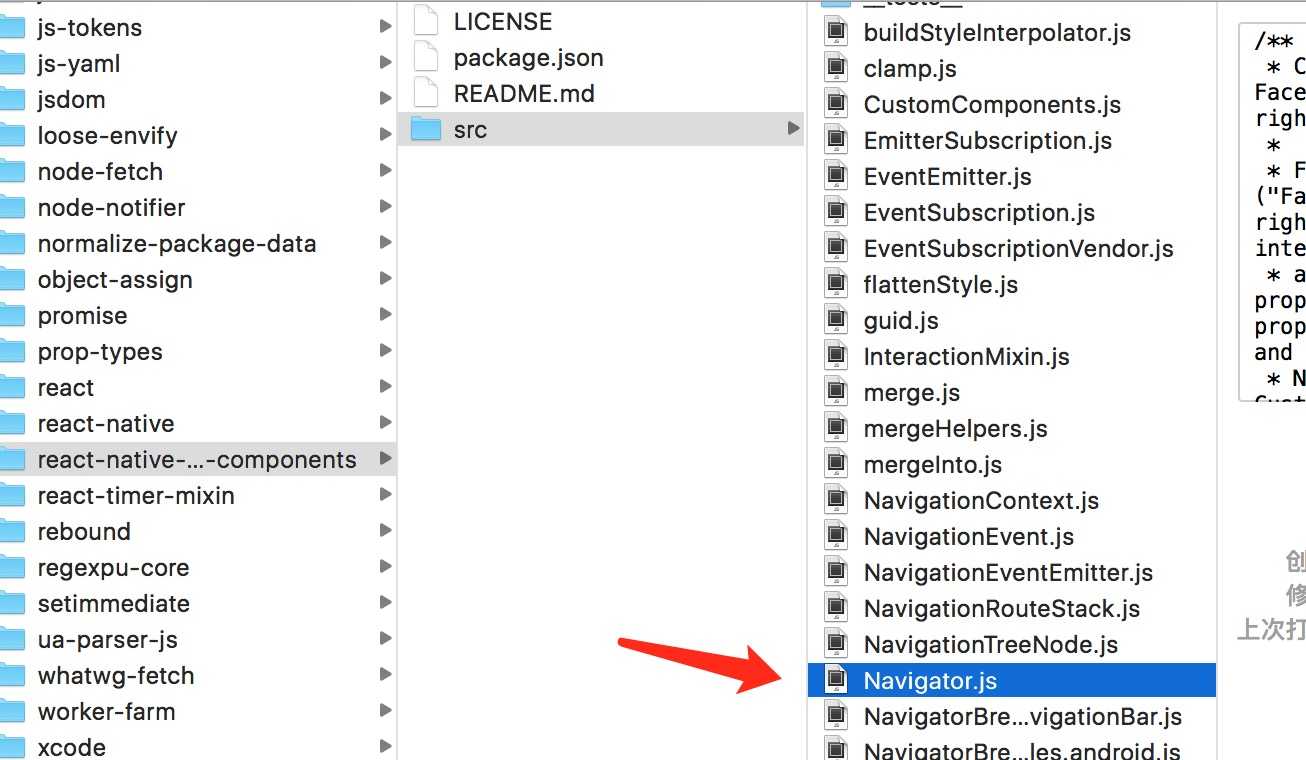
Navigator所在的库。yarn add react-native-deprecated-custom-componentstip: 笔者在终端运行yarn add react-native-deprecated-custom-components总报权限错误。
解决办法:在前面添加sudo,即yarn add react-native-deprecated-custom-components。
安装好之后,就可以看到Navigator了
直接在项目中导入就行:
import {Navigator} from ‘react-native-deprecated-custom-components‘创建 Navigator
<Navigator
    style={{flex:1}}
    initialRoute={{
        component: HelloView
    }}
    configureScene={this._configureScene.bind(this)}
    renderScene={this._renderScene.bind(this)}
/>

_configureScene(route, routeStack){
    return Navigator.SceneConfigs.PushFromLeft;
}

_renderScene(route, navigator){
    // 把导航控制器传递给HelloView
    // ...route: 获取route中所有属性,传递给HelloView
    // ...扩展符, 作用:如果是对象,就获取对象中所有值,如果是数组,就获取数组中所有值
    // <route.component navigator={navigator} {...route}/> 类似下面写法,把route的属性取出来赋值
    // <route.component navigator={navigator} component=route.component/>
    return (<route.component navigator={navigator} {...route.passProps}/>)
}
初始化路由:设置初始化界面,描述一开始显示哪个界面
initialRoute={{component: HelloView}}配置场景:设置跳转方向
_configureScene(route, routeStack){
    return Navigator.SceneConfigs.PushFromLeft;
}
渲染场景:根据路由,生成组件
// 生成组件,变量要用{}包住
_renderScene(route, navigator) {
// 类似<HomeView navigator={navigator} {...route.props}/>
// 把导航控制器传递给HomeView
// ...route.props: 获取route中所有属性,传递给HomeView
// ...扩展符, 作用:如果是对象,就获取对象中所有值,如果是数组,就获取数组中所有值
return (<route.component navigator={navigator} {... route.passProps}/>) }
设置导航尺寸:
style={{flex: 1}}跳转界面
this.props.navigator.push({
    component: Detail,
    title: ‘详细信息‘,
    passProps: {name: ‘scott‘},
})
可以发现,Navigator是不带导航栏的,需要自定义。
如果发现有错误的地方,欢迎各位指出,谢谢!
标签:背景色 弊端 底部导航 bind 步骤 params 进入 动画 导航栏
原文地址:http://www.cnblogs.com/yujihaia/p/7425855.html