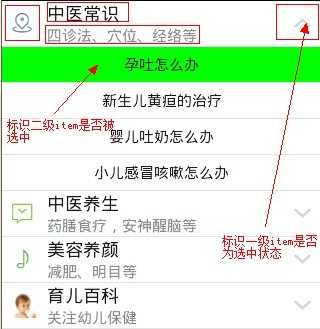
先看效果图:

上图是我们要实现的效果,那么现在我们开始着手去做,主要分为以下几步:
一丶我们需要根据效果图去思考该如何动手,从上图分析看,我们可以用一个相对布局RelativeLayout来完成group(一级item)的布局设计,至于child(二级item)的布局,我们可以用一个TextView来完成,当然,如果如要更复杂的效果可以参照一级item的布局方式进行。
以下是main.xml丶group.xml和child.xml的布局:
main.xml
<?xml version="1.0" encoding="utf-8"?>
<LinearLayout xmlns:android="http://schemas.android.com/apk/res/android"
android:layout_width="fill_parent"
android:layout_height="fill_parent"
android:orientation="vertical" >
<ExpandableListView
android:id="@+id/list"
android:layout_width="fill_parent"
android:layout_height="fill_parent"
android:background="#ffffff"
android:cacheColorHint="#00000000"
android:listSelector="#00000000"
>
</ExpandableListView>
</LinearLayout>
group.xml
<?xml version="1.0" encoding="utf-8"?>
<RelativeLayout xmlns:android="http://schemas.android.com/apk/res/android"
android:layout_width="match_parent"
android:layout_height="match_parent"
android:id="@+id/group_layout">
<ImageView
android:id="@+id/group_logo"
android:layout_width="wrap_content"
android:layout_height="wrap_content"
android:layout_alignParentLeft="true"
android:layout_centerInParent="true"
android:layout_marginLeft="10dp"
android:contentDescription="@string/list_logo" />
<TextView
android:id="@+id/group_title"
android:layout_width="wrap_content"
android:layout_height="wrap_content"
android:layout_marginLeft="10dp"
android:layout_toRightOf="@id/group_logo"
android:textColor="#130c0e"
android:textSize="18sp" />
<TextView
android:id="@+id/group_text"
android:layout_width="wrap_content"
android:layout_height="wrap_content"
android:layout_below="@id/group_title"
android:layout_marginLeft="10dp"
android:layout_toRightOf="@id/group_logo"
android:textColor="#838B8B"
android:textSize="15sp" />
<ImageView
android:id="@+id/group_state"
android:layout_width="wrap_content"
android:layout_height="wrap_content"
android:layout_alignParentRight="true"
android:layout_centerInParent="true"
android:layout_marginRight="10dp"
android:contentDescription="@string/list_state" />
</RelativeLayout>
child.xml
<?xml version="1.0" encoding="utf-8"?>
<RelativeLayout xmlns:android="http://schemas.android.com/apk/res/android"
android:layout_width="match_parent"
android:layout_height="match_parent" >
<TextView
android:id="@+id/child_text"
android:layout_width="wrap_content"
android:layout_height="20dp"
android:layout_centerInParent="true"
android:layout_marginTop="15dp"
android:textColor="#130c0e"
android:textSize="15sp" />
</RelativeLayout>
二、布局文件设置好以后,我们开始着手去实现代码,首先谈谈我在实现过程中遇到的问题:
一:在刚开始为二级item(expandableListView.setOnChildClickListener)设置点击事件时,自己思维进入了一个误区,刷新代码写错位置导致二级item不能实时表明选中状态,实验了一番发现自己脑子发抽,其实把代码转移到点击事件中就OK了。
二:为一级item设置点击事件时,刚开始想套用二级Item点击事件的方法去做,发现行不通后,自己实验了一番,定义了一个整型数组来存放对应groupPosition的点击次数,根据点击次数来设置状态图标,功能虽然实现了,但是感觉自己的这个方法不大实用,如果是动态加入就有点问题了,这个还希望各位看官给点建议。
好了,废话不多说了,下面是实现的代码,希望各位不吝指教:
/**
* 自定义ExpandableList列表类
*
* @author jgduan
*
*/
public class ExpandableList extends Activity {
// 这个数组是用来存储一级item的点击次数的,根据点击次数设置一级标签的选中、为选中状态
private int[] group_checked = new int[]{0,0,0,0,0,0,0,0,0,0,0,0,0,0,0,0,0,0,0,0,0,0,0,0};
// 用来标识是否设置二級item背景色为绿色,初始值为-1既为选中状态
private int child_groupId = -1;
private int child_childId = -1;
protected void onCreate(Bundle savedInstanceState) {
super.onCreate(savedInstanceState);
// 隐藏标题
requestWindowFeature(Window.FEATURE_NO_TITLE);
// 指定布局
setContentView(R.layout.main);
// 新建一个ExpandableListView
ExpandableListView expandableListView = (ExpandableListView) findViewById(R.id.list);
// 设置默认图标为不显示状态
expandableListView.setGroupIndicator(null);
// 为列表绑定数据源
expandableListView.setAdapter(adapter);
// 设置一级item点击的监听器
expandableListView.setOnGroupClickListener(new OnGroupClickListener() {
@Override
public boolean onGroupClick(ExpandableListView parent, View v,
int groupPosition, long id) {
group_checked[groupPosition] = group_checked[groupPosition]+1;
// 刷新界面
((BaseExpandableListAdapter) adapter).notifyDataSetChanged();
return false;
}
});
// 设置二级item点击的监听器
expandableListView.setOnChildClickListener(new OnChildClickListener() {
@Override
public boolean onChildClick(ExpandableListView parent, View v,
int groupPosition, int childPosition, long id) {
// 将被点击的一丶二级标签的位置记录下来
child_groupId = groupPosition;
child_childId = childPosition;
// 刷新界面
((BaseExpandableListAdapter) adapter).notifyDataSetChanged();
return false;
}
});
}
final ExpandableListAdapter adapter = new BaseExpandableListAdapter() {
// 一级标签上的logo图片数据源
int[] group_logo_array = new int[] { R.drawable.map,
R.drawable.message, R.drawable.music, R.drawable.children };
// 一级标签上的标题数据源
private String[] group_title_arry = new String[] { "中医常识", "中医养生",
"美容养颜", "育儿百科" };
// 一级标签的描述文本数据源
private String[] group_text_array = new String[] { "四诊法、穴位、经络等",
"药膳食疗,安神醒脑等", "减肥、明目等", "关注幼儿保健" };
// 子视图显示文字
private String[][] child_text_array = new String[][] {
{ "孕吐怎么办", "新生儿黄疸的治疗", "婴儿吐奶怎么办", "小儿感冒咳嗽怎么办" },
{ "孕吐怎么办", "新生儿黄疸的治疗", "婴儿吐奶怎么办", "小儿感冒咳嗽怎么办" },
{ "孕吐怎么办", "新生儿黄疸的治疗", "婴儿吐奶怎么办", "小儿感冒咳嗽怎么办" },
{ "孕吐怎么办", "新生儿黄疸的治疗", "婴儿吐奶怎么办", "小儿感冒咳嗽怎么办" } };
// 一级标签上的状态图片数据源
int[] group_state_array = new int[] { R.drawable.group_down,
R.drawable.group_up };
// 重写ExpandableListAdapter中的各个方法
/**
* 获取一级标签总数
*/
@Override
public int getGroupCount() {
return group_text_array.length;
}
/**
* 获取一级标签内容
*/
@Override
public Object getGroup(int groupPosition) {
return group_text_array[groupPosition];
}
/**
* 获取一级标签的ID
*/
@Override
public long getGroupId(int groupPosition) {
return groupPosition;
}
/**
* 获取一级标签下二级标签的总数
*/
@Override
public int getChildrenCount(int groupPosition) {
return child_text_array[groupPosition].length;
}
/**
* 获取一级标签下二级标签的内容
*/
@Override
public Object getChild(int groupPosition, int childPosition) {
return child_text_array[groupPosition][childPosition];
}
/**
* 获取二级标签的ID
*/
@Override
public long getChildId(int groupPosition, int childPosition) {
return childPosition;
}
/**
* 指定位置相应的组视图
*/
@Override
public boolean hasStableIds() {
return true;
}
/**
* 对一级标签进行设置
*/
@Override
public View getGroupView(int groupPosition, boolean isExpanded,
View convertView, ViewGroup parent) {
// 为视图对象指定布局
convertView = (RelativeLayout) RelativeLayout.inflate(
getBaseContext(), R.layout.group, null);
/**
* 声明视图上要显示的控件
*/
// 新建一个ImageView对象,用来显示一级标签上的logo图片
ImageView group_logo = (ImageView) convertView
.findViewById(R.id.group_logo);
// 新建一个TextView对象,用来显示一级标签上的标题信息
TextView group_title = (TextView) convertView
.findViewById(R.id.group_title);
// 新建一个TextView对象,用来显示一级标签上的大体描述的信息
TextView group_text = (TextView) convertView
.findViewById(R.id.group_text);
// 新建一个ImageView对象,根据用户点击来标识一级标签的选中状态
ImageView group_state = (ImageView) convertView
.findViewById(R.id.group_state);
/**
* 设置相应控件的内容
*/
// 设置要显示的图片
group_logo.setBackgroundResource(group_logo_array[groupPosition]);
// 设置标题上的文本信息
group_title.setText(group_title_arry[groupPosition]);
// 设置整体描述上的文本信息
group_text.setText(group_text_array[groupPosition]);
if(group_checked[groupPosition] % 2 == 1){
// 设置默认的图片是选中状态
group_state.setBackgroundResource(group_state_array[1]);
}else{
for(int test : group_checked){
if(test == 0 || test % 2 == 0){
// 设置默认的图片是未选中状态
group_state.setBackgroundResource(group_state_array[0]);
}
}
}
// 返回一个布局对象
return convertView;
}
/**
* 对一级标签下的二级标签进行设置
*/
@Override
public View getChildView(int groupPosition, int childPosition,
boolean isLastChild, View convertView, ViewGroup parent) {
// 为视图对象指定布局
convertView = (RelativeLayout) RelativeLayout.inflate(
getBaseContext(), R.layout.child, null);
/**
* 声明视图上要显示的控件
*/
// 新建一个TextView对象,用来显示具体内容
TextView child_text = (TextView) convertView
.findViewById(R.id.child_text);
/**
* 设置相应控件的内容
*/
// 设置要显示的文本信息
child_text.setText(child_text_array[groupPosition][childPosition]);
// 判断item的位置是否相同,如相同,则表示为选中状态,更改其背景颜色,如不相同,则设置背景色为白色
if (child_groupId == groupPosition
&& child_childId == childPosition) {
// 设置背景色为绿色
convertView.setBackgroundColor(Color.GREEN);
} else {
// 设置背景色为白色
convertView.setBackgroundColor(Color.WHITE);
}
// 返回一个布局对象
return convertView;
}
/**
* 当选择子节点的时候,调用该方法
*/
@Override
public boolean isChildSelectable(int groupPosition, int childPosition) {
return true;
}
};
}
}


