标签:row service lib 端口号 启动服务 hub artifact bug 安装部署
Gearman是当年LiveJournal用来做图片resize的,大家也明白图片resize是一个高CPU的操作,如果让web网站去做这个高CPU的功能,有可能会拖垮你的
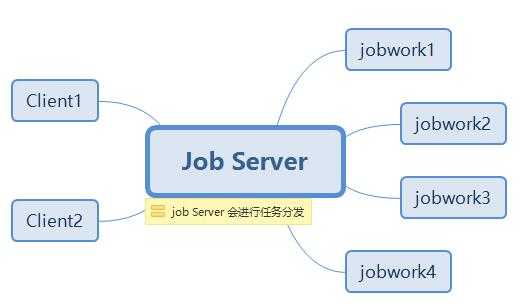
web应用,那本篇我们来看看gearman是如何解决这个问题的,它的架构图类似下面这样:

从上面这张图,你应该会看到,Gearman是由三个部分组成:
1. Job Server
这个就是Gearman的Job Server,通过它对Client 和 jobwork 进行桥接,是不是想起来了中介者模式。。。
2. Client
Gearman提供了Client API 给客户端调用,Client只需要将一个高CPU的业务函数名丢给Job Server,然后等待JobServer的返回执行结果。
3. jobwork
Gearman提供了work API 给work客户端进行调用。jobserver会根据后端的work集群的负载情况,分发给一个合适的work去执行,并等待结果。
说到这里,你应该就明白了,本质上它属于那种分布式的RPC调用,而且非常牛逼的地方在于Client 和 Work 可以用不同的语言实现。
一:安装部署
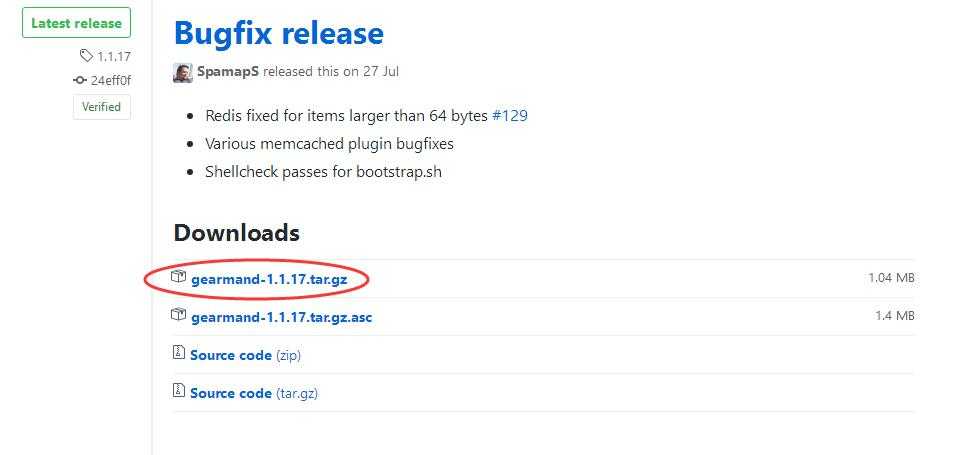
1. 下载地址:https://github.com/gearman/gearmand/releases
目前gearman的JobServer 有C,JAVA,Perl三种语言实现,由于C版本的JobServer是最活跃的,所以这里采用目前最新的1.1.17版本的gearmand在CentOS
上进行安装部署。

2. 快速安装
可以通过官网http://gearman.org/getting-started/中的getting-started进行快速安装。
<1> 基础依赖库安装和gearmand下载
 1 yum -y install boost-devel gperf libevent-devel libuuid-devel gcc44 gcc-c++
 2 wget https://github.com/gearman/gearmand/releases/download/1.1.17/gearmand-1.1.17.tar.gz
 3 cd gearmand-1.1.17.tar.gz
 4 tar xzvf gearmand-1.1.17.tar.gz
 5 cd gearmand-1.1.17
 6 [root@localhost gearmand-1.1.17]# ls
 7 aclocal.m4  build-aux     configure.ac  gear_config.in  libgearman-1.0     libhashkit-1.0  Makefile.am  rpm      THANKS
 8 AUTHORS     ChangeLog     COPYING       gearmand        libgearmancore     libhostile      Makefile.in  scripts  util
 9 benchmark   configmake.h  docs          HACKING         libgearman-server  libtest         man          support  version.m4
10 bin         configure     examples      libgearman      libhashkit         m4              NEWS         tests
<2> 然后就是常规的./configure --prefix=/usr/myapp/gearman && make && make install 这个过程超级慢,可以出去抽跟烟,
顺便再去拉泡屎。。。
1 ./configure --prefix=/usr/myapp/gearman && make && make install
<3> 若干年后,当你看到这个就算安装成功了。。。还是得恭喜一下。。。。至少没让你踩到缺少各种依赖包的界面。
 1 See any operating system documentation about shared libraries for
 2 more information, such as the ld(1) and ld.so(8) manual pages.
 3 ----------------------------------------------------------------------
 4  /usr/bin/mkdir -p ‘/usr/myapp/gearman/sbin‘
 5  /usr/bin/install -c -m 644 man/gearman_worker_create.3 man/gearman_worker_define_function.3 man/gearman_worker_echo.3 man/gearman_worker_errno.3 man/gearman_worker_error.3 man/gearman_worker_free.3 man/gearman_worker_function_exist.3 man/gearman_worker_grab_job.3 man/gearman_worker_options.3 man/gearman_worker_register.3 man/gearman_worker_remove_options.3 man/gearman_worker_remove_servers.3 man/gearman_worker_set_context.3 man/gearman_worker_set_log_fn.3 man/gearman_worker_set_namespace.3 man/gearman_worker_set_options.3 man/gearman_worker_set_timeout.3 man/gearman_client_has_option.3 man/gearman_client_options_t.3 man/gearman_task_attr_init.3 man/gearman_task_attr_init_background.3 man/gearman_task_attr_init_epoch.3 man/gearman_task_attr_t.3 man/gearman_worker_set_identifier.3 man/gearman_worker_set_workload_free_fn.3 man/gearman_worker_set_workload_malloc_fn.3 man/gearman_worker_st.3 man/gearman_worker_timeout.3 man/gearman_worker_unregister.3 man/gearman_worker_unregister_all.3 man/gearman_worker_wait.3 man/gearman_worker_work.3 man/libgearman.3 ‘/usr/myapp/gearman/share/man/man3‘
 6   /bin/sh ./libtool   --mode=install /usr/bin/install -c gearmand/gearmand ‘/usr/myapp/gearman/sbin‘
 7 libtool: install: /usr/bin/install -c gearmand/gearmand /usr/myapp/gearman/sbin/gearmand
 8  /usr/bin/mkdir -p ‘/usr/myapp/gearman/bin‘
 9   /bin/sh ./libtool   --mode=install /usr/bin/install -c bin/gearman bin/gearadmin ‘/usr/myapp/gearman/bin‘
10 libtool: install: /usr/bin/install -c bin/.libs/gearman /usr/myapp/gearman/bin/gearman
11 libtool: install: /usr/bin/install -c bin/gearadmin /usr/myapp/gearman/bin/gearadmin
12 make[3]: Leaving directory `/usr/myapp/gearmand-1.1.17‘
13 make[2]: Leaving directory `/usr/myapp/gearmand-1.1.17‘
14 make[1]: Leaving directory `/usr/myapp/gearmand-1.1.17‘
<4> 启动gearmand,你也可以用 -d 开启后台运行的模式,这里加上DEBUG只是看一下实时的DEBUG信息,如下所示:
 1 [root@localhost myapp]# cd /usr/myapp/gearman
 2 [root@localhost gearman]# ls
 3 bin  include  lib  sbin  share
 4 [root@localhost gearman]# cd bin
 5 [root@localhost bin]# ls
 6 gearadmin  gearman
 7 [root@localhost bin]# cd /usr/myapp/gearman
 8 [root@localhost gearman]# cd sbin
 9 [root@localhost sbin]# ls
10 gearmand
11 [root@localhost sbin]# ./gearmand --verbose DEBUG
12 ./gearmand: Could not open log file "/usr/myapp/gearman/var/log/gearmand.log", from "/usr/myapp/gearman/sbin", switching to stderr. (No such file or directory)
13   DEBUG 2017-08-29 02:31:10.796259 [  main ] THREADS: 4 -> libgearman-server/gearmand.cc:263
14    INFO 2017-08-29 02:31:10.796374 [  main ] Initializing Gear on port 4730 with SSL: false
15    INFO 2017-08-29 02:31:10.796487 [  main ] Starting up with pid 40299, verbose is set to DEBUG
16   DEBUG 2017-08-29 02:31:10.796637 [  main ] Method for libevent: epoll -> libgearman-server/gearmand.cc:364
17   DEBUG 2017-08-29 02:31:10.798874 [  main ] Trying to listen on 0.0.0.0:4730 -> libgearman-server/gearmand.cc:646
18    INFO 2017-08-29 02:31:10.800151 [  main ] Listening on 0.0.0.0:4730 (8)
19   DEBUG 2017-08-29 02:31:10.800175 [  main ] Trying to listen on :::4730 -> libgearman-server/gearmand.cc:646
20    INFO 2017-08-29 02:31:10.800307 [  main ] Listening on :::4730 (9)
21   DEBUG 2017-08-29 02:31:10.800333 [  main ] Creating wakeup pipe -> libgearman-server/gearmand.cc:915
22   DEBUG 2017-08-29 02:31:10.800344 [  main ] Creating 4 threads -> libgearman-server/gearmand.cc:378
23   DEBUG 2017-08-29 02:31:10.800357 [  main ] Initializing libevent for IO thread -> libgearman-server/gearmand_thread.cc:224
24   DEBUG 2017-08-29 02:31:10.800406 [  main ] Creating IO thread wakeup pipe -> libgearman-server/gearmand_thread.cc:495
25   DEBUG 2017-08-29 02:31:10.800467 [  main ] Thread 1 created -> libgearman-server/gearmand_thread.cc:273
26   DEBUG 2017-08-29 02:31:10.800507 [  main ] Initializing libevent for IO thread -> libgearman-server/gearmand_thread.cc:224
27   DEBUG 2017-08-29 02:31:10.800550 [  main ] Creating IO thread wakeup pipe -> libgearman-server/gearmand_thread.cc:495
28   DEBUG 2017-08-29 02:31:10.800585 [  main ] Thread 2 created -> libgearman-server/gearmand_thread.cc:273
29   DEBUG 2017-08-29 02:31:10.800594 [  main ] Initializing libevent for IO thread -> libgearman-server/gearmand_thread.cc:224
30   DEBUG 2017-08-29 02:31:10.800632 [  main ] Creating IO thread wakeup pipe -> libgearman-server/gearmand_thread.cc:495
31   DEBUG 2017-08-29 02:31:10.800669 [  main ] Thread 3 created -> libgearman-server/gearmand_thread.cc:273
32   DEBUG 2017-08-29 02:31:10.800677 [  main ] Initializing libevent for IO thread -> libgearman-server/gearmand_thread.cc:224
33   DEBUG 2017-08-29 02:31:10.800714 [  main ] Creating IO thread wakeup pipe -> libgearman-server/gearmand_thread.cc:495
34   DEBUG 2017-08-29 02:31:10.800753 [  main ] Thread 4 created -> libgearman-server/gearmand_thread.cc:273
35   DEBUG 2017-08-29 02:31:10.800761 [  main ] replaying queue: begin -> libgearman-server/gearmand.cc:391
36   DEBUG 2017-08-29 02:31:10.800766 [  main ] __replay -> libgearman-server/plugins/queue/default/queue.cc:101
37   DEBUG 2017-08-29 02:31:10.800774 [  main ] replaying queue: end -> libgearman-server/gearmand.cc:397
38    INFO 2017-08-29 02:31:10.800780 [  main ] Adding event for listening socket (8)
39    INFO 2017-08-29 02:31:10.800787 [  main ] Adding event for listening socket (9)
40   DEBUG 2017-08-29 02:31:10.800794 [  main ] Adding event for wakeup pipe -> libgearman-server/gearmand.cc:966
41   DEBUG 2017-08-29 02:31:10.800801 [  main ] Entering main event loop -> libgearman-server/gearmand.cc:406
42   DEBUG 2017-08-29 02:31:10.801186 [     2 ] Entering thread event loop -> libgearman-server/gearmand_thread.cc:463
43   DEBUG 2017-08-29 02:31:10.801277 [     3 ] Entering thread event loop -> libgearman-server/gearmand_thread.cc:463
44   DEBUG 2017-08-29 02:31:10.801507 [  main ] staring up Epoch thread -> libgearman-server/timer.cc:61
45   DEBUG 2017-08-29 02:31:10.801635 [     1 ] Entering thread event loop -> libgearman-server/gearmand_thread.cc:463
46   DEBUG 2017-08-29 02:31:10.802426 [     4 ] Entering thread event loop -> libgearman-server/gearmand_thread.cc:463
<5> 最后通过netstat,lsof, ps -ef 三板斧可以找出来gearmand大概占用的端口号,就如你看到的默认占用的4370端口,
当然你也可以在启动的时候用help命令也是能够知道的。
 1 [root@localhost ~]# netstat -tln
 2 Active Internet connections (only servers)
 3 Proto Recv-Q Send-Q Local Address           Foreign Address         State
 4 tcp        0      0 192.168.122.1:53        0.0.0.0:*               LISTEN
 5 tcp        0      0 0.0.0.0:22              0.0.0.0:*               LISTEN
 6 tcp        0      0 127.0.0.1:631           0.0.0.0:*               LISTEN
 7 tcp        0      0 127.0.0.1:25            0.0.0.0:*               LISTEN
 8 tcp        0      0 0.0.0.0:4730            0.0.0.0:*               LISTEN
 9 tcp6       0      0 :::8009                 :::*                    LISTEN
10 tcp6       0      0 :::8080                 :::*                    LISTEN
11 tcp6       0      0 :::22                   :::*                    LISTEN
12 tcp6       0      0 ::1:631                 :::*                    LISTEN
13 tcp6       0      0 ::1:25                  :::*                    LISTEN
14 tcp6       0      0 :::4730                 :::*                    LISTEN
15 tcp6       0      0 127.0.0.1:8005          :::*                    LISTEN
16 [root@localhost ~]# ps -ef | grep gearmand
17 root      40299  15869  0 02:31 pts/1    00:00:00 ./gearmand --verbose DEBUG
18 root      40364  40327  0 02:33 pts/2    00:00:00 grep --color=auto gearmand
19 [root@localhost ~]# lsof -i :4730
20 COMMAND    PID USER   FD   TYPE DEVICE SIZE/OFF NODE NAME
21 gearmand 40299 root    8u  IPv4 322550      0t0  TCP *:gearman (LISTEN)
22 gearmand 40299 root    9u  IPv6 322551      0t0  TCP *:gearman (LISTEN)
23 [root@localhost ~]#
二:Java Driver 在 Gearman上的使用
为了演示,我可以做一个简单的 “字符串.ToUpper”的业务逻辑来验证一下这个架构是否可以跑的起来。
1. java 充当 Gearman 的 work
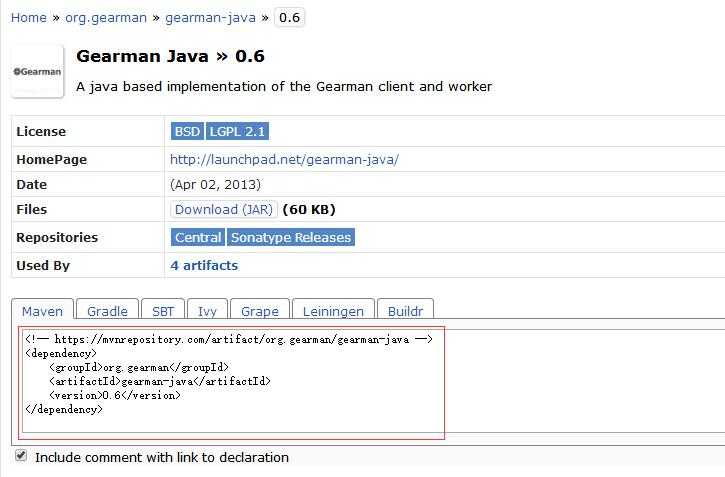
首先需要在mvn仓库中拉一下jar包:http://www.mvnrepository.com/artifact/org.gearman/gearman-java/0.6。

<1> UpperFunction类,这个类用于定义work具体的业务逻辑:
 1 package com.datamip.gearmanwork;
 2
 3 import java.text.SimpleDateFormat;
 4 import java.util.Date;
 5
 6 import org.gearman.client.GearmanJobResult;
 7 import org.gearman.client.GearmanJobResultImpl;
 8 import org.gearman.util.ByteUtils;
 9 import org.gearman.worker.AbstractGearmanFunction;
10
11 //字符串大写的业务Function
12 public class UpperFunction extends AbstractGearmanFunction {
13
14     @Override
15     public GearmanJobResult executeFunction() {
16
17         String param = ByteUtils.fromUTF8Bytes((byte[]) this.data);
18
19         byte[] mybytes = param.toUpperCase().getBytes();
20
21         GearmanJobResultImpl result = new GearmanJobResultImpl(mybytes, true, mybytes, null, null, -1, -1);
22
23         SimpleDateFormat formatter = new SimpleDateFormat("yyyy-MM-dd HH:mm:ss");
24
25         String dateString = formatter.format(new Date());
26
27         System.out.println(String.format("当前时间:%s, 过来的字符串:%s,返回的字符串:%s", dateString, param,new String(mybytes)));
28
29         return result;
30     }
31 }
<2> 将UpperFunction注册到gearmand中,从红色代码可以看到,其实是一个kv模式,这里的key="myUpperFunc”的对应执行业务就是new UpperFunction。
这样Client只需要传递一个"myUpperFunc",Gearmand就知道这个“字符串”对应是哪一个处理函数。。。
 1 public class App {
 2     public static void main(String[] args) {
 3
 4         GearmanWorker worker = new GearmanWorkerImpl();
 5
 6         GearmanNIOJobServerConnection conn = new GearmanNIOJobServerConnection("192.168.23.170", 4730);
 7         worker.addServer(conn);
 8
 9         // 将‘将转大写的函数注册’ 到gearmand中
10         worker.registerFunctionFactory(new GearmanFunctionFactory() {
11
12             public String getFunctionName() {
13                 return "myUpperFunc";
14             }
15
16             public GearmanFunction getFunction() {
17                 return new UpperFunction();
18             }
19         });
20
21         System.out.println("启动服务。。。。");
22
23         worker.work();
24     }
25 }
2. java 充当 Gearman 的 client
<1> GearSubmit类【简单的一个包装类,随便定义】
 1 package com.datamip.gearmanclient;
 2
 3 import java.util.concurrent.ExecutionException;
 4 import java.util.concurrent.ExecutorService;
 5 import java.util.concurrent.Executors;
 6 import java.util.concurrent.Future;
 7
 8 import org.gearman.client.GearmanClient;
 9 import org.gearman.client.GearmanClientImpl;
10 import org.gearman.client.GearmanJob;
11 import org.gearman.client.GearmanJobImpl;
12 import org.gearman.client.GearmanJobResult;
13 import org.gearman.common.GearmanJobServerConnection;
14 import org.gearman.common.GearmanNIOJobServerConnection;
15 import org.gearman.util.ByteUtils;
16
17 public class Gearsubmit {
18
19     public  void process() throws InterruptedException, ExecutionException {
20
21         GearmanJobServerConnection conn = new GearmanNIOJobServerConnection("192.168.23.170", 4730);
22
23         GearmanClient client = new GearmanClientImpl();
24
25         client.addJobServer(conn); // 添加连接
26
27         String functionName = "myUpperFunc";
28
29         byte[] data = ByteUtils.toUTF8Bytes("hello,world");
30
31         // 创建后台任务
32         GearmanJob job = GearmanJobImpl.createJob(functionName, data, null);
33
34         GearmanJobResult jobResult = null;
35
36         Future<GearmanJobResult> gearmanJobResult = client.submit(job);
37
38         jobResult = gearmanJobResult.get();
39
40         byte[] resultBytes = jobResult.getResults();
41
42         // 获取job的返回值
43         String value = ByteUtils.fromUTF8Bytes(resultBytes);
44
45         System.out.println(value);
46
47         System.out.println("执行结束");
48
49         client.shutdown();
50     }
51 }
<2> 主程序,开多线程并发的去执行。
 1 public class App {
 2     public static void main(String[] args) throws InterruptedException, ExecutionException, IOException {
 3
 4         ExecutorService executorService = Executors.newFixedThreadPool(100);
 5
 6         for (int i = 0; i < 10000; i++) {
 7             executorService.execute(new Runnable() {
 8
 9                 @Override
10                 public void run() {
11                     Gearsubmit submit=new Gearsubmit();
12
13                     try {
14                         submit.process();
15                     } catch (InterruptedException | ExecutionException e) {
16                         // TODO Auto-generated catch block
17                         e.printStackTrace();
18                     }
19                 }
20             });
21         }
22
23         System.in.read();
24     }
25 }
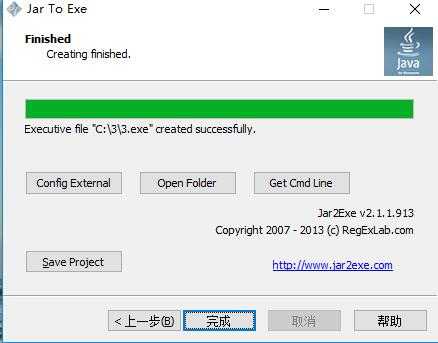
好了,一切都准备好了,接下来为了演示,演示就是解释,我用Jar2Exe把work程序导出成jar再转换成exe,如下图:


然后我把3.exe开成5个实例,client用100个线程的线程池并发调用,当然一切都是模拟。。。。可以看到,当我client启动的时候,5个work都在执行,
如果这个时候,你把某一个work停止了,jobserver也不再将任务丢给它,而是转给其他负载相对小的work继续执行。

好了,本篇就说到这里,希望对你有帮助。
标签:row service lib 端口号 启动服务 hub artifact bug 安装部署
原文地址:http://www.cnblogs.com/huangxincheng/p/7449722.html