标签:安装mysql 下载 yum conf mpi man 上传 extra efi
LNMP=Linux+Nginx+MySQL+php
所以搭建LNMP需要逐一安装这几个包
下面我们就逐一安装各种包
安装环境centos6.8_64
一、安装Nginx1.10.3
卸载Linux自带的MySQL5.1.73、安装Nginx
使用下面命令卸载
yum remove mysql -y
安装Nginx需要的依赖包
yum -y install gcc gcc-c++ autoconf automake zlib zlib-devel openssl openssl-devel pcre*
显示pcre*安装不成功
现在我们需要把pcre*
上传并解压到指定的目录
tar zxf pcre-8.38.tar.gz -C /usr/local/src
上传Nginx包并解压到指定位置、并到Nginx包目录下
rz nginx-1.10.3.tar.gz
tar zxf nginx-1.10.3.tar.gz -C /usr/local/src; cd /usr/local/src/nginx-1.10.3
创建Nginx用户
[root@juny-11 nginx-1.10.3]# useradd -M -s /sbin/nologin nginx
useradd -M -s /sbin/nologin nginx
开始编译
./configure --prefix=/usr/local/nginx --with-http_dav_module --with-http_stub_status_module --with-http_addition_module --with-http_sub_module --with-http_flv_module --with-http_mp4_module --with-pcre=/usr/local/src/pcre-8.38 --user=nginx --group=nginx
下一步,使用make -j 4
[root@juny-11 nginx-1.10.3]# make -j 4
make -j 4
开始编译安装
[root@juny-11 nginx-1.10.3]# make install
make install
编译安装结束以后修改配置支持php文件
增加一个Nginx用户;修改弟66行的html的配置文件

把前面的注释去掉并把Nginx的网页路径增加到相应的位置
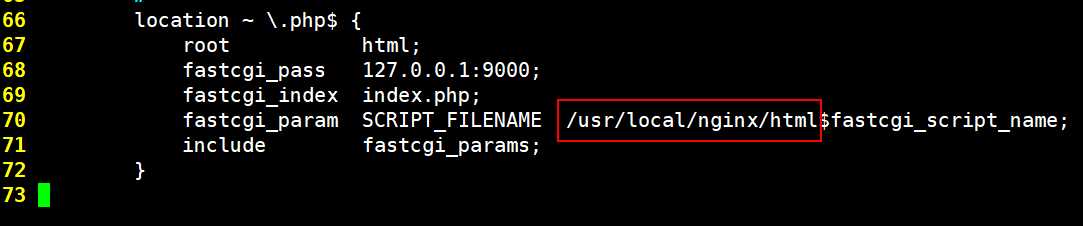
保存并退出
创建一个软连接
[root@juny-11 ~]# ln -s /usr/local/nginx/sbin/nginx /usr/local/sbin/
ln -s /usr/local/nginx/sbin/nginx /usr/local/sbin/
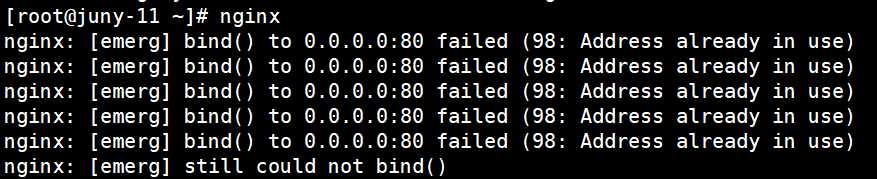
验证Nginx的安装
nginx
nginx -t
[root@juny-11 ~]# nginx -t
nginx: the configuration file /usr/local/nginx/conf/nginx.conf syntax is ok
nginx: configuration file /usr/local/nginx/conf/nginx.conf test is successful
给Nginx一个执行权限
[root@juny-11 ~]# chmod +x /etc/init.d/nginx
增加开机自启动
[root@juny-11 ~]# chkconfig --add nginx
chkconfig --add nginx
设置开机自启动
[root@juny-11 ~]# chkconfig nginx on
chkconfig nginx on
测试、测试前先关闭防火墙
[root@juny-11 ~]# iptables -F
iptables -F
在浏览器上输入本服务器的ip地址进行测试
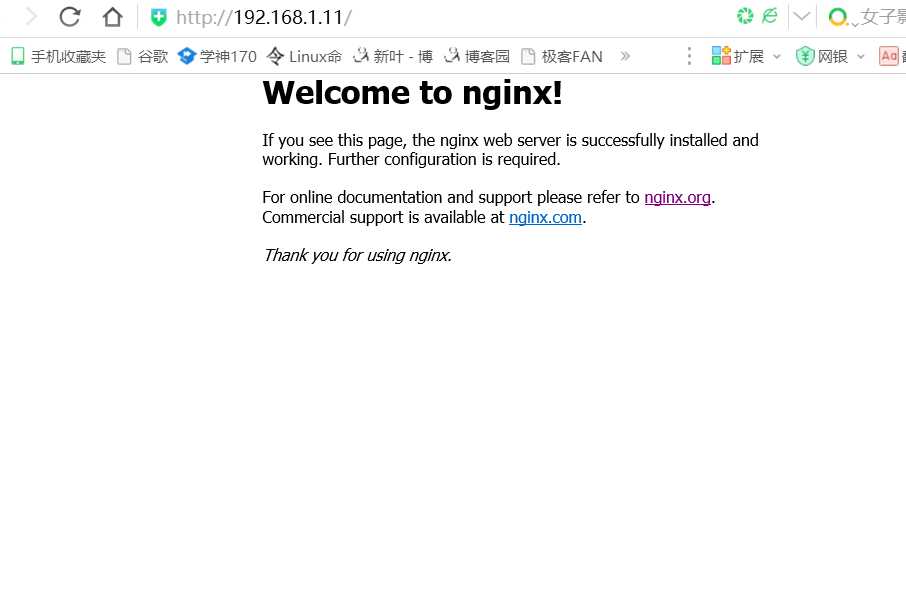
表示安装成功
如是虚拟机的可以拍摄一个快照保存
二、编译安装MySQL
准备MySQL 5.6.26的安装包、可以根据这两个链接下载安装包
http://dev.mysql.com/doc/refman/5.6/en/getting-mysql.html
http://dev.mysql.com/downloads/mirrors.htm
安装编译需要的依赖包
[root@juny-11 ~]# yum install gcc-c++ gdb make ncurses-devel bison-devel -y
yum install gcc-c++ gdb make ncurses-devel bison-devel -y
安装结束依赖包
创建MySQL用
[root@juny-11 ~]# groupadd mysql
groupadd mysql
创建组
[root@juny-11 ~]# useradd -M -s /sbin/nologin -r -g mysql mysql
useradd -M -s /sbin/nologin -r -g mysql mysql
进行解压并安到指定目录里面去
[root@juny-11 ~]# tar zxf mysql-5.6.26.tar.gz -C /usr/local/src/ ; cd /usr/local/src/mysql-5.6.26
tar zxf mysql-5.6.26.tar.gz -C /usr/local/src/ ; cd /usr/local/src/mysql-5.6.26
开始编译
cmake -DCMAKE_INSTALL_PREFIX=/usr/local/mysql -DMYSQL_UNIX_ADDR=/tmp/mysql.sock -DDEFAULT_CHARSET=utf8 -DDEFAULT_COLLATION=utf8_general_ci -DWITH_EXTRA_CHARSETS=all -DWITH_MYISAM_STORAGE_ENGINE=1 -DWITH_INNOBASE_STORAGE_ENGINE=1 -DWITH_MEMORY_STORAGE_ENGINE=1 -DWITH_READLINE=1 -DENABLED_LOCAL_INFILE=1 -DMYSQL_DATADIR=/usr/local/mysql/data -DMYSQL-USER=mysql
使用make开始编译、编译大概需要10分钟左右,主要是看自己的配置
[root@juny-11 mysql-5.6.26]# make -j 4
make -j 4
编译安装
[root@juny-11 mysql-5.6.26]# make install
make install
配置MySQL
更改属主
[root@juny-11 mysql-5.6.26]# chown -R mysql:mysql /usr/local/mysql/
chown -R mysql:mysql /usr/local/mysql/
覆盖配置文件并更改my.cnf的位置
[root@juny-11 ~]# cp /usr/local/mysql/support-files/my-default.cnf /etc/my.cnf
cp /usr/local/mysql/support-files/my-default.cnf /etc/my.cnf
拷贝启动脚本
[root@juny-11 ~]# cp /usr/local/mysql/support-files/mysql.server /etc/init.d/mysqld
cp /usr/local/mysql/support-files/mysql.server /etc/init.d/mysqld
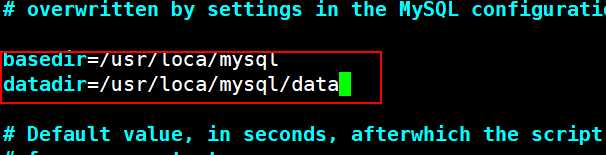
修改启动 配置文件
[root@juny-11 ~]# vim /etc/init.d/mysqld
vim /etc/init.d/mysqld
给MySQL 777权限
[root@juny-11 ~]# chmod 777 /etc/init.d/mysqld
chmod 777 /etc/init.d/mysqld
增加开启启动并设置开机自启
[root@juny-11 ~]# chkconfig --add mysqld
[root@juny-11 ~]# chkconfig mysqld on
chkconfig --add mysqld && chkconfig mysqld on
初始化数据库(重要)
初始化数据库出现问题
[root@juny-11 ~]# /usr/local/mysql/scripts/mysql_install_db --user=mysql
FATAL ERROR: Could not find ./bin/my_print_defaults
If you compiled from source, you need to run ‘make install‘ to
copy the software into the correct location ready for operation.
If you are using a binary release, you must either be at the top
level of the extracted archive, or pass the --basedir option
pointing to that location.
使用yum undate -y 更新系统
添加服务,拷贝服务脚本到init.d目录
cp support-files/mysql.server /etc/init.d/mysql
启动MySQL
service mysql start
启动成功以后,配置MySQL密码为123456
mysql> SET PASSWORD = PASSWORD(‘123456‘);
SET PASSWORD = PASSWORD(‘123456‘);
安装完成
三、安装php
标签:安装mysql 下载 yum conf mpi man 上传 extra efi
原文地址:http://www.cnblogs.com/it-hack/p/7476663.html