标签:ref dom 根据 cte service dir doc user use
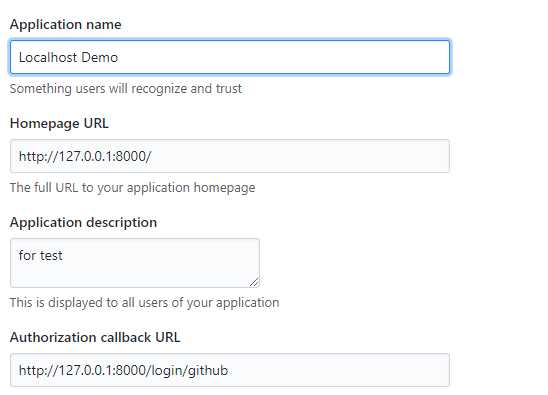
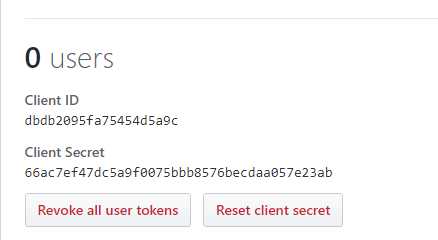
1. 因为使用的是github账号登陆,所以先自己注册一个github账号,登陆成功后点击右上角的头像选择其中的setting;选择左边列表中的OAuth Apps,点击Register a new application,根据要求填入数据,其中的Homepage URL我直接填写本地项目首页地址 http://127.0.0.1:8000/,Authorization callback URL填写http://127.0.0.1:8000//login/github(此为回调地址即在此处对从github获取回来的信息进行处理),点击下方Register application即可生成我们想要的Client Id 和Client Secret,第一步到此为止。


2. 使用composer安装第三方登录所需的依赖包,我使用的是安正超的overtrue/socialite这个包,在composer.json中加入
"overtrue/socialite": "~1.1"
然后执行
composer update
等待安装完成即可
3. 创建两个路由和对应的控制器(根据自己情况命名)
Route::get(‘/github‘, ‘TestController@github‘);
Route::get(‘/login/github‘, ‘TestController@githubLogin‘);
第一个路由用来让github进行信息验证,第二个路由用来进行回调信息处理(创建账号)。
4. 在控制器中创建对应的方法,根据我们引用的包在gibhub中给我们的readMe文件可以轻松填写控制器方法中的内容,github项目地址https://github.com/overtrue/socialite,
(实际开发中出于信息安全考虑应该将config中的参数卸载env文件,然后引入config文件夹的service.php中,最后通过config函数获取出来值)
protected $config = [
    ‘github‘ => [
	‘client_id‘     => ‘dbdb2095fa75454d5a9c‘,
        ‘client_secret‘ => ‘66ac7ef47dc5a9f0075bbb8576becdaa057e23ab‘,
        ‘redirect‘      => ‘http://127.0.0.1:8000/login/github‘,
    ],
];
public function github () {
    $socialite = new SocialiteManager($this->config);

    $response = $socialite->driver(‘github‘)->redirect();

    return $response;
}
public function githubLogin () {
    $socialite = new SocialiteManager($this->config);

    $githubUser = $socialite->driver(‘github‘)->user();

     user::create([
	‘name‘ => $githubUser->getNickname(),
	‘email‘ => $githubUser->getEmail(),
	‘password‘ => bcrypt(str_random(16)),
    ]);

    return redirect(‘/‘);
}
第二个方法中直接将从github获取的个人信息创建成了账户,(user表中应该有两个字段social_type和social_id,假如github登陆social_type存github,social_id存你在github中的用户id来判断唯一性)。
5. 在执行第一个路由验证github信息的时候可能出现报错
cURL error 60: SSL certificate: unable to get local issuer certificate
此为SSL证书问题,解决方法:https://easywechat.org/zh-cn/docs/troubleshooting.html#curl-60-SSL-certificate-problem-unable-to-get-local-issuer-certificate
标签:ref dom 根据 cte service dir doc user use
原文地址:http://www.cnblogs.com/cyclzdblog/p/7500888.html