标签:info 保存 apm gate 列操作 顺序 tle wait 创建
在 ASP.NET 中,我们知道,它有一个面向切面的请求管道,有19个主要的事件构成,能够让我们进行灵活的扩展。通常是在 web.config 中通过注册 HttpModule来实现对请求管道事件监听,并通过 HttpHandler 进入到我们的应用程序中。而在 ASP.NET Core 中,对请求管道进行了重新设计,通过使用一种称为中间件的方式来进行管道的注册,同时也变得更加简洁和强大。
本系列文章从源码分析的角度来探索 ASP.NET Core 的运行原理,分为以下几个章节:
ASP.NET Core 运行原理解剖[1]:Hosting
ASP.NET Core 运行原理解剖[2]:Hosting补充之配置介绍
ASP.NET Core 运行原理解剖[3]:Middleware-请求管道的构成(Current)
ASP.NET Core 运行原理解剖[4]:进入HttpContext的世界
ASP.NET Core 运行原理解剖[5]:Authentication
在第一章中,我们就介绍过 IApplicationBuilder,在我们熟悉的 Startup 类的Configure方法中,通常第一个参数便是IApplicationBuilder,对它应该是非常熟悉了,而在这里,就再彻底的解剖一下 IApplicationBuilder 对象。
首先,IApplicationBuilder 是用来构建请求管道的,而所谓请求管道,本质上就是对 HttpContext 的一系列操作,即通过对 Request 的处理,来生成 Reponse。因此,在 ASP.NET Core 中定义了一个 RequestDelegate 委托,来表示请求管道中的一个步骤,它有如下定义:
public delegate Task RequestDelegate(HttpContext context);而对请求管道的注册是通过 Func<RequestDelegate, RequestDelegate> 类型的委托(也就是中间件)来实现的。
为什么要设计一个这样的委托呢?让我们来分析一下,它接收一个 RequestDelegate 类型的参数,并返回一个 RequestDelegate 类型,也就是说前一个中间件的输出会成为下一个中间件的输入,这样把他们串联起来,形成了一个完整的管道。那么第一个中间件的输入是什么,最后一个中间件的输出又是如何处理的呢?带着这个疑惑,我们慢慢往下看。
IApplicationBuilder 的默认实现是 ApplicationBuilder,它的定义在 HttpAbstractions 项目中 :
public interface IApplicationBuilder
{
    IServiceProvider ApplicationServices { get; set; }

    IFeatureCollection ServerFeatures { get; }

    IDictionary<string, object> Properties { get; }

    IApplicationBuilder Use(Func<RequestDelegate, RequestDelegate> middleware);

    IApplicationBuilder New();

    RequestDelegate Build();
}

public class ApplicationBuilder : IApplicationBuilder
{
    private readonly IList<Func<RequestDelegate, RequestDelegate>> _components = new List<Func<RequestDelegate, RequestDelegate>>();

    ...
}
它有一个内部的 Func<RequestDelegate, RequestDelegate> 类型的集合(用来保存我们注册的中间件)和三个核心方法:
Use是我们非常熟悉的注册中间件的方法,其实现非常简单,就是将注册的中间件保存到其内部属性 _components 中。
public IApplicationBuilder Use(Func<RequestDelegate, RequestDelegate> middleware)
{
    _components.Add(middleware);
    return this;
}我们使用Use注册两个简单的中间件:
public void Configure(IApplicationBuilder app)
{
    app.Use(next =>
    {
        Console.WriteLine("A");
        return async (context) =>
        {
            // 1. 对Request做一些处理
            // TODO

            // 2. 调用下一个中间件
            Console.WriteLine("A-BeginNext");
            await next(context);
            Console.WriteLine("A-EndNext");

            // 3. 生成 Response
            //TODO
        };
    });

    app.Use(next =>
    {
        Console.WriteLine("B");
        return async (context) =>
        {
            // 1. 对Request做一些处理
            // TODO

            // 2. 调用下一个中间件
            Console.WriteLine("B-BeginNext");
            await next(context);
            Console.WriteLine("B-EndNext");

            // 3. 生成 Response
            //TODO
        };
    });
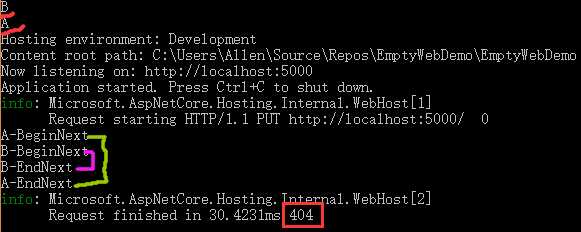
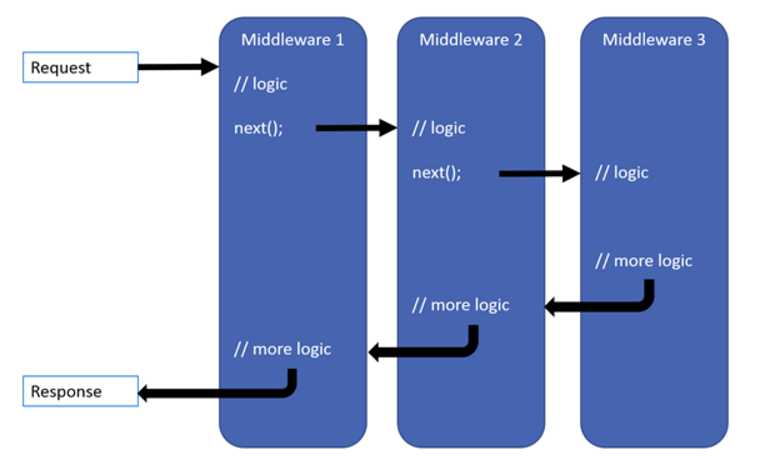
}如上,注册了A和B两个中间件,通常每一个中间件有如上所示三个处理步骤,也就是围绕着Next分别对Request和Respone做出相应的处理,而B的执行会嵌套在A的里面,因此A是第一个处理Request,并且最后一个收到Respone,这样就构成一个经典的的U型管道。
而上面所示代码的执行结算如下:

非常符合我们的预期,但是最终返回的结果是一个 404 HttpNotFound,这又是为什么呢?让我们再看一下它的 Build 方法。
第一章中,我们介绍到,在 Hosting 的启动中,便是通过该 Build 方法创建一个 RequestDelegate 类型的委托,Http Server 通过该委托来完成整个请求的响应,它有如下定义:
public RequestDelegate Build()
{
    RequestDelegate app = context =>
    {
        context.Response.StatusCode = 404;
        return Task.CompletedTask;
    };

    foreach (var component in _components.Reverse())
    {
        app = component(app);
    }

    return app;
}
可以看到首先定义了一个 404 的中间件,然后使用了Reverse函数将注册的中间件列表进行反转,因此首先执行我们所注册的最后一个中间件,输入参数便是一个 404 ,依次执行到第一个中间件,将它的输出传递给 HostingApplication 再由 IServer 来执行。整个构建过程是类似于俄罗斯套娃,按我们的注册顺序从里到外,一层套一层。
最后,再解释一下,上面的代码返回404的原因。RequestDelegate的执行是从俄罗斯套娃的最外层开始,也就是从我们注册的第一个中间件A开始执行,A调用B,B则调用前面介绍的404 的中间件,最终也就返回了一个 404,那如何避免返回404呢,这时候就要用到 IApplicationBuilder 的扩展方法Run了。
对于上面 404 的问题,我们只需要对中间件A做如下修改即可:
app.Use(next =>
{
    Console.WriteLine("B");
    return async (context) =>
    {
        // 1. 对Request做一些处理
        // TODO

        // 2. 调用下一个中间件
        Console.WriteLine("B-BeginNext");
        await context.Response.WriteAsync("Hello ASP.NET Core!");
        Console.WriteLine("B-EndNext");

        // 3. 生成 Response
        //TODO
    };
});
将之前的 await next(context); 替换成了 await context.Response.WriteAsync("Hello ASP.NET Core!");,自然也就将404替换成了返回一个 "Hello ASP.NET Core!" 字符串。
在我们注册的中间件中,是通过 Next 委托 来串连起来的,如果在某一个中间件中没有调用 Next 委托,则该中间件将做为管道的终点,因此,我们在最后一个中间件不应该再调用 Next 委托,而 Run 扩展方法,通常用来注册最后一个中间件,有如下定义:
public static class RunExtensions
{
    public static void Run(this IApplicationBuilder app, RequestDelegate handler)
    {
        if (app == null)
        {
            throw new ArgumentNullException(nameof(app));
        }

        if (handler == null)
        {
            throw new ArgumentNullException(nameof(handler));
        }

        app.Use(_ => handler);
    }
}可以看到,Run 方法接收的只有一个 RequestDelegate 委托,没有了 Next 委托,进而保证了它不会再调用下一个中间件,即使我们在它之后注册了其它中间件,也不会被执行。因此建议,我们最终处理 Response 的中间件使用 Run 来注册,类似于 ASP.NET 4.x 中的 HttpHandler。
而 IApplicationBuilder 还有一个常用的 New 方法,通常用来创建分支:
public class ApplicationBuilder : IApplicationBuilder
{
    private ApplicationBuilder(ApplicationBuilder builder)
    {
        Properties = new CopyOnWriteDictionary<string, object>(builder.Properties, StringComparer.Ordinal);
    }

    public IApplicationBuilder New()
    {
        return new ApplicationBuilder(this);
    }
}
New 方法根据自身来“克隆”了一个新的 ApplicationBuilder 对象,而新的 ApplicationBuilder 可以访问到创建它的对象的 Properties 属性,但是对自身 Properties 属性的修改,却不到影响到它的创建者,这是通过 CopyOnWriteDictionary 来实现的:
internal class CopyOnWriteDictionary<TKey, TValue> : IDictionary<TKey, TValue>
{
    private readonly IDictionary<TKey, TValue> _sourceDictionary;

    public CopyOnWriteDictionary(IDictionary<TKey, TValue> sourceDictionary, IEqualityComparer<TKey> comparer)
    {
        _sourceDictionary = sourceDictionary;
        _comparer = comparer;
    }

    private IDictionary<TKey, TValue> ReadDictionary => _innerDictionary ?? _sourceDictionary;

    private IDictionary<TKey, TValue> WriteDictionary =>
    {
        if (_innerDictionary == null)
        {
            _innerDictionary = new Dictionary<TKey, TValue>(_sourceDictionary, _comparer);
        }
        return _innerDictionary;
    };
}
最后再放一张网上经典的 ASP.NET Core 请求管道图:

通过上面的介绍,我们知道,中间件本质上就是一个类型为 Func<RequestDelegate, RequestDelegate> 的委托对象,但是直接使用这个委托对象还是多有不便,因此 ASP.NET Core 提供了一个更加具体的中间件的概念,我们在大部分情况下都会将中间件定义成一个单独的类型,使代码更加清晰。
首先看一下 IMiddleware 接口定义:
public interface IMiddleware
{
    Task InvokeAsync(HttpContext context, RequestDelegate next);
}
IMiddleware 中只有一个方法:InvokeAsync,它接收一个 HttpContext 参数,用来处理HTTP请求,和一个 RequestDelegate 参数,代表下一个中间件。当然, ASP.NET Core 并没有要求我们必须实现 IMiddleware 接口,我们也可以像 Startup 类的实现方式一样,通过遵循一些约定来更加灵活的定义我们的中间件。
对于 IMiddleware 类型的中间件的注册,使用 UseMiddleware 扩展方法,定义如下:
public static class UseMiddlewareExtensions
{
    public static IApplicationBuilder UseMiddleware<TMiddleware>(this IApplicationBuilder app, params object[] args)
    {
        return app.UseMiddleware(typeof(TMiddleware), args);
    }

    public static IApplicationBuilder UseMiddleware(this IApplicationBuilder app, Type middleware, params object[] args)
    {
        if (typeof(IMiddleware).GetTypeInfo().IsAssignableFrom(middleware.GetTypeInfo()))
        {
            return UseMiddlewareInterface(app, middleware);
        }

        ...
    }
}
泛型的注册方法,在 ASP.NET Core 中比较常见,比如日志,依赖注入中都有类似的方法,它只是一种简写形式,最终都是将泛型转换为Type类型进行注册。
如上代码,首先通过通过 IsAssignableFrom 方法来判断是否实现 IMiddleware 接口,从而分为了两种方式实现方式,我们先看一下实现了 IMiddleware 接口的中间件的执行过程:
private static IApplicationBuilder UseMiddlewareInterface(IApplicationBuilder app, Type middlewareType)
{
    return app.Use(next =>
    {
        return async context =>
        {
            var middlewareFactory = (IMiddlewareFactory)context.RequestServices.GetService(typeof(IMiddlewareFactory));

            var middleware = middlewareFactory.Create(middlewareType);

            try
            {
                await middleware.InvokeAsync(context, next);
            }
            finally
            {
                middlewareFactory.Release(middleware);
            }
        };
    });
}
如上,创建了一个 Func<RequestDelegate, RequestDelegate> 委托,在返回的 RequestDelegate 委托中调用我们的 IMiddleware 中间件的 InvokeAsync 方法。其实也只是简单的对 Use 方法的一种封装。而 IMiddleware 实例的创建则使用 IMiddlewareFactory 来实现的:
public class MiddlewareFactory : IMiddlewareFactory
{
    private readonly IServiceProvider _serviceProvider;

    public MiddlewareFactory(IServiceProvider serviceProvider)
    {
        _serviceProvider = serviceProvider;
    }

    public IMiddleware Create(Type middlewareType)
    {
        return _serviceProvider.GetRequiredService(middlewareType) as IMiddleware;
    }

    public void Release(IMiddleware middleware)
    {
    }
}
通过如上代码,可以发现一个坑,因为 IMiddleware 实例的创建是直接从 DI 容器中来获取的,也就是说,如果我们没有将我们实现了 IMiddleware 接口的中间件注册到DI中,而直接使用 UseMiddleware 来注册时,会报错:“`InvalidOperationException: No service for type ‘MiddlewareXX‘ has been registered.”。
不过通常我们并不会去实现 IMiddleware 接口,而是采用基于约定的,更加灵活的方式来定义中间件,而此时,UseMiddleware 方法会通过反射来创建中间件的实例:
public static IApplicationBuilder UseMiddleware(this IApplicationBuilder app, Type middleware, params object[] args)
{
    // 未实例 IMiddleware 时的注册方式
    return app.Use(next =>
    {
        var methods = middleware.GetMethods(BindingFlags.Instance | BindingFlags.Public);
        var invokeMethods = methods.Where(m =>
            string.Equals(m.Name, InvokeMethodName, StringComparison.Ordinal)
            || string.Equals(m.Name, InvokeAsyncMethodName, StringComparison.Ordinal)
            ).ToArray();

        ...
        var methodinfo = invokeMethods[0];
        var parameters = methodinfo.GetParameters();
        var ctorArgs = new object[args.Length + 1];
        ctorArgs[0] = next;
        Array.Copy(args, 0, ctorArgs, 1, args.Length);
        var instance = ActivatorUtilities.CreateInstance(app.ApplicationServices, middleware, ctorArgs);
        if (parameters.Length == 1)
        {
            return (RequestDelegate)methodinfo.CreateDelegate(typeof(RequestDelegate), instance);
        }

        var factory = Compile<object>(methodinfo, parameters);

        return context =>
        {
            return factory(instance, context, serviceProvider);
        };
    });
}
首先是根据命名约定来判断我们的注册的 Middleware 类是否符合要求,然后使用ActivatorUtilities.CreateInstance调用构造函数,创建实例。而在调用构造函数时需要的码数,会先在传入到 UseMiddleware 方法中的参数 args 中来查找 ,如果找不到则再去DI中查找,再找不到,将会抛出一个异常。实例创建成功后,调用Invoke/InvokeAsync方法,不过针对Invoke方法的调用并没有直接使用反射来实现,而是采用表了达式,后者具有更好的性能,感兴趣的可以去看完整代码 UseMiddlewareExtensions 中的 Compile 方法。
通过以上代码,我们也可以看出 IMiddleware 的命名约定:
必须要有一个 Invoke 或 InvokeAsync 方法,两者也只能存在一个。
返回类型必须是 Task 或者继承自 Task。
Invoke 或 InvokeAsync 方法必须要有一个 HttpContext 类型的参数。
不过,需要注意的是,Next 委托必须放在构造函数中,而不能放在 InvokeAsync 方法参数中,这是因为 Next 并不在DI系统中,而 ActivatorUtilities.CreateInstance 创建实例时,也会检查构造中是否具有 RequestDelegate 类型的 Next 参数,如果没有,则会抛出一个异常:“A suitable constructor for type ‘{instanceType}‘ could not be located. Ensure the type is concrete and services are registered for all parameters of a public constructor.”。
在有些场景下,我们可能需要针对某些请求,做一些特定的操作。当然,我们可以定义一个中间件,在中间件中判断该请求是否符合我们的预期,进而选择是否执行该操作。但是有一种更好的方式 UseWhen 来实现这样的需求。从名字我们可以猜出,它提供了一种基于条件来注册中间件的方式,有如下定义:
using Predicate = Func<HttpContext, bool>;

public static IApplicationBuilder UseWhen(this IApplicationBuilder app, Predicate predicate, Action<IApplicationBuilder> configuration)
{
    var branchBuilder = app.New();
    configuration(branchBuilder);

    return app.Use(main =>
    {
        branchBuilder.Run(main);
        var branch = branchBuilder.Build();

        return context =>
        {
            if (predicate(context))
            {
                return branch(context);
            }
            else
            {
                return main(context);
            }
        };
    });
}
首先使用上面介绍过的 New 方法创建一个管道分支,将我们传入的 configuration 委托注册到该分支中,然后再将 Main 也就是后续的中间件也注册到该分支中,最后通过我们指定的 Predicate 来判断是执行新分支,还是继续在之前的管道中执行。
它的使用方式如下:
public void Configure(IApplicationBuilder app)
{
    app.UseMiddlewareA();

    app.UseWhen(context => context.Request.Path.StartsWithSegments("/api"), appBuilder =>
    {
        appBuilder.UseMiddlewareB();
    });

    app.UseMiddlewareC);
}
我们注册了三个中间件:A, B, C 。中间件 A 和 C 会一直执行(除了短路的情况), 而 B 只有在符合预期时,也就是当请求路径以 /api 开头时,才会执行。
UseWhen是非常强大和有用的,建议当我们想要针对某些请求做一些特定的处理时,我们应该只为这些请求注册特定的中间件,而不是在中间件中去判断请求是否符合预期来选择执行某些操作,这样能有更好的性能。
以下是 UseWhen 的一些使用场景:
MapWhen 与 UseWhen 非常相似,但是他们有着本质的区别,先看一下 MapWhen 的定义:
using Predicate = Func<HttpContext, bool>;

public static IApplicationBuilder MapWhen(this IApplicationBuilder app, Predicate predicate, Action<IApplicationBuilder> configuration)
{
    var branchBuilder = app.New();
    configuration(branchBuilder);
    var branch = branchBuilder.Build();

    // put middleware in pipeline
    var options = new MapWhenOptions
    {
        Predicate = predicate,
        Branch = branch,
    };
    return app.Use(next => new MapWhenMiddleware(next, options).Invoke);
}如上,可以看出他们的区别:MapWhen 并没有将父分支中的后续中间件注册进来,而是一个独立的分支,而在 MapWhenMiddleware 中只是简单的判断是执行新分支还是旧分支:
public class MapWhenMiddleware
{
    ...

    public async Task Invoke(HttpContext context)
    {
        if (_options.Predicate(context))
        {
            await _options.Branch(context);
        }
        else
        {
            await _next(context);
        }
    }
}
再看一下 MapWhen 的运行效果:
public void Configure(IApplicationBuilder app)
{
    app.UseMiddlewareA();

    app.MapWhen(context => context.Request.Path.StartsWithSegments("/api"), appBuilder =>
    {
        appBuilder.UseMiddlewareB();
    });

    app.UseMiddlewareC();
}如上,中间件A将一直执行,之后如果请求路径以 /api 开头,则会执行 B ,并到此结束,不会再执行 C ,反之,不执行 B ,而执行 C 以及后续的其它的中间件。
当我们希望某些请求使用完全独立的处理方式时,MapWhen 就非常有用,如 UseStaticFiles :
public void Configure(IApplicationBuilder app)
{
    app.MapWhen(context => context.Request.Path.Value.StartsWithSegments("/assets"),
        appBuilder => appBuilder.UseStaticFiles());
}
如上,只有以 /assets 开头的请求,才会执行 StaticFiles 中间件,而其它请求则不会执行 StaticFiles 中间件,这样可以带来稍微的性能提升。
UsePathBase用于拆分请求路径,类似于 MVC 中 Area 的效果,它不会创建请求管道分支,不影响管道的流程,仅仅是设置 Request 的 Path 和 PathBase 属性:
public static IApplicationBuilder UsePathBase(this IApplicationBuilder app, PathString pathBase)
{
    pathBase = pathBase.Value?.TrimEnd(‘/‘);
    if (!pathBase.HasValue)
    {
        return app;
    }
    return app.UseMiddleware<UsePathBaseMiddleware>(pathBase);
}

public class UsePathBaseMiddleware
{
    public async Task Invoke(HttpContext context)
    {
        if (context.Request.Path.StartsWithSegments(_pathBase, out matchedPath, out remainingPath))
        {
            var originalPath = context.Request.Path;
            var originalPathBase = context.Request.PathBase;
            context.Request.Path = remainingPath;
            context.Request.PathBase = originalPathBase.Add(matchedPath);
            try
            {
                await _next(context);
            }
            finally
            {
                context.Request.Path = originalPath;
                context.Request.PathBase = originalPathBase;
            }
        }
        else
        {
            await _next(context);
        }
    }
}
如上,当请求路径以我们指定的 PathString 开头时,则将请求的 PathBase 设置为 传入的 pathBase,Path 则为剩下的部分。
PathString 用来表示请求路径的一个片段,它可以从字符串隐式转换,但是要求必须以
/开头,并且不以/结尾。
Map 包含 UsePathBase 的功能,并且创建一个独立的分支来完成请求的处理,类似于 MapWhen:
public static class MapExtensions
{
    public static IApplicationBuilder Map(this IApplicationBuilder app, PathString pathMatch, Action<IApplicationBuilder> configuration)
    {
        ...

        return app.Use(next => new MapMiddleware(next, options).Invoke);
    }
}
以上方法中与 MapWhen 一样,不同的只是 Map 调用了 MapMiddleware 中间件:
public class MapMiddleware
{
    ...

    public async Task Invoke(HttpContext context)
    {
        PathString matchedPath;
        PathString remainingPath;
        if (context.Request.Path.StartsWithSegments(_options.PathMatch, out matchedPath, out remainingPath))
        {
            var path = context.Request.Path;
            var pathBase = context.Request.PathBase;
            context.Request.PathBase = pathBase.Add(matchedPath);
            context.Request.Path = remainingPath;
            try
            {
                await _options.Branch(context);
            }
            finally
            {
                context.Request.PathBase = pathBase;
                context.Request.Path = path;
            }
        }
        else
        {
            await _next(context);
        }
    }
}
如上,可以看出 Map 扩展方法比 MapWhen 多了对 Request.PathBase 和 Request.Path 的处理,最后演示一下 Map 的用例:
public void Configure(IApplicationBuilder app)
{
    app.Map("/account", builder =>
    {
        builder.Run(async context =>
        {
            Console.WriteLine($"PathBase: {context.Request.PathBase}, Path: {context.Request.Path}");
            await context.Response.WriteAsync("This is from account");
        });
    });

    app.Run(async context =>
    {
        Console.WriteLine($"PathBase: {context.Request.PathBase}, Path: {context.Request.Path}");
        await context.Response.WriteAsync("This is default");
    });
}
如上,我们为 /account 定义了一个分支,当我们 /account/user 的时候,将返回 This is from account ,并且会将 Request.PathBase 设置为 /account ,将 Request.Path 设置为 /user。
本文详细介绍了 ASP.NET Core 请求管道的构建过程,以及一些帮助我们更加方便的来配置请求管道的扩展方法。在 ASP.NET Core 中,至少要有一个中间件来响应请求,而我们的应用程序实际上只是中间件的集合,MVC 也只是其中的一个中间件而已。简单来说,中间件就是一个处理http请求和响应的组件,多个中间件构成了请求处理管道,每个中间件都可以选择处理结束,还是继续传递给管道中的下一个中间件,以此串联形成请求管道。通常,我们注册的每个中间件,每次请求和响应均会被调用,但也可以使用 Map , MapWhen ,UseWhen 等扩展方法对中间件进行过滤。
参考资料:
标签:info 保存 apm gate 列操作 顺序 tle wait 创建
原文地址:http://www.cnblogs.com/Leo_wl/p/7503008.html