标签:ring virt secure configure block 选择 another default 输入
一.eclipse中jetty插件安装:
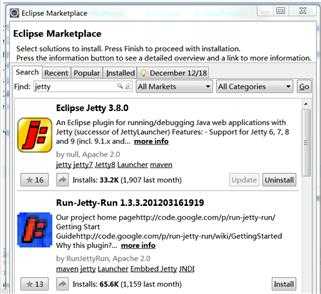
打开eclipse,依次点击菜单Help->Eclipse Marketplace,在Find后面的框中输入jetty,选择第一项进行install即可。

二.jetty插件的使用:
安装成功后可能要重启eclipse:
然后开始配置:
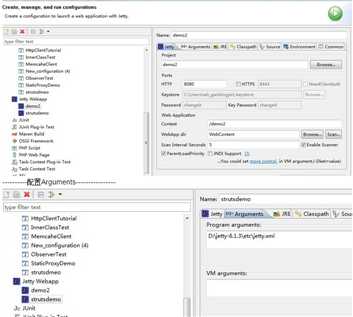
Run》run configurations》
在Jetty Webapp》右键》new,Browser想要启动的项目,配置端口号(我配的是8080),Arguments需要指向一个jetty.xml文件(这个文件可以从jetty网站上下载到,下面我也会贴出来)

上面的jetty.xml文件如下:
<?xml version="1.0"?>
<!DOCTYPE Configure PUBLIC "-//Jetty//Configure//EN" "http://www.eclipse.org/jetty/configure_9_0.dtd">

<!-- =============================================================== -->
<!-- Documentation of this file format can be found at:              -->
<!-- http://wiki.eclipse.org/Jetty/Reference/jetty.xml_syntax        -->
<!--                                                                 -->
<!-- Additional configuration files are available in $JETTY_HOME/etc -->
<!-- and can be mixed in. See start.ini file for the default         -->
<!-- configuration files.                                            -->
<!--                                                                 -->
<!-- For a description of the configuration mechanism, see the       -->
<!-- output of:                                                      -->
<!--   java -jar start.jar -?                                        -->
<!-- =============================================================== -->

<!-- =============================================================== -->
<!-- Configure a Jetty Server instance with an ID "Server"           -->
<!-- Other configuration files may also configure the "Server"       -->
<!-- ID, in which case they are adding configuration to the same     -->
<!-- instance.  If other configuration have a different ID, they     -->
<!-- will create and configure another instance of Jetty.            -->
<!-- Consult the javadoc of o.e.j.server.Server for all              -->
<!-- configuration that may be set here.                             -->
<!-- =============================================================== -->
<Configure id="Server" class="org.eclipse.jetty.server.Server">

    <!-- =========================================================== -->
    <!-- Configure the Server Thread Pool.                           -->
    <!-- The server holds a common thread pool which is used by      -->
    <!-- default as the executor used by all connectors and servlet  -->
    <!-- dispatches.                                                 -->
    <!--                                                             -->
    <!-- Configuring a fixed thread pool is vital to controlling the -->
    <!-- maximal memory footprint of the server and is a key tuning  -->
    <!-- parameter for tuning.  In an application that rarely blocks -->
    <!-- then maximal threads may be close to the number of 5*CPUs.  -->
    <!-- In an application that frequently blocks, then maximal      -->
    <!-- threads should be set as high as possible given the memory  -->
    <!-- available.                                                  -->
    <!--                                                             -->
    <!-- Consult the javadoc of o.e.j.util.thread.QueuedThreadPool   -->
    <!-- for all configuration that may be set here.                 -->
    <!-- =========================================================== -->
    <Arg name="threadpool">
      <New id="threadpool" class="org.eclipse.jetty.util.thread.QueuedThreadPool">
        <Arg name="minThreads" type="int">10</Arg>
        <Arg name="maxThreads" type="int">200</Arg>
        <Arg name="idleTimeout" type="int">60000</Arg>
        <Set name="detailedDump">false</Set>
      </New>
    </Arg>

    <!-- =========================================================== -->
    <!-- Add shared Scheduler instance                               -->
    <!-- =========================================================== -->
    <Call name="addBean">
      <Arg>
        <New class="org.eclipse.jetty.util.thread.ScheduledExecutorScheduler"/>
      </Arg>
    </Call>

    <!-- =========================================================== -->
    <!-- Http Configuration.                                         -->
    <!-- This is a common configuration instance used by all         -->
    <!-- connectors that can carry HTTP semantics (HTTP, HTTPS, SPDY)-->
    <!-- It configures the non wire protocol aspects of the HTTP     -->
    <!-- semantic.                                                   -->
    <!--                                                             -->
    <!-- This configuration is only defined here and is used by      -->
    <!-- reference from the jetty-http.xml, jetty-https.xml and      -->
    <!-- jetty-spdy.xml configuration files which instantiate the    -->
    <!-- connectors.                                                 -->
    <!--                                                             -->
    <!-- Consult the javadoc of o.e.j.server.HttpConfiguration       -->
    <!-- for all configuration that may be set here.                 -->
    <!-- =========================================================== -->
    <New id="httpConfig" class="org.eclipse.jetty.server.HttpConfiguration">
      <Set name="secureScheme">https</Set>
      <Set name="securePort"><Property name="jetty.secure.port" default="8443" /></Set>
      <Set name="outputBufferSize">32768</Set>
      <Set name="requestHeaderSize">8192</Set>
      <Set name="responseHeaderSize">8192</Set>
      <Set name="sendServerVersion">true</Set>
      <Set name="sendDateHeader">false</Set>
      <Set name="headerCacheSize">512</Set>

      <!-- Uncomment to enable handling of X-Forwarded- style headers
      <Call name="addCustomizer">
        <Arg><New class="org.eclipse.jetty.server.ForwardedRequestCustomizer"/></Arg>
      </Call>
      -->
    </New>

    <Call name="addConnector">
    <Arg>
      <New class="org.eclipse.jetty.server.ServerConnector">
        <Arg name="server"><Ref refid="Server" /></Arg>
        <Arg name="factories">
          <Array type="org.eclipse.jetty.server.ConnectionFactory">
            <Item>
              <New class="org.eclipse.jetty.server.HttpConnectionFactory">
                <Arg name="config"><Ref refid="httpConfig" /></Arg>
              </New>
            </Item>
          </Array>
        </Arg>
        <Set name="host"><Property name="jetty.host" /></Set>
        <Set name="port"><Property name="jetty.port" default="4001" />4001</Set>
        <Set name="idleTimeout">30000</Set>
      </New>
    </Arg>
  </Call>


    <!-- =========================================================== -->
    <!-- Set the default handler structure for the Server            -->
    <!-- A handler collection is used to pass received requests to   -->
    <!-- both the ContextHandlerCollection, which selects the next   -->
    <!-- handler by context path and virtual host, and the           -->
    <!-- DefaultHandler, which handles any requests not handled by   -->
    <!-- the context handlers.                                       -->
    <!-- Other handlers may be added to the "Handlers" collection,   -->
    <!-- for example the jetty-requestlog.xml file adds the          -->
    <!-- RequestLogHandler after the default handler                 -->
    <!-- =========================================================== -->
    <Set name="handler">
      <New id="Handlers" class="org.eclipse.jetty.server.handler.HandlerCollection">
        <Set name="handlers">
         <Array type="org.eclipse.jetty.server.Handler">
           <Item>
             <New id="Contexts" class="org.eclipse.jetty.server.handler.ContextHandlerCollection"/>
           </Item>
           <Item>
             <New id="DefaultHandler" class="org.eclipse.jetty.server.handler.DefaultHandler"/>
           </Item>
         </Array>
        </Set>
      </New>
    </Set>

    <!-- =========================================================== -->
    <!-- extra server options                                        -->
    <!-- =========================================================== -->
    <Set name="stopAtShutdown">true</Set>
    <Set name="stopTimeout">5000</Set>
    <Set name="dumpAfterStart">false</Set>
    <Set name="dumpBeforeStop">false</Set>

</Configure>
请注意更改端口号
之后Apply,run,即可快速启动该项目。
通过:http://localhost:8080/demo2/即可访问工程
上述模式,仅是运行模式,还不能debug。
debug与上面唯一的不同就是要由:
Run》debug configurations》进入配置,其它完全一样,启动后,即可设置断点进行配置。
-----------------
若想通过maven来启动jetty,见我的上一篇文章:
http://www.cnblogs.com/nightswatch/p/4639664.html
标签:ring virt secure configure block 选择 another default 输入
原文地址:http://www.cnblogs.com/w-essay/p/7519621.html