标签:turn 编写 个人 auto 选择 配置文件 init div package
本文根据个人喜好记录“腾讯课堂”的《Java项目之Maven+SpringMVC+Spring+Mybatis+MySql消费查询系统》视频教程关键步骤信息,视频地址:https://ke.qq.com/course/193395
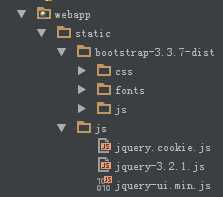
1. 前端框架jquery+bootstrap导入

2. 集成springmvc+spring
2.1 修改web.xml的域名空间如下
<?xml version="1.0" encoding="UTF-8"?>
<web-app version="3.1"
         xmlns="http://xmlns.jcp.org/xml/ns/javaee"
         xmlns:xsi="http://www.w3.org/2001/XMLSchema-instance"
         xsi:schemaLocation="http://xmlns.jcp.org/xml/ns/javaee
                                    http://xmlns.jcp.org/xml/ns/javaee/web-app_3_1.xsd">

</web-app>
2.2 pom文件中添加servlet、jstl、spring相关依赖
<!-- https://mvnrepository.com/artifact/javax.servlet/javax.servlet-api -->
    <dependency>
      <groupId>javax.servlet</groupId>
      <artifactId>javax.servlet-api</artifactId>
      <version>3.1.0</version>
      <scope>provided</scope>
    </dependency>

    <!-- https://mvnrepository.com/artifact/javax.servlet/jstl -->
    <dependency>
      <groupId>javax.servlet</groupId>
      <artifactId>jstl</artifactId>
      <version>1.2</version>
    </dependency>

    <!-- https://mvnrepository.com/artifact/org.springframework/spring-webmvc -->
    <dependency>
      <groupId>org.springframework</groupId>
      <artifactId>spring-webmvc</artifactId>
      <version>${spring.version}</version>
    </dependency>
其中,spring选择的版本号如下
<spring.version>4.3.11.RELEASE</spring.version>
2.3 web.xml添加springmvc配置
<filter>
        <filter-name>encoding-filter</filter-name>
        <filter-class>org.springframework.web.filter.CharacterEncodingFilter</filter-class>
    </filter>
    <filter-mapping>
        <filter-name>encoding-filter</filter-name>
        <servlet-name>spring-mvc-servlet</servlet-name>
    </filter-mapping>

    <servlet>
        <servlet-name>spring-mvc-servlet</servlet-name>
        <servlet-class>org.springframework.web.servlet.DispatcherServlet</servlet-class>
        <load-on-startup>1</load-on-startup>
        <init-param>
            <param-name>contextConfigLocation</param-name>
            <param-value>classpath:spring-mvc.xml</param-value>
        </init-param>
    </servlet>
    <servlet-mapping>
        <servlet-name>spring-mvc-servlet</servlet-name>
        <url-pattern>*.do</url-pattern>
    </servlet-mapping>
2.4 添加spring-mvc.xml配置
<mvc:annotation-driven/>
<context:component-scan base-package="com.pawn.vip.web.controller"/>
2.5 编写测试类验证
@Controller
public class HelloController {

    @ResponseBody
    @RequestMapping("/hello.do")
    public String testHello(){
        return "hello spring mvc" ;
    }
}
结果如下:

2.6 web.xml添加spring配置
<listener>
     <listener-class>org.springframework.web.context.ContextLoaderListener</listener-class>
</listener>

<context-param>
     <param-name>contextConfigLocation</param-name>
    <param-value>classpath:spring-context.xml</param-value>
</context-param>
2.7 添加spring-context.xml配置文件
<context:component-scan base-package="com.pawn.vip.service"/>
2.8 编写测试类
@Service
public class HelloService {
    public String getHelloString(){
        return "hello spring mvc from service" ;
    }
}


@Controller
public class HelloController {

    @Autowired
    HelloService helloService ;

    @ResponseBody
    @RequestMapping("/hello.do")
    public String testHello(){
        return helloService.getHelloString() ;
    }

}
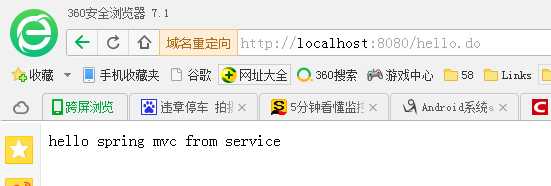
结果如下:

标签:turn 编写 个人 auto 选择 配置文件 init div package
原文地址:http://www.cnblogs.com/xpawn/p/7524782.html