标签:ica repo 源码 toc url xmlns 支持 需要 cti
通过之前几篇Spring Cloud中几个核心组件的介绍,我们已经可以构建一个简略的(不够完善)微服务架构了。比如下图所示:
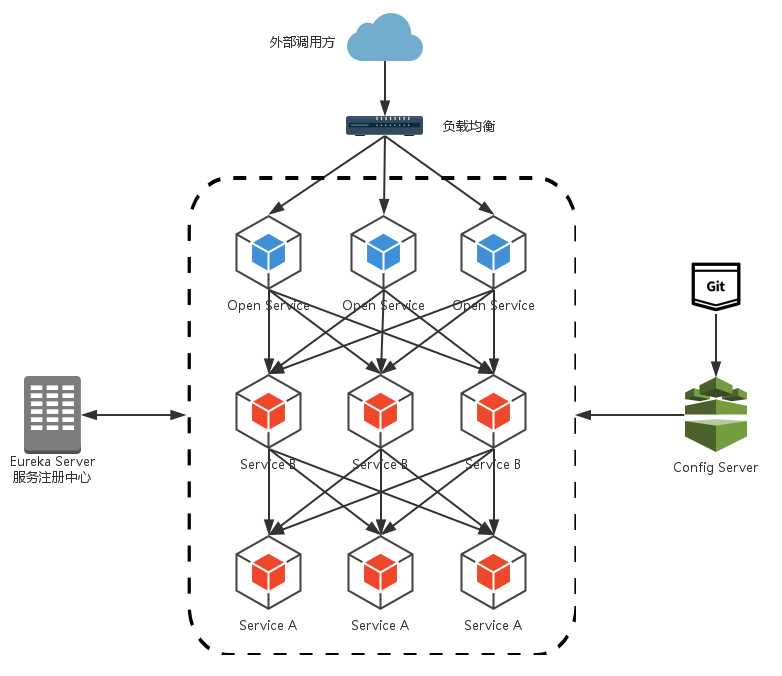
我们使用Spring Cloud Netflix中的Eureka实现了服务注册中心以及服务注册与发现;而服务间通过Ribbon或Feign实现服务的消费以及均衡负载;通过Spring Cloud Config实现了应用多环境的外部化配置以及版本管理。为了使得服务集群更为健壮,使用Hystrix的融断机制来避免在微服务架构中个别服务出现异常时引起的故障蔓延。
在该架构中,我们的服务集群包含:内部服务Service A和Service B,他们都会注册与订阅服务至Eureka Server,而Open Service是一个对外的服务,通过均衡负载公开至服务调用方。本文我们把焦点聚集在对外服务这块,这样的实现是否合理,或者是否有更好的实现方式呢?
先来说说这样架构需要做的一些事儿以及存在的不足:
面对类似上面的问题,我们要如何解决呢?下面进入本文的正题:服务网关!
为了解决上面这些问题,我们需要将权限控制这样的东西从我们的服务单元中抽离出去,而最适合这些逻辑的地方就是处于对外访问最前端的地方,我们需要一个更强大一些的均衡负载器,它就是本文将来介绍的:服务网关。
服务网关是微服务架构中一个不可或缺的部分。通过服务网关统一向外系统提供REST API的过程中,除了具备服务路由、均衡负载功能之外,它还具备了权限控制等功能。Spring Cloud Netflix中的Zuul就担任了这样的一个角色,为微服务架构提供了前门保护的作用,同时将权限控制这些较重的非业务逻辑内容迁移到服务路由层面,使得服务集群主体能够具备更高的可复用性和可测试性。
下面我们通过实例例子来使用一下Zuul来作为服务的路有功能。
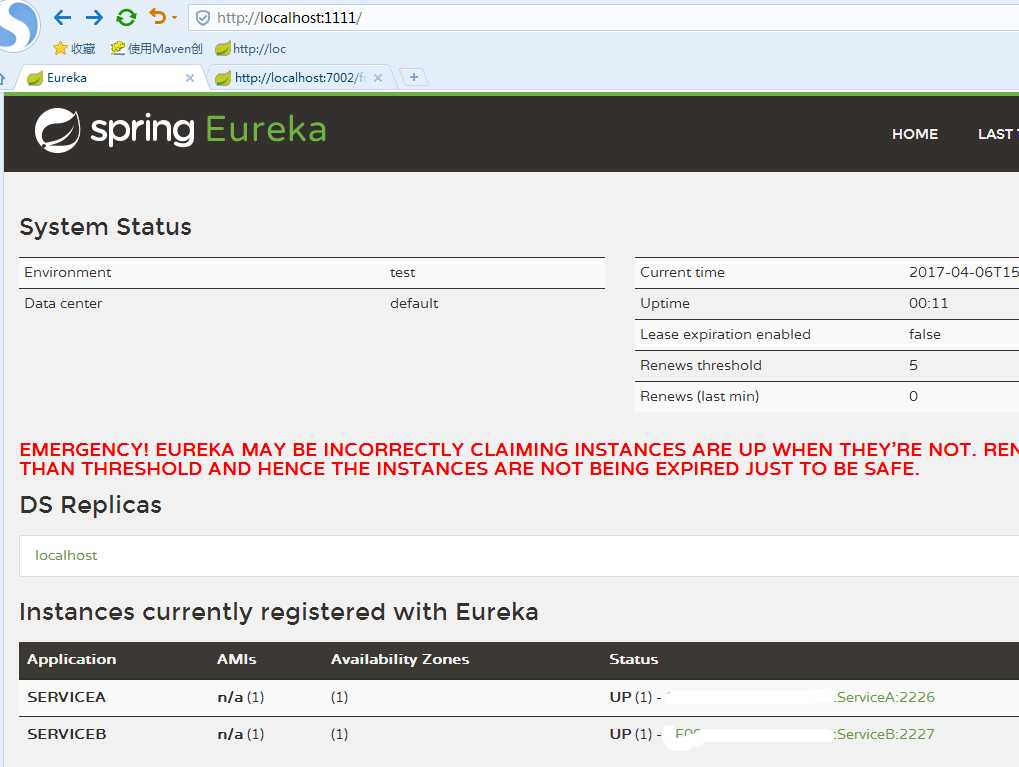
在使用Zuul之前,我们先构建一个服务注册中心、以及两个简单的服务,比如:我构建了一个service-A,一个service-B。然后启动eureka-server和这两个服务。通过访问eureka-server,我们可以看到service-A和service-B已经注册到了服务中心。
compute-service:见《服务注册发现Eureka之一:Spring Cloud Eureka的服务注册与发现》
1 主启动程序:

package com.dxz.service;

import org.springframework.boot.autoconfigure.SpringBootApplication;
import org.springframework.boot.builder.SpringApplicationBuilder;
import org.springframework.cloud.client.discovery.EnableDiscoveryClient;

@EnableDiscoveryClient
@SpringBootApplication
public class SCserviceAApplication {

    public static void main(String[] args) {
        new SpringApplicationBuilder(SCserviceAApplication.class).web(true).run(args);
    }
}
2service类
package com.dxz.service.controler;

import org.apache.log4j.Logger;
import org.springframework.beans.factory.annotation.Autowired;
import org.springframework.cloud.client.ServiceInstance;
import org.springframework.cloud.client.discovery.DiscoveryClient;
import org.springframework.web.bind.annotation.RequestMapping;
import org.springframework.web.bind.annotation.RequestMethod;
import org.springframework.web.bind.annotation.RequestParam;
import org.springframework.web.bind.annotation.RestController;

@RestController
public class ServiceAController {
    private final Logger logger = Logger.getLogger(getClass());
    @Autowired
    private DiscoveryClient client;

    @RequestMapping(value = "/add", method = RequestMethod.GET)
    public Integer add(@RequestParam Integer a, @RequestParam Integer b) {
        ServiceInstance instance = client.getLocalServiceInstance();
        Integer r = a + b;
        logger.info("/add, host:" + instance.getHost() + ", service_id:" + instance.getServiceId() + ", result:" + r);
        return r;
    }
}
3配置信息
spring.application.name=ServiceA
server.port=2226
eureka.client.serviceUrl.defaultZone=http://localhost:1111/eureka/
service-B:新建maven工程SCserviceB
1 主启动程序:
package com.dxz.service;

import org.springframework.boot.autoconfigure.SpringBootApplication;
import org.springframework.boot.builder.SpringApplicationBuilder;
import org.springframework.cloud.client.discovery.EnableDiscoveryClient;

@EnableDiscoveryClient
@SpringBootApplication
public class SCserviceBApplication {

    public static void main(String[] args) {
        new SpringApplicationBuilder(SCserviceBApplication.class).web(true).run(args);
    }
}
2service服务类
package com.dxz.service.controler;

import org.apache.log4j.Logger;
import org.springframework.beans.factory.annotation.Autowired;
import org.springframework.cloud.client.ServiceInstance;
import org.springframework.cloud.client.discovery.DiscoveryClient;
import org.springframework.web.bind.annotation.RequestMapping;
import org.springframework.web.bind.annotation.RequestMethod;
import org.springframework.web.bind.annotation.RequestParam;
import org.springframework.web.bind.annotation.RestController;

@RestController
public class ServiceBController {
    private final Logger logger = Logger.getLogger(getClass());
    @Autowired
    private DiscoveryClient client;

    @RequestMapping(value = "/minus", method = RequestMethod.GET)
    public Integer add(@RequestParam Integer a, @RequestParam Integer b) {
        ServiceInstance instance = client.getLocalServiceInstance();
        Integer r = a - b;
        logger.info("/minus, host:" + instance.getHost() + ", service_id:" + instance.getServiceId() + ", result:" + r);
        return r;
    }
}
3配置信息
spring.application.name=ServiceB
server.port=2227
eureka.client.serviceUrl.defaultZone=http://localhost:1111/eureka/
如果您还不熟悉如何构建服务中心和注册服务,请先阅读《Spring Cloud构建微服务架构(一)服务注册与发现》。
如果您不想自己动手准备,可以从这里获取示例代码:http://git.oschina.net/didispace/SpringBoot-Learning
<project xmlns="http://maven.apache.org/POM/4.0.0" xmlns:xsi="http://www.w3.org/2001/XMLSchema-instance"
    xsi:schemaLocation="http://maven.apache.org/POM/4.0.0 http://maven.apache.org/xsd/maven-4.0.0.xsd">
    <modelVersion>4.0.0</modelVersion>
    <groupId>com.dxz</groupId>
    <artifactId>SCzull</artifactId>
    <version>0.0.1-SNAPSHOT</version>
    <parent>
        <groupId>org.springframework.boot</groupId>
        <artifactId>spring-boot-starter-parent</artifactId>
        <version>1.3.5.RELEASE</version>   <!--配合spring cloud版本 -->
        <relativePath /> <!-- lookup parent from repository -->
    </parent>
    <properties>
        <!--设置字符编码及java版本 -->
        <project.build.sourceEncoding>UTF-8</project.build.sourceEncoding>
        <java.version>1.8</java.version>
    </properties>
    <dependencies>
        <dependency>
            <groupId>org.springframework.cloud</groupId>
            <artifactId>spring-cloud-starter-zuul</artifactId>
            <version>1.2.6.RELEASE</version>
        </dependency>
        <dependency>
            <groupId>org.springframework.cloud</groupId>
            <artifactId>spring-cloud-starter-eureka</artifactId>
            <version>1.2.6.RELEASE</version>
        </dependency>
    </dependencies>

    <!--依赖管理,用于管理spring-cloud的依赖 -->
    <dependencyManagement>
        <dependencies>
            <dependency>
                <groupId>org.springframework.cloud</groupId>
                <artifactId>spring-cloud-starter-parent</artifactId>
                <version>Brixton.SR3</version>   <!--官网为Angel.SR4版本,但是我使用的时候总是报错 -->
                <type>pom</type>
                <scope>import</scope>
            </dependency>
        </dependencies>
    </dependencyManagement>
</project>
@EnableZuulProxy注解开启Zuulimport org.springframework.boot.builder.SpringApplicationBuilder;
import org.springframework.cloud.client.SpringCloudApplication;
import org.springframework.cloud.netflix.zuul.EnableZuulProxy;
@EnableZuulProxy
@SpringCloudApplication
public class SCzullApplication {
public static void main(String[] args) {
new SpringApplicationBuilder(SCzullApplication.class).web(true).run(args);
}
}
application.properties@SpringCloudApplication注解,之前没有提过,通过源码我们看到,它整合了@SpringBootApplication、@EnableDiscoveryClient、@EnableCircuitBreaker,主要目的还是简化配置。这几个注解的具体作用这里就不做详细介绍了,之前的文章已经都介绍过。
|
1
2
|
spring.application.name=api-gateway
server.port=5555
|
完成上面的工作后,Zuul已经可以运行了,但是如何让它为我们的微服务集群服务,还需要我们另行配置,下面详细的介绍一些常用配置内容。
通过服务路由的功能,我们在对外提供服务的时候,只需要通过暴露Zuul中配置的调用地址就可以让调用方统一的来访问我们的服务,而不需要了解具体提供服务的主机信息了。
在Zuul中提供了两种映射方式:
|
1
2
3
|
# routes to url
zuul.routes.api-a-url.path=/api-a-url/**
zuul.routes.api-a-url.url=http://localhost:2222/
|
该配置,定义了,所有到Zuul的中规则为:/api-a-url/**的访问都映射到http://localhost:2222/上,也就是说当我们访问http://localhost:5555/api-a-url/add?a=1&b=2的时候,Zuul会将该请求路由到:http://localhost:2222/add?a=1&b=2上。
其中,配置属性zuul.routes.api-a-url.path中的api-a-url部分为路由的名字,可以任意定义,但是一组映射关系的path和url要相同,下面讲serviceId时候也是如此。
spring.application.name=api-gateway
server.port=5555


zuul.routes.api-a.path=/api-a/**
zuul.routes.api-a.serviceId=serviceA
zuul.routes.api-b.path=/api-b/**
zuul.routes.api-b.serviceId=serviceB
eureka.client.serviceUrl.defaultZone=http://localhost:1111/eureka/
针对我们在准备工作中实现的两个微服务service-A和service-B,定义了两个路由api-a和api-b来分别映射。另外为了让Zuul能发现service-A和service-B,也加入了eureka的配置。
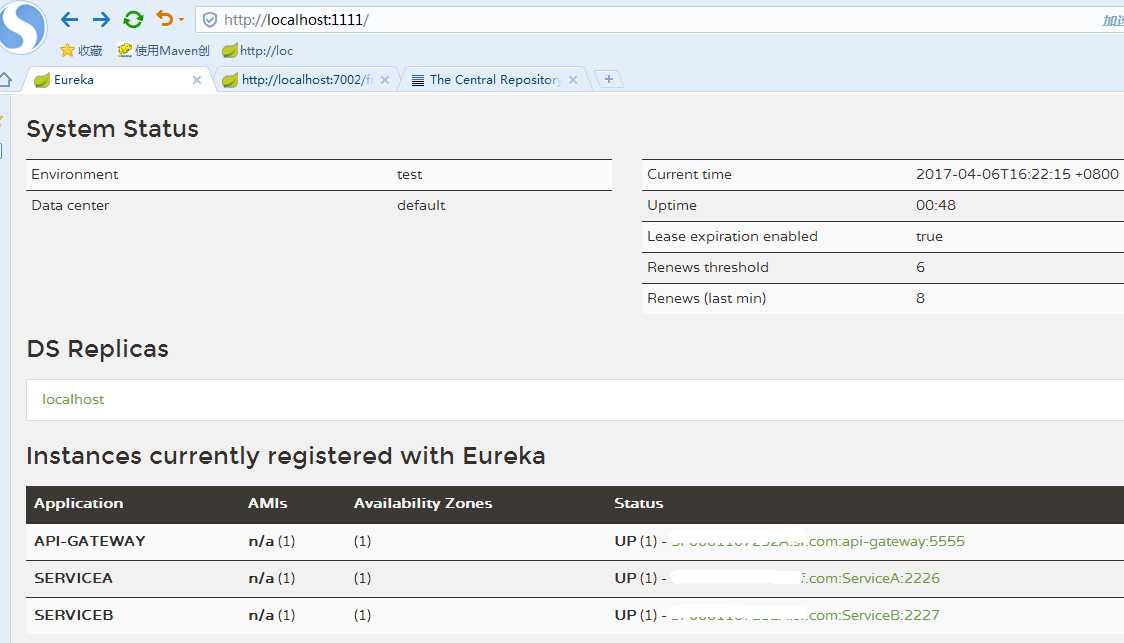
接下来,我们将eureka-server、service-A、service-B以及这里用Zuul实现的服务网关启动起来,在eureka-server的控制页面中,我们可以看到分别注册了service-A、service-B以及api-gateway
尝试通过服务网关来访问service-A和service-B,根据配置的映射关系,分别访问下面的url
http://localhost:5555/api-a/add?a=1&b=2:通过serviceId映射访问service-A中的add服务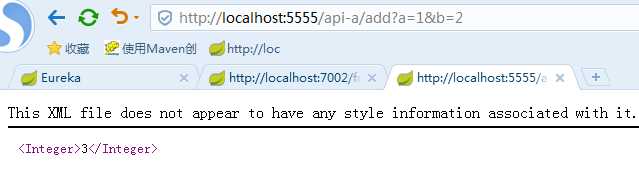
http://localhost:5555/api-b/add?a=1&b=2:通过serviceId映射访问service-B中的add服务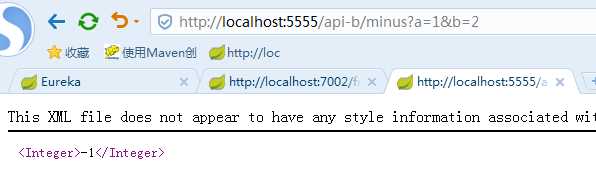
http://localhost:5555/api-a-url/add?a=1&b=2:通过url映射访问service-A中的add服务我测试访问不了。
推荐使用serviceId的映射方式,除了对Zuul维护上更加友好之外,serviceId映射方式还支持了断路器,对于服务故障的情况下,可以有效的防止故障蔓延到服务网关上而影响整个系统的对外服务
在完成了服务路由之后,我们对外开放服务还需要一些安全措施来保护客户端只能访问它应该访问到的资源。所以我们需要利用Zuul的过滤器来实现我们对外服务的安全控制。
在服务网关中定义过滤器只需要继承ZuulFilter抽象类实现其定义的四个抽象函数就可对请求进行拦截与过滤。
比如下面的例子,定义了一个Zuul过滤器,实现了在请求被路由之前检查请求中是否有accessToken参数,若有就进行路由,若没有就拒绝访问,返回401 Unauthorized错误。
package com.dxz;

import javax.servlet.http.HttpServletRequest;

import org.apache.log4j.Logger;

import com.netflix.zuul.ZuulFilter;
import com.netflix.zuul.context.RequestContext;

public class AccessFilter extends ZuulFilter {

    private static Logger log = Logger.getLogger(AccessFilter.class);

    @Override
    public String filterType() {
        return "pre";
    }

    @Override
    public int filterOrder() {
        return 0;
    }

    @Override
    public boolean shouldFilter() {
        return true;
    }

    @Override
    public Object run() {
        RequestContext ctx = RequestContext.getCurrentContext();
        HttpServletRequest request = ctx.getRequest();

        log.info(String.format("%s request to %s", request.getMethod(), request.getRequestURL().toString()));

        Object accessToken = request.getParameter("accessToken");
        if (accessToken == null) {
            log.warn("access token is empty");
            ctx.setSendZuulResponse(false);
            ctx.setResponseStatusCode(401);
            return null;
        }
        log.info("access token ok");
        return null;
    }

}
filterType:返回一个字符串代表过滤器的类型,在zuul中定义了四种不同生命周期的过滤器类型,具体如下:自定义过滤器的实现,需要继承ZuulFilter,需要重写实现下面四个方法:
pre:可以在请求被路由之前调用routing:在路由请求时候被调用post:在routing和error过滤器之后被调用error:处理请求时发生错误时被调用filterOrder:通过int值来定义过滤器的执行顺序shouldFilter:返回一个boolean类型来判断该过滤器是否要执行,所以通过此函数可实现过滤器的开关。在上例中,我们直接返回true,所以该过滤器总是生效。run:过滤器的具体逻辑。需要注意,这里我们通过ctx.setSendZuulResponse(false)令zuul过滤该请求,不对其进行路由,然后通过ctx.setResponseStatusCode(401)设置了其返回的错误码,当然我们也可以进一步优化我们的返回,比如,通过ctx.setResponseBody(body)对返回body内容进行编辑等。在实现了自定义过滤器之后,还需要实例化该过滤器才能生效,我们只需要在应用主类中增加如下内容:
package com.dxz;

import org.springframework.boot.builder.SpringApplicationBuilder;
import org.springframework.cloud.client.SpringCloudApplication;
import org.springframework.cloud.netflix.zuul.EnableZuulProxy;
import org.springframework.context.annotation.Bean;

@EnableZuulProxy
@SpringCloudApplication
public class SCzullApplication {
    public static void main(String[] args) {
        new SpringApplicationBuilder(SCzullApplication.class).web(true).run(args);
    }

    @Bean
    public AccessFilter accessFilter() {
        return new AccessFilter();
    }

}
启动该服务网关后,访问:
http://localhost:5555/api-a/add?a=1&b=2:返回401错误http://localhost:5555/api-a/add?a=1&b=2&accessToken=token:正确路由到server-A,并返回计算内容
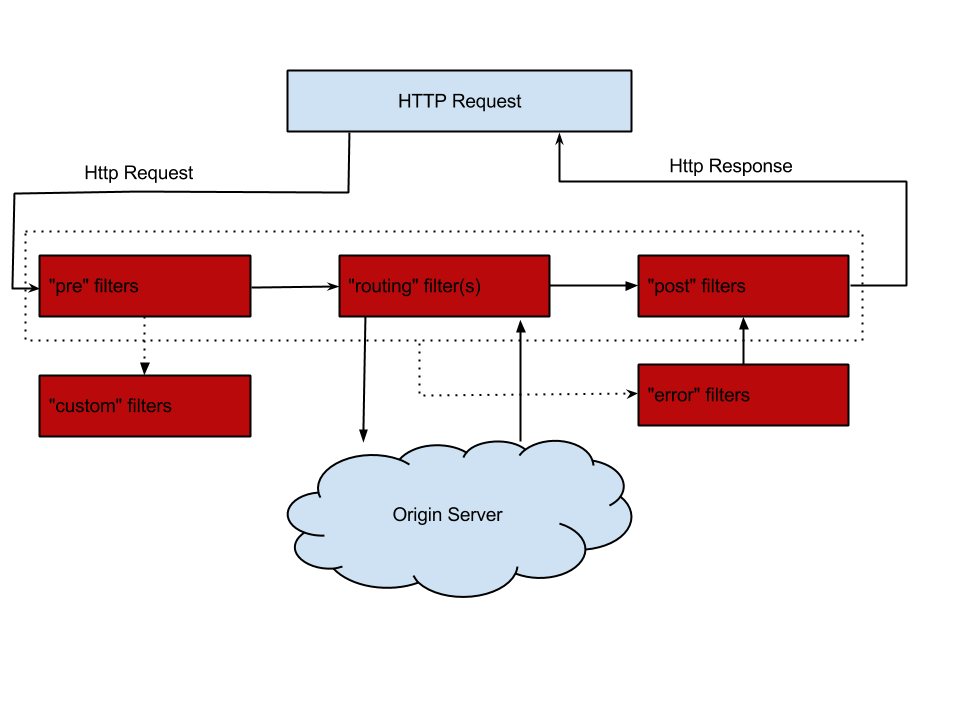
对于其他一些过滤类型,这里就不一一展开了,根据之前对filterType生命周期介绍,可以参考下图去理解,并根据自己的需要在不同的生命周期中去实现不同类型的过滤器。
最后,总结一下为什么服务网关是微服务架构的重要部分,是我们必须要去做的原因:
标签:ica repo 源码 toc url xmlns 支持 需要 cti
原文地址:http://www.cnblogs.com/duanxz/p/7527765.html