标签:exe info 注释 teacher code hone 代码 插入 为我
掌握:
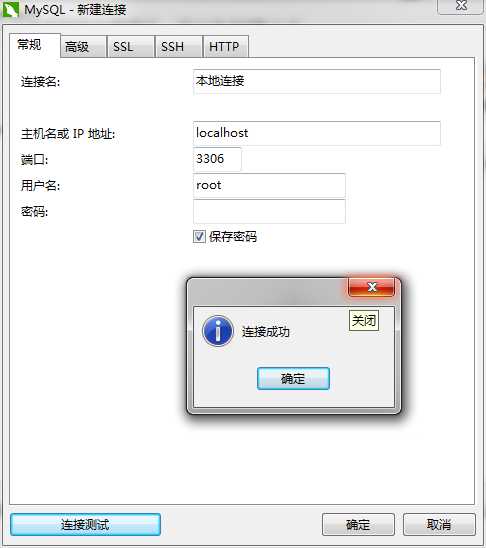
#1. 测试+链接数据库
连接名:随意起名字就行,如果连接的是本地就输入本地连接就可以
主机名或IP地址:填写localhost就是本地连接,也可以输入ip地址连接其他数据库
端口:3306默认本地
用户名:root默认的
密码:我个人的数据库没密码,测试起来方便
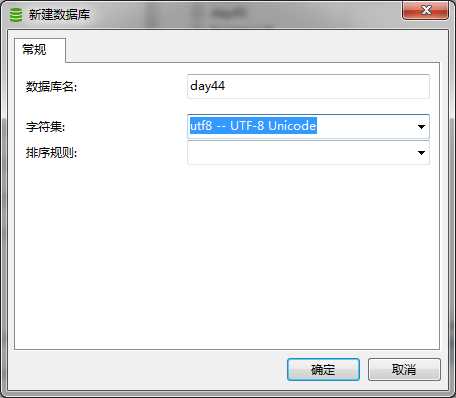
#2. 新建库
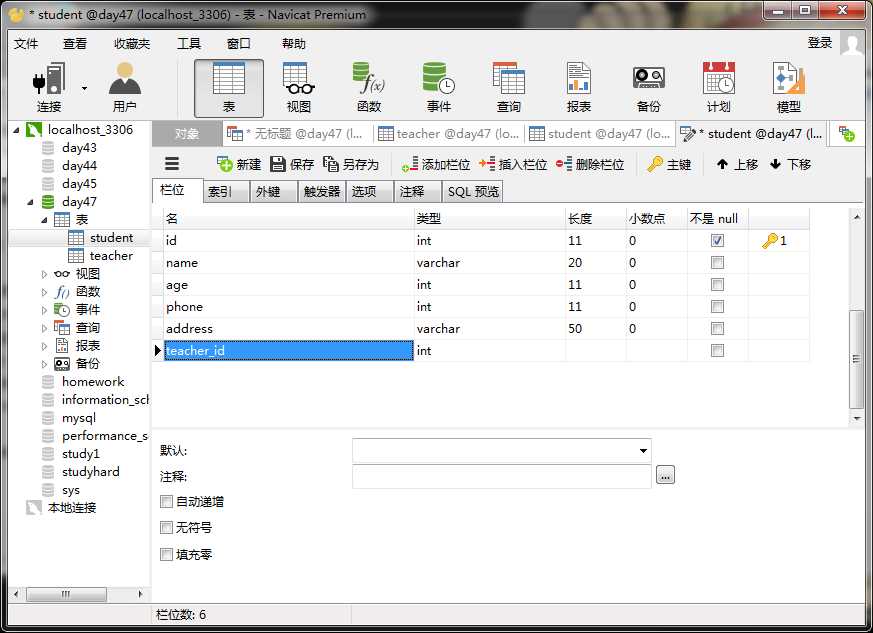
#3. 新建表,新增字段+类型+约束
创建student表
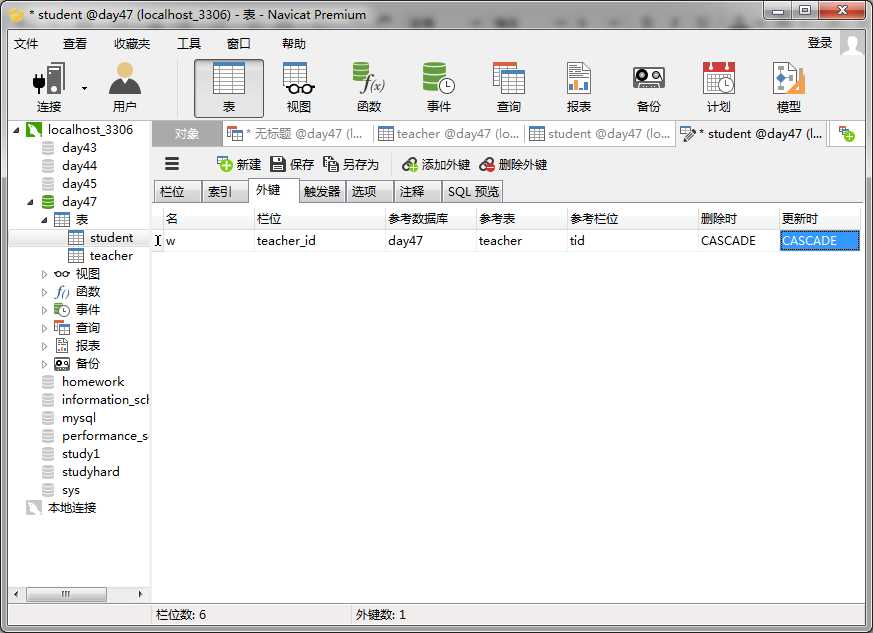
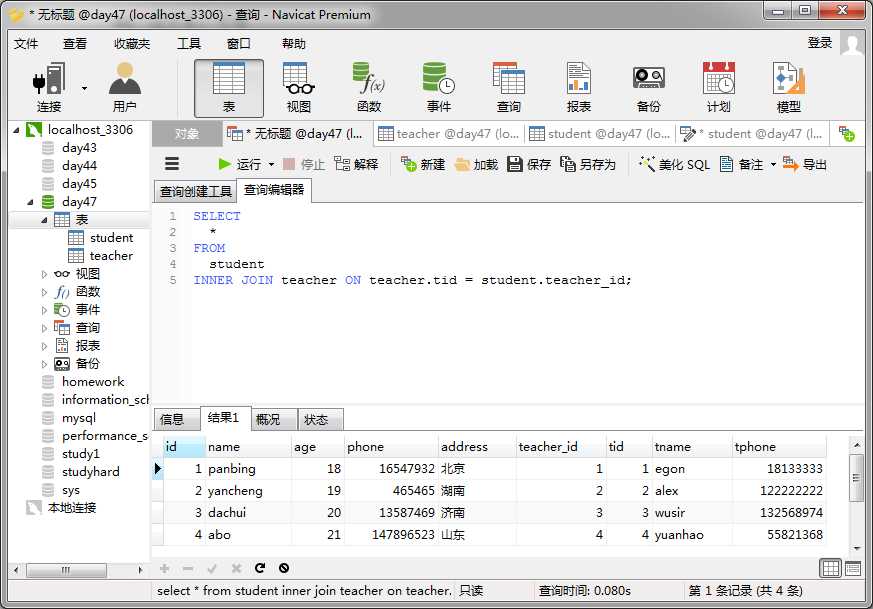
#4. 设计表:外键我这个表的外键连接的是teacher表的tid#5. 新建查询
#6. 备份库/表
备份出的文件可以重新导入#注意:
批量加注释:ctrl+/键
批量去注释:ctrl+shift+/键
#提示本人的安装包跟上面下载的不一样,但是出入不大,操作什么的都一样
(上面下载的mysqlIDE运行之后点击注册,文件中有一个key文件,直接输入激活码就行)。
pip3 install pythonimport pymysql
#链接
conn=pymysql.connect(host=‘localhost‘,user=‘root‘,password=‘‘,database=‘day47‘,charset = ‘utf8‘)
#host=‘连接地址‘,user=‘用户名‘,password=‘密码‘,database=‘数据库名称,charset =‘utf8‘
#游标
cursor=conn.cursor()
#执行sql语句
sql=‘select * from student‘ #注意%s需要加引号
print(sql)
res=cursor.execute(sql) #执行sql语句,返回sql查询成功的记录数目
print(res)
cursor.close()
conn.close()
#运行结果
select * from student
4
#数据库实际数据:
mysql> select * from student;
+----+----------+------+-----------+---------+------------+
| id | name | age | phone | address | teacher_id |
+----+----------+------+-----------+---------+------------+
| 1 | panbing | 18 | 16547932 | 北京 | 1 |
| 2 | yancheng | 19 | 465465 | 湖南 | 2 |
| 3 | dachui | 20 | 13587469 | 济南 | 3 |
| 4 | abo | 21 | 147896523 | 山东 | 4 |
+----+----------+------+-----------+---------+------------+
4 rows in set (0.01 sec)
import pymysql

conn=pymysql.connect(host=‘localhost‘,user=‘root‘,password=‘‘,database=‘day47‘,charset = ‘utf8‘)
cursor=conn.cursor()
sql=‘insert into student(id,name,age,phone,address,teacher_id) values("%s","%s","%s","%s","%s","%s")‘ #注意%s需要加引号
res=cursor.execute(sql,(5,‘liuhu‘,18,154789632,‘哈尔滨‘,4)) #执行sql语句,返回sql查询成功的记录数目
print(res)
conn.commit()
cursor.close()
conn.close()
执行结果
    1
数据库实际数据
mysql> select * from student;
+----+----------+------+-----------+----------+------------+
| id | name     | age  | phone     | address  | teacher_id |
+----+----------+------+-----------+----------+------------+
|  1 | panbing  |   18 |  16547932 | 北京     |          1 |
|  2 | yancheng |   19 |    465465 | 湖南     |          2 |
|  3 | dachui   |   20 |  13587469 | 济南     |          3 |
|  4 | abo      |   21 | 147896523 | 山东     |          4 |
|  5 | ‘liuhu‘  |   18 | 154789632 | ‘哈尔滨‘ |          4 |
+----+----------+------+-----------+----------+------------+
5 rows in set (0.00 sec)


#执行成功语句之后必须执行一句conn.commit()这样语句执行成功之后数据库里的数据才会显示。


#数据进行多条插入
import pymysql
conn=pymysql.connect(host=‘localhost‘,user=‘root‘,password=‘‘,database=‘day47‘,charset = ‘utf8‘)
cursor=conn.cursor()
sql=‘insert into student(name,age,phone,address,teacher_id) values("%s","%s","%s","%s","%s")‘

res=cursor.executemany(sql,[(‘liuhu‘,18,154789,‘西藏‘,4),
                            (‘huli‘,18,1589632,‘哈尔滨‘,3),
                            (‘cyhg‘,19,632,‘内蒙‘,2)])
print(res)
conn.commit()
cursor.close()
conn.close()
#结果
    3
#数据库数据
import pymysql

conn=pymysql.connect(host=‘localhost‘,user=‘root‘,password=‘‘,database=‘day47‘,charset = ‘utf8‘)
cursor=conn.cursor()
sql = ‘truncate student‘
res=cursor.execute(sql) #执行sql语句
conn.commit()
cursor.close()
conn.close()
执行之后数据库实际数据:
mysql> select * from student;
Empty set (0.00 sec)
更改数据库的表的名称

import pymysql
conn=pymysql.connect(host=‘localhost‘,user=‘root‘,password=‘‘,database=‘day47‘,charset = ‘utf8‘)
cursor=conn.cursor()
res=cursor.execute(sql) #执行sql语句,返回sql查询成功的记录数目
conn.commit()
cursor.close()
conn.close()


执行后的结果

mysql> select * from student;
ERROR 1146 (42S02): Table ‘day47.student‘ doesn‘t exist

mysql> select * from hello;
Empty set (0.00 sec)
import pymysql

conn=pymysql.connect(host=‘localhost‘,user=‘root‘,password=‘‘,database=‘day47‘,charset = ‘utf8‘)
cursor=conn.cursor()
sql = ‘select * from hello‘
res=cursor.execute(sql) #执行sql语句,返回sql查询成功的记录数目
print(res)
print(cursor.fetchone())
print(cursor.fetchone())
print(cursor.fetchmany(2))
print(cursor.fetchone())
conn.commit()
cursor.close()
conn.close()
输出结果:
6
(1, "‘liuhu‘", 18, 154789, "‘西藏‘", 4)
((2, "‘huli‘", 18, 1589632, "‘哈尔滨‘", 3), (3, "‘cyhg‘", 19, 632, "‘内蒙‘", 2))
(4, "‘liuhu‘", 18, 154789, "‘西藏‘", 4)
((5, "‘huli‘", 18, 1589632, "‘哈尔滨‘", 3),)
((6, "‘cyhg‘", 19, 632, "‘内蒙‘", 2),)


#fetchone()是显示一条数据,从头开始显示
#fetchmany()是更爱光标的位置括号内的值就是执行第几个光标


import pymysql
conn=pymysql.connect(host=‘localhost‘,user=‘root‘,password=‘‘,database=‘day47‘,charset = ‘utf8‘)
cursor=conn.cursor()
sql = ‘select * from hello‘
res=cursor.execute(sql) #执行sql语句,返回sql查询成功的记录数目
print(res)
print(cursor.fetchall())
conn.commit()
cursor.close()
conn.close()
输出结果:
6
((1, "‘liuhu‘", 18, 154789, "‘西藏‘", 4), (2, "‘huli‘", 18, 1589632, "‘哈尔滨‘", 3), (3, "‘cyhg‘", 19, 632, "‘内蒙‘", 2), (4, "‘liuhu‘", 18, 154789, "‘西藏‘", 4), (5, "‘huli‘", 18, 1589632, "‘哈尔滨‘", 3), (6, "‘cyhg‘", 19, 632, "‘内蒙‘", 2))

#fetchall()是显示表中所有的数据#示例代码:
import pymysql
username = input(‘用户名:》》‘).strip()
userpasswd = input(‘密码:》》‘).strip()
conn=pymysql.connect(host=‘localhost‘,user=‘root‘,password=‘‘,database=‘day47‘,charset = ‘utf8‘)
cursor=conn.cursor()
sql=‘select * from user where name="%s" and passswd="%s"‘ %(username,userpasswd) #注意%s需要加引号
print(sql)
res=cursor.execute(sql) #执行sql语句,返回sql查询成功的记录数目
print(res)
conn.commit()
cursor.close()
conn.close()
if res:
print(‘登陆成功‘)
else:
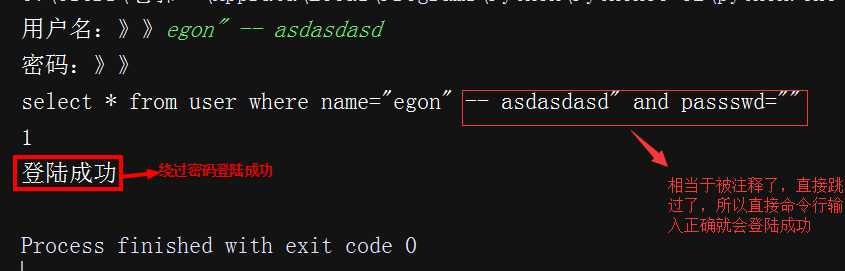
print(‘登陆失败‘)注意:符号--会注释掉它之后的sql,正确的语法:--后至少有一个任意字符
根本原理:就根据程序的字符串拼接name=‘%s‘,我们输入一个xxx‘ -- haha,用我们输入的xxx加‘在程序中拼接成一个判断条件name=‘xxx‘ -- haha‘
最后那一个空格,在一条sql语句中如果遇到select * from t1 where id > 3 -- and name=‘egon‘;则--之后的条件被注释掉了
#1、sql注入之:用户存在,绕过密码
egon‘ -- 任意字符
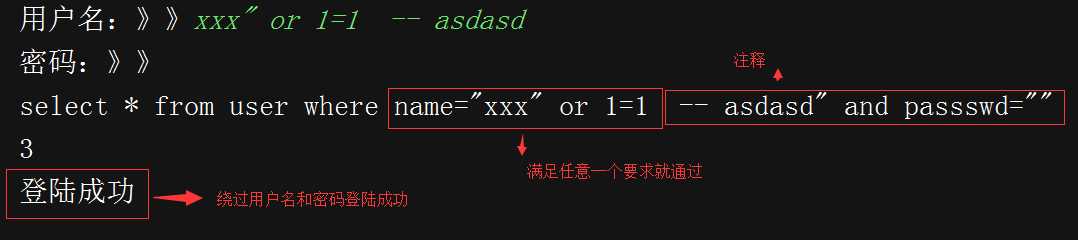
#2、sql注入之:用户不存在,绕过用户与密码
xxx‘ or 1=1 -- 任意字符
2.解决方法:
# 原来是我们对sql进行字符串拼接
# sql="select * from userinfo where name=‘%s‘ and password=‘%s‘" %(user,pwd)
# print(sql)
# res=cursor.execute(sql)

#改写为(execute帮我们做字符串拼接,我们无需且一定不能再为%s加引号了)
sql="select * from userinfo where name=%s and password=%s" #!!!注意%s需要去掉引号,因为pymysql会自动为我们加上
res=cursor.execute(sql,[user,pwd]) #pymysql模块自动帮我们解决sql注入的问题,只要我们按照pymysql的规矩来。


示例代码:
import pymysql

username = input(‘用户名:》》‘).strip()
userpasswd = input(‘密码:》》‘).strip()
conn=pymysql.connect(host=‘localhost‘,user=‘root‘,password=‘‘,database=‘day47‘,charset = ‘utf8‘)
cursor=conn.cursor()
sql=‘select * from user where name=%s and passswd=%s‘#注意%s需要加引号
print(sql)
res=cursor.execute(sql,[username,userpasswd]) #执行sql语句,返回sql查询成功的记录数目
print(res)
conn.commit()
cursor.close()
conn.close()
if res:
    print(‘登陆成功‘)
else:
    print(‘登陆失败‘)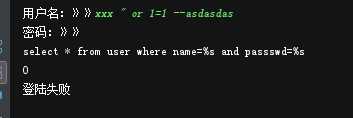
标签:exe info 注释 teacher code hone 代码 插入 为我
原文地址:http://www.cnblogs.com/De-Luffy/p/7544841.html