标签:inline logs function 直接 weight params webp return default
通过上篇文章对路由的工作原理有了基本的了解,现在我们一起来学习路由是如何传递参数的,也就是带参数的跳转。
带参数的跳转,一般是两种方式:
①.a标签直接跳转。
②点击按钮,触发函数跳转。
在上篇文章中我们已经有两个页面(Helloworld.vue&Hello.vue),现在我准备往Hello.vue里面添加3个链接,分别对应两种情况的跳转。
第一步:在原来的Hello.vue里添加路由链接跳转的代码(见第38-44行代码),添加后的Hello.vue代码如下:
 1 <template>
 2   <div class="hello">
 3     <h1>{{ msg }}</h1>
 4     <h2>Essential Links</h2>
 5     <ul>
 6       <li>
 7         <a href="https://vuejs.org" target="_blank">Core Docs</a>
 8       </li>
 9       <li>
10         <a href="https://forum.vuejs.org" target="_blank">Forum</a>
11       </li>
12       <li>
13         <a href="https://chat.vuejs.org" target="_blank">Community Chat</a>
14       </li>
15       <li>
16         <a href="https://twitter.com/vuejs" target="_blank">Twitter</a>
17       </li>
18       <br>
19       <li>
20         <a href="http://vuejs-templates.github.io/webpack/" target="_blank">Docs for This Template</a>
21       </li>
22     </ul>
23     <h2>Ecosystem</h2>
24     <ul>
25       <li>
26         <a href="http://router.vuejs.org/" target="_blank">vue-router</a>
27       </li>
28       <li>
29         <a href="http://vuex.vuejs.org/" target="_blank">vuex</a>
30       </li>
31       <li>
32         <a href="http://vue-loader.vuejs.org/" target="_blank">vue-loader</a>
33       </li>
34       <li>
35         <a href="https://github.com/vuejs/awesome-vue" target="_blank">awesome-vue</a>
36       </li>
37     </ul>
38     <div>
39       <router-link :to="{path:‘/helloworld/123‘}">参数传递1</router-link>
40       <br>
41       <router-link :to="{path:‘/helloworld/789‘,query:{userid:9527,name:‘Tom_Lo‘}}">参数传递2</router-link>
42       <br>
43       <button @click="toNewpage">点击跳转</button>
44     </div>
45   </div>
46 </template>
47
48 <script>
49 export default {
50   name: ‘hello‘,
51   data() {
52     return {
53       msg: ‘Welcome to Your Vue.js App‘
54     }
55   },
56    methods: {
57     toNewpage: function() {
58
59       this.$router.push({ path: ‘/helloworld/999‘, query: { userid: 128, name: ‘Tom‘ } });
60     }
61   }
62 }
63 </script>
64
65 <!-- Add "scoped" attribute to limit CSS to this component only -->
66 <style scoped>
67 h1,
68 h2 {
69   font-weight: normal;
70 }
71
72 ul {
73   list-style-type: none;
74   padding: 0;
75 }
76
77 li {
78   display: inline-block;
79   margin: 0 10px;
80 }
81
82 a {
83   color: #42b983;
84 }
85 </style>
第38-44行代码的路由链接跳转写法是固定的,记住会用就好了。
第二步:Hello.vue传递了参数,那么我们就用Helloworld.vue接收参数。见更新后的Helloworld.vue代码:
 1 <!--模板部分-->
 2 <template>
 3   <div class="container">
 4     <h1>hello,world!</h1>
 5     <p>{{test}}</p>
 6     <p>接收的参数id:
 7       <span class="hint">{{id}}</span>
 8     </p>
 9     <p>接收的参数userid:
10       <span class="hint">{{userid}}</span>
11     </p>
12     <p>接收的参数name:
13       <span class="hint">{{username}}</span>
14     </p>
15   </div>
16 </template>
17 <!--js部分-->
18 <script>
19 export default {
20   name: ‘helloworld‘,
21   data() {
22     return {
23       test: ‘this is a test‘,
24       id: this.$route.params.id,//接收参数
25       userid: this.$route.query.userid,
26       username: this.$route.query.name
27     }
28   }
29 }
30 </script>
31 <!--样式部分-->
32 <style>
33 .container {
34   background: #aaa;
35   color: blue;
36 }
37 </style>
上面的第6-14行就是接收参数的容器。
注意:Hello.vue中的$router是用来传递参数的,而Helloworld.vue中的$route是用来接收参数的。
第三步:路由变化了,当然还得在index.js里面体现(见第16行),见更新后的index.js代码:
 1 import Vue from ‘vue‘
 2 import Router from ‘vue-router‘
 3 import Hello from ‘@/components/Hello‘
 4 import HelloWorld from ‘@/components/Helloworld‘//我们新定义的组件
 5
 6 Vue.use(Router)
 7
 8 export default new Router({
 9   routes: [
10     {
11       path: ‘/‘,
12       name: ‘Hello‘,
13       component: Hello
14     },
15     {//新路由
16       path: ‘/helloworld/:id‘,
17       name: ‘HelloWorld‘,
18       component: HelloWorld
19     }
20   ]
21 })
第四步:入口文件App.vue不用动。路由定义、发送参数、接收参数都具备了,下面咱们就跑一下试试吧~~
运行跳转成功后如下图:
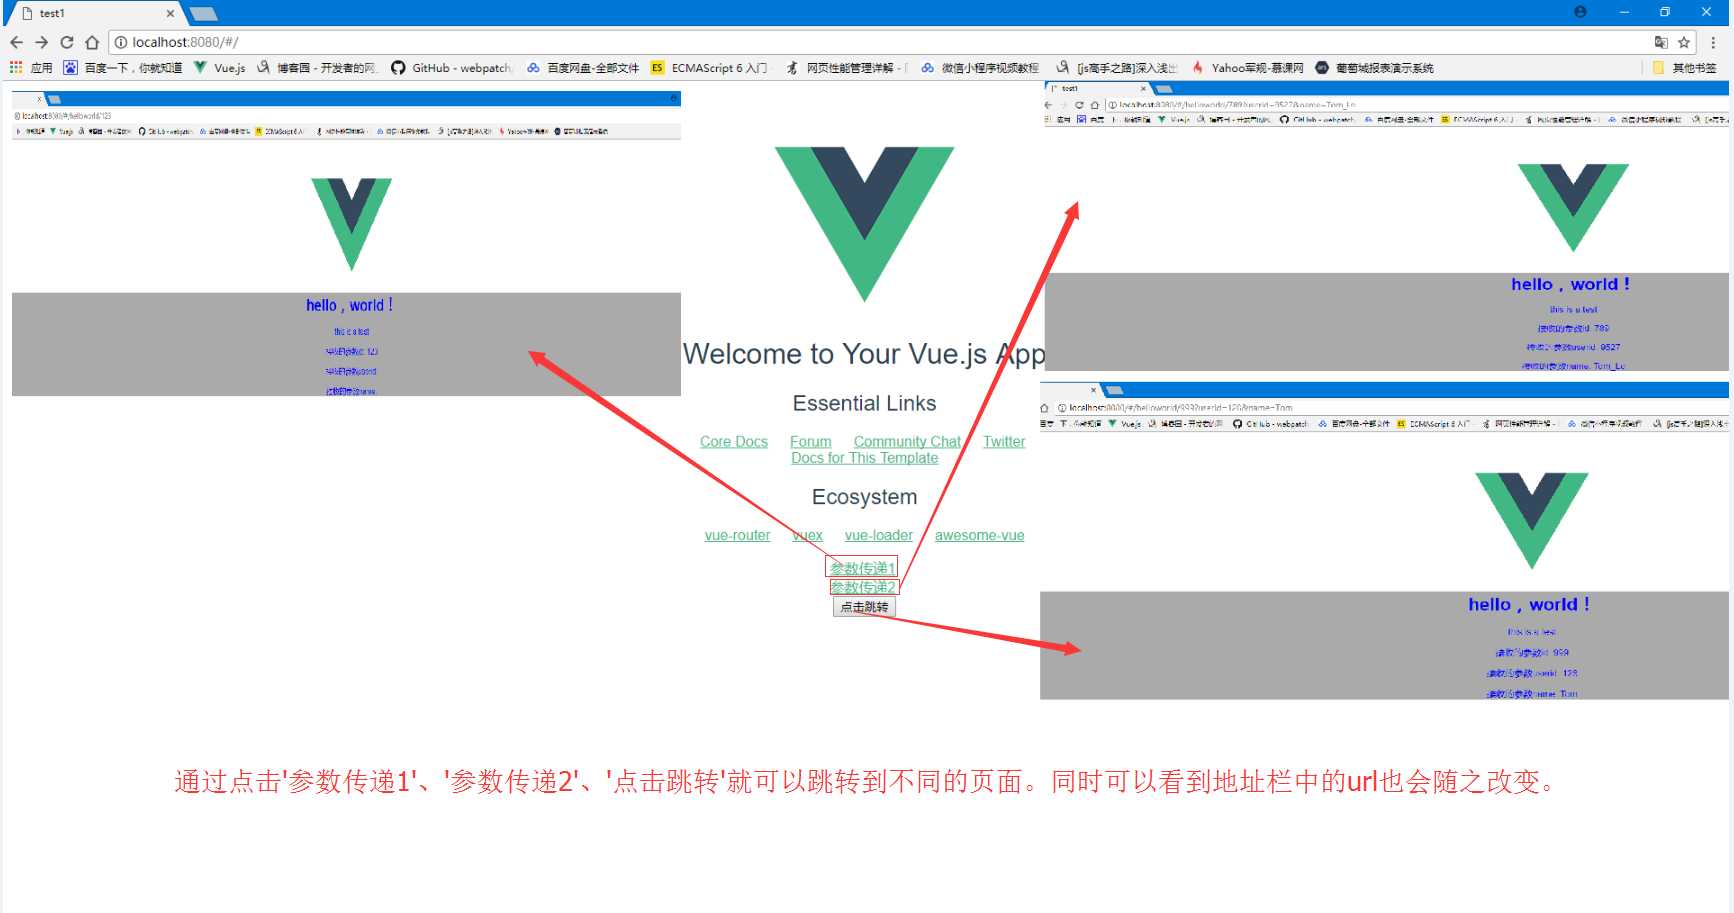
通过图示我们看到,参数都可以正常拿到了。
同时注意url的变化。首先url是有个#号,这个就代表是单页面的路由(hash模式);然后我们的参数实际都是放在url上传输的,要注意别超出url的长度范围。
标签:inline logs function 直接 weight params webp return default
原文地址:http://www.cnblogs.com/luxiaoxing/p/7564580.html