标签:结束 command test class interface web toc 表格 adt
大纲
一、什么是SNMP
二、SNMP背景
三、SNMP结构概述
四、SNMP支持的网管操作
五、SNMP的实现结构
六、SNMP的技术内容
七、SNMP的发展历史
八、SNMP的技术术语
九、综合上述(总结)
十、Net-SNMP详解
十一、SNMP的MIB详解
注,实验环境 CentOS 6.4 x86_64 软件版本 net-snmp 5.5。(说明:本博文的一些图片自于开源社区与官方网站并不是所有内容全是原创)
一、什么是SNMP
SNMP:“简单网络管理协议”,用于网络管理的协议。SNMP用于网络设备的管理。SNMP的工作方式:管理员需要向设备获取数据,所以SNMP提供了“读”操作;管理员需要向设备执行设置操作,所以SNMP提供了“写”操作;设备需要在重要状况改变的时候,向管理员通报事件的发生,所以SNMP提供了“Trap”操作。
二、SNMP背景
SNMP的基本思想:为不同种类的设备、不同厂家生产的设备、不同型号的设备,定义为一个统一的接口和协议,使得管理员可以是使用统一的外观面对这些需要管理的网络设备进行管理。通过网络,管理员可以管理位于不同物理空间的设备,从而大大提高网络管理的效率,简化网络管理员的工作。
三、SNMP结构概述
SNMP被设计为工作在TCP/IP协议族上。SNMP基于TCP/IP协议工作,对网络中支持SNMP协议的设备进行管理。所有支持SNMP协议的设备都提供SNMP这个统一界面,使得管理员可以使用统一的操作进行管理,而不必理会设备是什么类型、是哪个厂家生产的。如下图,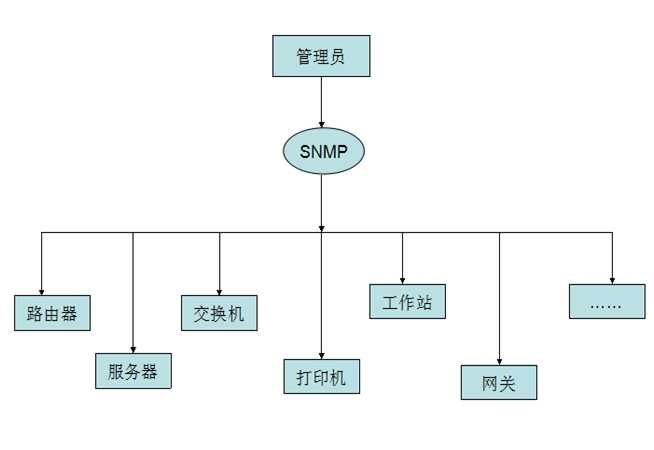
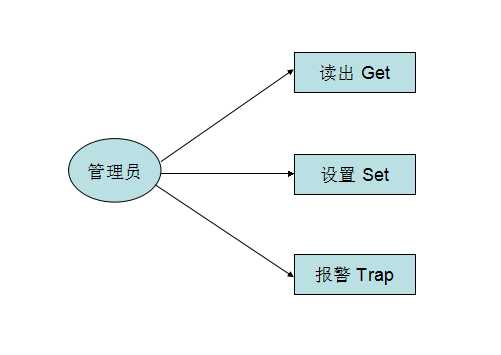
四、SNMP支持的网管操作
对于网络管理,我们面对的数据是设备的配置、参数、状态等信息,面对的操作是读取和设置;同时,因为网络设备众多,为了能及时得到设备的重要状态,还要求设备能主动地汇报重要状态,这就是报警功能。如下图,
五、SNMP的实现结构
在具体实现上,SNMP为管理员提供了一个网管平台(NMS),又称为管理站,负责网管命令的发出、数据存储、及数据分析。被监管的设备上运行一个SNMP代理(Agent)),代理实现设备与管理站的SNMP通信。如下图,
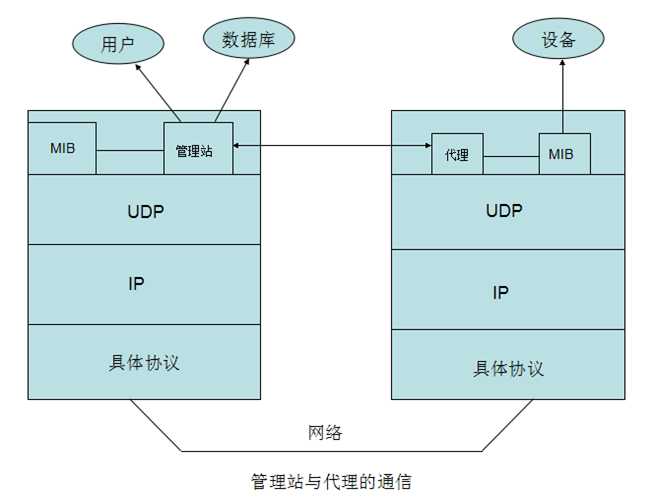
管理站与代理端通过MIB进行接口统一,MIB定义了设备中的被管理对象。管理站和代理都实现了相应的MIB对象,使得双方可以识别对方的数据,实现通信。管理站向代理申请MIB中定义的数据,代理识别后,将管理设备提供的相关状态或参数等数据转换为MIB定义的格式,应答给管理站,完成一次管理操作。
已有的设备,只要新加一个SNMP模块就可以实现网络支持。旧的带扩展槽的设备,只要插入SNMP模块插卡即可支持网络管理。网络上的许多设备,路由器、交换机等,都可以通过添加一个SNMP网管模块而增加网管功能。服务器可以通过运行一个网管进程实现。其他服务级的产品也可以通过网管模块实现网络管理,如Oracle、WebLogic都有SNMP进程,运行后就可以通过管理站对这些系统级服务进行管理。
根据管理者和被管理的设备在网络管理操作中的不同职责,SNMP定义了3种角色。如下图,
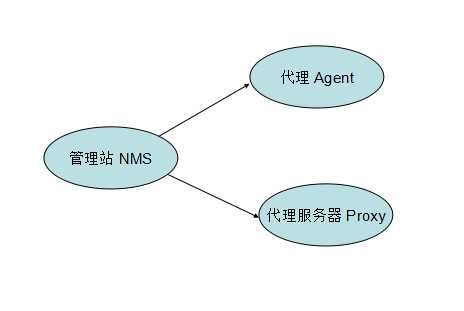
网络管理系统:又称管理站、NMS。是系统的控制台,向管理员提供界面以获取与改变设备的配置、信息、状态、操作等信息。管理站与Agent进行通信,执行相应的Set和Get操作,并接收代理发过来的警报(Trap)。
代理:Agent是网络管理的代理人,负责管理站和设备SNMP操作的传递。介于管理站和设备之间,与管理站通信并相应管理站的请求,从设备获取相应的数据,或对设备进行相应的设置,来响应管理站的请求。代理也需要具有根据设备的相应状态使用MIB中定义的Trap向管理站发送报告的能力。
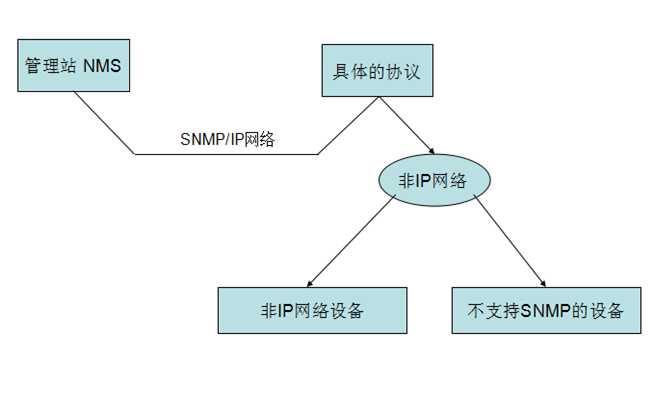
代理服务器:Proxy是一种特殊的代理,在不能直接使用SNMP协议的地方,如:异种网络、不同版本的SNMP代理等情况,Proxy代替相关设备向管理站提供一种外观,为设备代理SNMP协议的实现。Proxy做了异种网络或不同版本代理和相应SNMP数据请求的转换工作。如下图,
附:管理信息库MIB:定义了设备上可以使用的管理信息。代理和管理站使用MIB作为统一的数据接口通信。
六、SNMP的技术内容
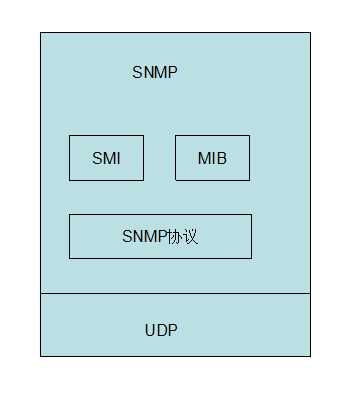
如下图,
七、SNMP的发展历史
八、SNMP的技术术语
九、综合上述(总结)
1.SNMP现有几个版本
SNMP共有v1,v2,v3这三个版本:
2.ASN.1、BER、SMI、MIB、PDU的关系
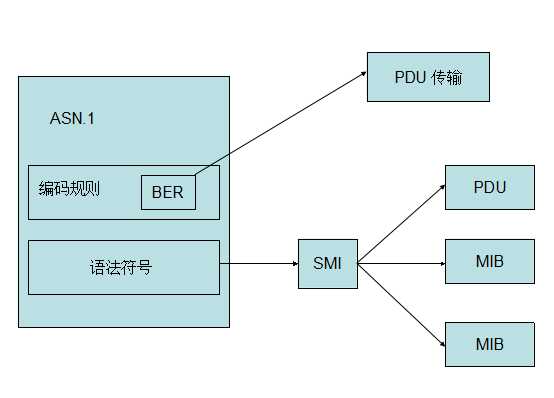
3.比较规范的SNMP背景
SNMP作为一种过渡技术以其简单易用的特性被广泛使用,使用的网络产品提供对SNMP的支持。SNMP还扩展了具有远程管理功能的RMON,使得管理人员可以对整个子网进行管理,而不是对整个子网内的设备进行管理。
十、Net-SNMP
1.net-snmp简介
使用net-snmp作为学习SNMP的工具,搭建一个net-snmp环境。Net-snmp是一个开源的SNMP项目。最新版本为:5.7.2。net-snmp支持snmpv1、snmpv2、snmpv3,支持基于IPv4和IPv6的SNMP应用程序。
2.net-snmp的安装与配置
官方网站: http://www.net-snmp.org/download.html,net-snmp被很多商业化的Linux包含,但是大多数的Linux使用net-snmp的主代理实现Linux的SNMP支持。
3.支持的平台
net-snmp可以在BSD UNIX、Linux、Windows等操作系统上编译运行。Windows下可以安装一个VMWare虚拟机软件,新建一个虚拟机,在虚拟机上安装Linux用来学习。
4.实验环境
5.同步时间
|
1 |
[root@snmp ~]# ntpdate 202.120.2.101 |
6.安装yum源
|
1 2 |
[root@node1 ~]# rpm -ivh http://download.fedoraproject.org/pub/epel/6/x86_64/epel-release-6-8.noarch.rpm [root@node1 ~]# rpm -ivh http://pkgs.repoforge.org/rpmforge-release/rpmforge-release-0.5.3-1.el6.rf.x86_64.rpm |
7.查看一下net-snmp相关软件包
|
1 2 3 4 5 6 7 8 9 |
[root@node1 ~]# yum list all | grep net-snmp* net-snmp.x86_64 1:5.5-44.el6_4.4 updates net-snmp-devel.i686 1:5.5-44.el6_4.4 updates net-snmp-devel.x86_64 1:5.5-44.el6_4.4 updates net-snmp-libs.i686 1:5.5-44.el6_4.4 updates net-snmp-libs.x86_64 1:5.5-44.el6_4.4 updates net-snmp-perl.x86_64 1:5.5-44.el6_4.4 updates net-snmp-python.x86_64 1:5.5-44.el6_4.4 updates net-snmp-utils.x86_64 1:5.5-44.el6_4.4 updates |
注,有两个重要的安装,net-snmp.x86_64 、net-snmp-utils.x86_64 一个是net-snmp软件包,另一个是snmp的工具包。下面我们来安装一下,
|
1 |
[root@node1 ~]# yum install -y net-snmp net-snmp-utils |
8.查看一下安装的软件包
|
1 2 3 4 |
[root@node1 ~]# rpm -qa | grep net-snmp* net-snmp-5.5-44.el6_4.4.x86_64 net-snmp-utils-5.5-44.el6_4.4.x86_64 net-snmp-libs-5.5-44.el6_4.4.x86_64 |
9.查看一下软件包具体安装的内容
下面是snmp软件包的内容,
|
1 2 3 4 5 6 7 8 9 10 11 12 13 14 15 16 17 18 19 20 21 22 23 24 25 26 27 28 29 30 31 32 33 34 35 36 37 38 39 40 41 42 43 44 45 46 47 48 49 50 51 52 53 54 55 56 57 58 59 60 61 62 63 64 65 |
[root@node1 ~]# rpm -ql net-snmp-5.5-44.el6_4.4.x86_64 /etc/rc.d/init.d/snmpd #snmp的启动脚本 /etc/rc.d/init.d/snmptrapd /etc/snmp #snmp配置文件目录 /etc/snmp/snmpd.conf #snmp配置文件 /etc/snmp/snmptrapd.conf /etc/sysconfig/snmpd /etc/sysconfig/snmptrapd /usr/bin/net-snmp-create-v3-user /usr/bin/snmpconf /usr/sbin/snmpd /usr/sbin/snmptrapd /usr/share/doc/net-snmp-5.5 /usr/share/doc/net-snmp-5.5/AGENT.txt /usr/share/doc/net-snmp-5.5/COPYING /usr/share/doc/net-snmp-5.5/ChangeLog.trimmed /usr/share/doc/net-snmp-5.5/EXAMPLE.conf /usr/share/doc/net-snmp-5.5/FAQ /usr/share/doc/net-snmp-5.5/NEWS /usr/share/doc/net-snmp-5.5/PORTING /usr/share/doc/net-snmp-5.5/README /usr/share/doc/net-snmp-5.5/README.agent-mibs /usr/share/doc/net-snmp-5.5/README.agentx /usr/share/doc/net-snmp-5.5/README.krb5 /usr/share/doc/net-snmp-5.5/README.mib2c /usr/share/doc/net-snmp-5.5/README.snmpv3 /usr/share/doc/net-snmp-5.5/README.thread /usr/share/doc/net-snmp-5.5/TODO /usr/share/doc/net-snmp-5.5/ipf-mod.pl /usr/share/doc/net-snmp-5.5/passtest /usr/share/man/man1/net-snmp-create-v3-user.1.gz #帮助文件 /usr/share/man/man1/snmpconf.1.gz /usr/share/man/man5/snmp_config.5.gz /usr/share/man/man5/snmpd.conf.5.gz /usr/share/man/man5/snmpd.examples.5.gz /usr/share/man/man5/snmpd.internal.5.gz /usr/share/man/man5/snmptrapd.conf.5.gz /usr/share/man/man5/variables.5.gz /usr/share/man/man8/snmpd.8.gz /usr/share/man/man8/snmptrapd.8.gz /usr/share/snmp /usr/share/snmp/snmpconf-data /usr/share/snmp/snmpconf-data/snmp-data /usr/share/snmp/snmpconf-data/snmp-data/authopts /usr/share/snmp/snmpconf-data/snmp-data/debugging /usr/share/snmp/snmpconf-data/snmp-data/mibs /usr/share/snmp/snmpconf-data/snmp-data/output /usr/share/snmp/snmpconf-data/snmp-data/snmpconf-config /usr/share/snmp/snmpconf-data/snmpd-data /usr/share/snmp/snmpconf-data/snmpd-data/acl /usr/share/snmp/snmpconf-data/snmpd-data/basic_setup /usr/share/snmp/snmpconf-data/snmpd-data/extending /usr/share/snmp/snmpconf-data/snmpd-data/monitor /usr/share/snmp/snmpconf-data/snmpd-data/operation /usr/share/snmp/snmpconf-data/snmpd-data/snmpconf-config /usr/share/snmp/snmpconf-data/snmpd-data/system /usr/share/snmp/snmpconf-data/snmpd-data/trapsinks /usr/share/snmp/snmpconf-data/snmptrapd-data /usr/share/snmp/snmpconf-data/snmptrapd-data/authentication /usr/share/snmp/snmpconf-data/snmptrapd-data/formatting /usr/share/snmp/snmpconf-data/snmptrapd-data/logging /usr/share/snmp/snmpconf-data/snmptrapd-data/runtime /usr/share/snmp/snmpconf-data/snmptrapd-data/snmpconf-config /usr/share/snmp/snmpconf-data/snmptrapd-data/traphandle /var/run/net-snmp |
下面是snmp的常用操作工具,
|
1 2 3 4 5 6 7 8 9 10 11 12 13 14 15 16 17 18 19 20 21 22 23 24 25 26 27 28 29 30 31 32 33 34 35 36 37 38 39 40 41 |
[root@node1 ~]# rpm -ql net-snmp-utils-5.5-44.el6_4.4.x86_64 /usr/bin/encode_keychange /usr/bin/snmpbulkget #下面是snmp常用工具,下面我们会详细讲解 /usr/bin/snmpbulkwalk /usr/bin/snmpdelta /usr/bin/snmpdf /usr/bin/snmpget /usr/bin/snmpgetnext /usr/bin/snmpinform /usr/bin/snmpnetstat /usr/bin/snmpset /usr/bin/snmpstatus /usr/bin/snmptable /usr/bin/snmptest /usr/bin/snmptranslate /usr/bin/snmptrap /usr/bin/snmpusm /usr/bin/snmpvacm /usr/bin/snmpwalk /usr/share/man/man1/encode_keychange.1.gz /usr/share/man/man1/snmpbulkget.1.gz /usr/share/man/man1/snmpbulkwalk.1.gz /usr/share/man/man1/snmpcmd.1.gz /usr/share/man/man1/snmpconf.1.gz /usr/share/man/man1/snmpdelta.1.gz /usr/share/man/man1/snmpdf.1.gz /usr/share/man/man1/snmpget.1.gz /usr/share/man/man1/snmpgetnext.1.gz /usr/share/man/man1/snmpinform.1.gz /usr/share/man/man1/snmpnetstat.1.gz /usr/share/man/man1/snmpset.1.gz /usr/share/man/man1/snmpstatus.1.gz /usr/share/man/man1/snmptable.1.gz /usr/share/man/man1/snmptest.1.gz /usr/share/man/man1/snmptranslate.1.gz /usr/share/man/man1/snmptrap.1.gz /usr/share/man/man1/snmpusm.1.gz /usr/share/man/man1/snmpvacm.1.gz /usr/share/man/man1/snmpwalk.1.gz /usr/share/man/man5/snmp.conf.5.gz /usr/share/man/man5/variables.5.gz |
10.查看一下默认配置文件
注,大家可以看到默认配置文件有很多内容,但其实大部分都是注释。下面我们来讲解一下常用的配置选项,
|
1 2 3 4 5 6 7 8 9 10 11 12 13 14 15 16 17 18 19 20 21 22 23 24 25 26 27 28 29 30 31 32 33 34 35 36 37 38 39 40 41 42 43 44 45 46 47 48 49 50 51 52 53 54 55 56 57 58 59 60 61 62 63 64 65 66 67 68 69 70 71 72 73 74 75 76 77 78 79 80 81 82 83 84 85 86 87 88 89 90 91 92 93 94 95 96 97 98 99 100 101 102 103 104 105 106 107 108 109 110 111 112 113 114 115 116 117 118 119 120 121 122 123 124 125 126 127 128 129 130 131 132 133 134 135 136 137 138 139 140 141 142 143 144 145 146 147 148 149 150 151 152 153 154 155 156 157 158 159 160 161 162 163 164 165 166 167 168 169 170 171 172 173 174 175 176 177 178 179 180 181 182 183 184 185 186 187 188 189 190 191 192 193 194 195 196 197 198 199 200 201 202 203 204 205 206 207 208 209 210 211 212 213 214 215 216 217 218 219 220 221 222 223 224 225 226 227 228 229 230 231 232 233 234 235 236 237 238 239 240 241 242 243 244 245 246 247 248 249 250 251 252 253 254 255 256 257 258 259 260 261 262 263 264 265 266 267 268 269 270 271 272 273 274 275 276 277 278 279 280 281 282 283 284 285 286 287 288 289 290 291 292 293 294 295 296 297 298 299 300 301 302 303 304 305 306 307 308 309 310 311 312 313 314 315 316 317 318 319 320 321 322 323 324 325 326 327 328 329 330 331 332 333 334 335 336 337 338 339 340 341 342 343 344 345 346 347 348 349 350 351 352 353 354 355 356 357 358 359 360 361 362 363 364 365 366 367 368 369 370 371 372 373 374 375 376 377 378 379 380 |
[root@node1 ~]# cat /etc/snmp/snmpd.conf ############################################################################### # # snmpd.conf: # An example configuration file for configuring the ucd-snmp snmpd agent. # ############################################################################### # # This file is intended to only be as a starting point. Many more # configuration directives exist than are mentioned in this file. For # full details, see the snmpd.conf(5) manual page. # # All lines beginning with a ‘#‘ are comments and are intended for you # to read. All other lines are configuration commands for the agent. ############################################################################### # Access Control ############################################################################### # As shipped, the snmpd demon will only respond to queries on the # system mib group until this file is replaced or modified for # security purposes. Examples are shown below about how to increase the # level of access. # By far, the most common question I get about the agent is "why won‘t # it work?", when really it should be "how do I configure the agent to # allow me to access it?" # # By default, the agent responds to the "public" community for read # only access, if run out of the box without any configuration file in # place. The following examples show you other ways of configuring # the agent so that you can change the community names, and give # yourself write access to the mib tree as well. # # For more information, read the FAQ as well as the snmpd.conf(5) # manual page. #### # First, map the community name "public" into a "security name" # sec.name source community com2sec notConfigUser default public #### # Second, map the security name into a group name: # groupName securityModel securityName group notConfigGroup v1 notConfigUser group notConfigGroup v2c notConfigUser #### # Third, create a view for us to let the group have rights to: # Make at least snmpwalk -v 1 localhost -c public system fast again. # name incl/excl subtree mask(optional) view systemview included .1.3.6.1.2.1.1 view systemview included .1.3.6.1.2.1.25.1.1 #### # Finally, grant the group read-only access to the systemview view. # group context sec.model sec.level prefix read write notif access notConfigGroup "" any noauth exact systemview none none # ----------------------------------------------------------------------------- #下面的是一个例子,具体是关于怎么对本机或其他网络主机赋予权限 # Here is a commented out example configuration that allows less # restrictive access. # YOU SHOULD CHANGE THE "COMMUNITY" TOKEN BELOW TO A NEW KEYWORD ONLY # KNOWN AT YOUR SITE. YOU *MUST* CHANGE THE NETWORK TOKEN BELOW TO # SOMETHING REFLECTING YOUR LOCAL NETWORK ADDRESS SPACE. ## sec.name source community #com2sec local localhost COMMUNITY #com2sec mynetwork NETWORK/24 COMMUNITY ## group.name sec.model sec.name #group MyRWGroup any local #group MyROGroup any mynetwork # #group MyRWGroup any otherv3user #... ## incl/excl subtree mask #view all included .1 80 ## -or just the mib2 tree- #view mib2 included .iso.org.dod.internet.mgmt.mib-2 fc ## context sec.model sec.level prefix read write notif #access MyROGroup "" any noauth 0 all none none #access MyRWGroup "" any noauth 0 all all all ############################################################################### # Sample configuration to make net-snmpd RFC 1213. # Unfortunately v1 and v2c don‘t allow any user based authentification, so # opening up the default config is not an option from a security point. # # WARNING: If you uncomment the following lines you allow write access to your # snmpd daemon from any source! To avoid this use different names for your # community or split out the write access to a different community and # restrict it to your local network. # Also remember to comment the syslocation and syscontact parameters later as # otherwise they are still read only (see FAQ for net-snmp). # # First, map the community name "public" into a "security name" # sec.name source community #com2sec notConfigUser default public # Second, map the security name into a group name: # groupName securityModel securityName #group notConfigGroup v1 notConfigUser #group notConfigGroup v2c notConfigUser # Third, create a view for us to let the group have rights to: # Open up the whole tree for ro, make the RFC 1213 required ones rw. # name incl/excl subtree mask(optional) #view roview included .1 #view rwview included system.sysContact #view rwview included system.sysName #view rwview included system.sysLocation #view rwview included interfaces.ifTable.ifEntry.ifAdminStatus #view rwview included at.atTable.atEntry.atPhysAddress #view rwview included at.atTable.atEntry.atNetAddress #view rwview included ip.ipForwarding #view rwview included ip.ipDefaultTTL #view rwview included ip.ipRouteTable.ipRouteEntry.ipRouteDest #view rwview included ip.ipRouteTable.ipRouteEntry.ipRouteIfIndex #view rwview included ip.ipRouteTable.ipRouteEntry.ipRouteMetric1 #view rwview included ip.ipRouteTable.ipRouteEntry.ipRouteMetric2 #view rwview included ip.ipRouteTable.ipRouteEntry.ipRouteMetric3 #view rwview included ip.ipRouteTable.ipRouteEntry.ipRouteMetric4 #view rwview included ip.ipRouteTable.ipRouteEntry.ipRouteType #view rwview included ip.ipRouteTable.ipRouteEntry.ipRouteAge #view rwview included ip.ipRouteTable.ipRouteEntry.ipRouteMask #view rwview included ip.ipRouteTable.ipRouteEntry.ipRouteMetric5 #view rwview included ip.ipNetToMediaTable.ipNetToMediaEntry.ipNetToMediaIfIndex #view rwview included ip.ipNetToMediaTable.ipNetToMediaEntry.ipNetToMediaPhysAddress #view rwview included ip.ipNetToMediaTable.ipNetToMediaEntry.ipNetToMediaNetAddress #view rwview included ip.ipNetToMediaTable.ipNetToMediaEntry.ipNetToMediaType #view rwview included tcp.tcpConnTable.tcpConnEntry.tcpConnState #view rwview included egp.egpNeighTable.egpNeighEntry.egpNeighEventTrigger #view rwview included snmp.snmpEnableAuthenTraps # Finally, grant the group read-only access to the systemview view. # group context sec.model sec.level prefix read write notif #access notConfigGroup "" any noauth exact roview rwview none ############################################################################### # System contact information #联系人信息 # It is also possible to set the sysContact and sysLocation system # variables through the snmpd.conf file: syslocation Unknown (edit /etc/snmp/snmpd.conf) syscontact Root <root@localhost> (configure /etc/snmp/snmp.local.conf) # Example output of snmpwalk: # % snmpwalk -v 1 localhost -c public system # system.sysDescr.0 = "SunOS name sun4c" # system.sysObjectID.0 = OID: enterprises.ucdavis.ucdSnmpAgent.sunos4 # system.sysUpTime.0 = Timeticks: (595637548) 68 days, 22:32:55 # system.sysContact.0 = "Me <me@somewhere.org>" # system.sysName.0 = "name" # system.sysLocation.0 = "Right here, right now." # system.sysServices.0 = 72 ############################################################################### # Logging #日志信息 # We do not want annoying "Connection from UDP: " messages in syslog. # If the following option is commented out, snmpd will print each incoming # connection, which can be useful for debugging. dontLogTCPWrappersConnects yes # ----------------------------------------------------------------------------- ############################################################################### # Process checks. #关于检测进程数目的有个OIDs,可以在enterprises.ucdavis.procTable查看 # The following are examples of how to use the agent to check for # processes running on the host. The syntax looks something like: # # proc NAME [MAX=0] [MIN=0] # # NAME: the name of the process to check for. It must match # exactly (ie, http will not find httpd processes). # MAX: the maximum number allowed to be running. Defaults to 0. # MIN: the minimum number to be running. Defaults to 0. # # Examples (commented out by default): # # Make sure mountd is running #proc mountd # Make sure there are no more than 4 ntalkds running, but 0 is ok too. #proc ntalkd 4 # Make sure at least one sendmail, but less than or equal to 10 are running. #proc sendmail 10 1 # A snmpwalk of the process mib tree would look something like this: # # % snmpwalk -v 1 localhost -c public .1.3.6.1.4.1.2021.2 # enterprises.ucdavis.procTable.prEntry.prIndex.1 = 1 # enterprises.ucdavis.procTable.prEntry.prIndex.2 = 2 # enterprises.ucdavis.procTable.prEntry.prIndex.3 = 3 # enterprises.ucdavis.procTable.prEntry.prNames.1 = "mountd" # enterprises.ucdavis.procTable.prEntry.prNames.2 = "ntalkd" # enterprises.ucdavis.procTable.prEntry.prNames.3 = "sendmail" # enterprises.ucdavis.procTable.prEntry.prMin.1 = 0 # enterprises.ucdavis.procTable.prEntry.prMin.2 = 0 # enterprises.ucdavis.procTable.prEntry.prMin.3 = 1 # enterprises.ucdavis.procTable.prEntry.prMax.1 = 0 # enterprises.ucdavis.procTable.prEntry.prMax.2 = 4 # enterprises.ucdavis.procTable.prEntry.prMax.3 = 10 # enterprises.ucdavis.procTable.prEntry.prCount.1 = 0 # enterprises.ucdavis.procTable.prEntry.prCount.2 = 0 # enterprises.ucdavis.procTable.prEntry.prCount.3 = 1 # enterprises.ucdavis.procTable.prEntry.prErrorFlag.1 = 1 # enterprises.ucdavis.procTable.prEntry.prErrorFlag.2 = 0 # enterprises.ucdavis.procTable.prEntry.prErrorFlag.3 = 0 # enterprises.ucdavis.procTable.prEntry.prErrMessage.1 = "No mountd process running." # enterprises.ucdavis.procTable.prEntry.prErrMessage.2 = "" # enterprises.ucdavis.procTable.prEntry.prErrMessage.3 = "" # enterprises.ucdavis.procTable.prEntry.prErrFix.1 = 0 # enterprises.ucdavis.procTable.prEntry.prErrFix.2 = 0 # enterprises.ucdavis.procTable.prEntry.prErrFix.3 = 0 # # Note that the errorFlag for mountd is set to 1 because one is not # running (in this case an rpc.mountd is, but thats not good enough), # and the ErrMessage tells you what‘s wrong. The configuration # imposed in the snmpd.conf file is also shown. # # Special Case: When the min and max numbers are both 0, it assumes # you want a max of infinity and a min of 1. # # ----------------------------------------------------------------------------- ############################################################################### # Executables/scripts #snmpd可以运行一个脚本,并可以得到他的返回值(最后一个)在enterprises.ucdavis.extTable下查看 # # You can also have programs run by the agent that return a single # line of output and an exit code. Here are two examples. # # exec NAME PROGRAM [ARGS ...] # # NAME: A generic name. The name must be unique for each exec statement. # PROGRAM: The program to run. Include the path! # ARGS: optional arguments to be passed to the program # a simple hello world #exec echotest /bin/echo hello world # Run a shell script containing: # # #!/bin/sh # echo hello world # echo hi there # exit 35 # # Note: this has been specifically commented out to prevent # accidental security holes due to someone else on your system writing # a /tmp/shtest before you do. Uncomment to use it. # #exec shelltest /bin/sh /tmp/shtest # Then, # % snmpwalk -v 1 localhost -c public .1.3.6.1.4.1.2021.8 # enterprises.ucdavis.extTable.extEntry.extIndex.1 = 1 # enterprises.ucdavis.extTable.extEntry.extIndex.2 = 2 # enterprises.ucdavis.extTable.extEntry.extNames.1 = "echotest" # enterprises.ucdavis.extTable.extEntry.extNames.2 = "shelltest" # enterprises.ucdavis.extTable.extEntry.extCommand.1 = "/bin/echo hello world" # enterprises.ucdavis.extTable.extEntry.extCommand.2 = "/bin/sh /tmp/shtest" # enterprises.ucdavis.extTable.extEntry.extResult.1 = 0 # enterprises.ucdavis.extTable.extEntry.extResult.2 = 35 # enterprises.ucdavis.extTable.extEntry.extOutput.1 = "hello world." # enterprises.ucdavis.extTable.extEntry.extOutput.2 = "hello world." # enterprises.ucdavis.extTable.extEntry.extErrFix.1 = 0 # enterprises.ucdavis.extTable.extEntry.extErrFix.2 = 0 # Note that the second line of the /tmp/shtest shell script is cut # off. Also note that the exit status of 35 was returned. # ----------------------------------------------------------------------------- ############################################################################### # disk checks #硬盘分区的定义,语法如下,只有定义了才会取抓值。单位KB # The agent can check the amount of available disk space, and make # sure it is above a set limit. # disk PATH [MIN=100000] # # PATH: mount path to the disk in question. # MIN: Disks with space below this value will have the Mib‘s errorFlag set. # Default value = 100000. # Check the / partition and make sure it contains at least 10 megs. #disk / 10000 # % snmpwalk -v 1 localhost -c public .1.3.6.1.4.1.2021.9 # enterprises.ucdavis.diskTable.dskEntry.diskIndex.1 = 0 # enterprises.ucdavis.diskTable.dskEntry.diskPath.1 = "/" Hex: 2F # enterprises.ucdavis.diskTable.dskEntry.diskDevice.1 = "/dev/dsk/c201d6s0" # enterprises.ucdavis.diskTable.dskEntry.diskMinimum.1 = 10000 # enterprises.ucdavis.diskTable.dskEntry.diskTotal.1 = 837130 # enterprises.ucdavis.diskTable.dskEntry.diskAvail.1 = 316325 # enterprises.ucdavis.diskTable.dskEntry.diskUsed.1 = 437092 # enterprises.ucdavis.diskTable.dskEntry.diskPercent.1 = 58 # enterprises.ucdavis.diskTable.dskEntry.diskErrorFlag.1 = 0 # enterprises.ucdavis.diskTable.dskEntry.diskErrorMsg.1 = "" # ----------------------------------------------------------------------------- ############################################################################### # load average checks #这个是定义cpu任务的负载信息的,值是平均最大值 # load [1MAX=12.0] [5MAX=12.0] [15MAX=12.0] # # 1MAX: If the 1 minute load average is above this limit at query # time, the errorFlag will be set. # 5MAX: Similar, but for 5 min average. # 15MAX: Similar, but for 15 min average. # Check for loads: #load 12 14 14 # % snmpwalk -v 1 localhost -c public .1.3.6.1.4.1.2021.10 # enterprises.ucdavis.loadTable.laEntry.loadaveIndex.1 = 1 # enterprises.ucdavis.loadTable.laEntry.loadaveIndex.2 = 2 # enterprises.ucdavis.loadTable.laEntry.loadaveIndex.3 = 3 # enterprises.ucdavis.loadTable.laEntry.loadaveNames.1 = "Load-1" # enterprises.ucdavis.loadTable.laEntry.loadaveNames.2 = "Load-5" # enterprises.ucdavis.loadTable.laEntry.loadaveNames.3 = "Load-15" # enterprises.ucdavis.loadTable.laEntry.loadaveLoad.1 = "0.49" Hex: 30 2E 34 39 # enterprises.ucdavis.loadTable.laEntry.loadaveLoad.2 = "0.31" Hex: 30 2E 33 31 # enterprises.ucdavis.loadTable.laEntry.loadaveLoad.3 = "0.26" Hex: 30 2E 32 36 # enterprises.ucdavis.loadTable.laEntry.loadaveConfig.1 = "12.00" # enterprises.ucdavis.loadTable.laEntry.loadaveConfig.2 = "14.00" # enterprises.ucdavis.loadTable.laEntry.loadaveConfig.3 = "14.00" # enterprises.ucdavis.loadTable.laEntry.loadaveErrorFlag.1 = 0 # enterprises.ucdavis.loadTable.laEntry.loadaveErrorFlag.2 = 0 # enterprises.ucdavis.loadTable.laEntry.loadaveErrorFlag.3 = 0 # enterprises.ucdavis.loadTable.laEntry.loadaveErrMessage.1 = "" # enterprises.ucdavis.loadTable.laEntry.loadaveErrMessage.2 = "" # enterprises.ucdavis.loadTable.laEntry.loadaveErrMessage.3 = "" # ----------------------------------------------------------------------------- ############################################################################### # Extensible sections. # 与enterprises.ucdavis.extTable的区别 # This alleviates the multiple line output problem found in the # previous executable mib by placing each mib in its own mib table: # Run a shell script containing: # # #!/bin/sh # echo hello world # echo hi there # exit 35 # # Note: this has been specifically commented out to prevent # accidental security holes due to someone else on your system writing # a /tmp/shtest before you do. Uncomment to use it. # # exec .1.3.6.1.4.1.2021.50 shelltest /bin/sh /tmp/shtest # % snmpwalk -v 1 localhost -c public .1.3.6.1.4.1.2021.50 # enterprises.ucdavis.50.1.1 = 1 # enterprises.ucdavis.50.2.1 = "shelltest" # enterprises.ucdavis.50.3.1 = "/bin/sh /tmp/shtest" # enterprises.ucdavis.50.100.1 = 35 # enterprises.ucdavis.50.101.1 = "hello world." # enterprises.ucdavis.50.101.2 = "hi there." # enterprises.ucdavis.50.102.1 = 0 # Now the Output has grown to two lines, and we can see the ‘hi # there.‘ output as the second line from our shell script. # # Note that you must alter the mib.txt file to be correct if you want # the .50.* outputs above to change to reasonable text descriptions. # Other ideas: # # exec .1.3.6.1.4.1.2021.51 ps /bin/ps # exec .1.3.6.1.4.1.2021.52 top /usr/local/bin/top # exec .1.3.6.1.4.1.2021.53 mailq /usr/bin/mailq #可以运行多个脚本 # ----------------------------------------------------------------------------- ############################################################################### # Pass through control. # # Usage: # pass MIBOID EXEC-COMMAND # # This will pass total control of the mib underneath the MIBOID # portion of the mib to the EXEC-COMMAND. # # Note: You‘ll have to change the path of the passtest script to your # source directory or install it in the given location. # # Example: (see the script for details) # (commented out here since it requires that you place the # script in the right location. (its not installed by default)) # pass .1.3.6.1.4.1.2021.255 /bin/sh /usr/local/local/passtest # % snmpwalk -v 1 localhost -c public .1.3.6.1.4.1.2021.255 # enterprises.ucdavis.255.1 = "life the universe and everything" # enterprises.ucdavis.255.2.1 = 42 # enterprises.ucdavis.255.2.2 = OID: 42.42.42 # enterprises.ucdavis.255.3 = Timeticks: (363136200) 42 days, 0:42:42 # enterprises.ucdavis.255.4 = IpAddress: 127.0.0.1 # enterprises.ucdavis.255.5 = 42 # enterprises.ucdavis.255.6 = Gauge: 42 # # % snmpget -v 1 localhost public .1.3.6.1.4.1.2021.255.5 # enterprises.ucdavis.255.5 = 42 # # % snmpset -v 1 localhost public .1.3.6.1.4.1.2021.255.1 s "New string" # enterprises.ucdavis.255.1 = "New string" # # For specific usage information, see the man/snmpd.conf.5 manual page # as well as the local/passtest script used in the above example. ############################################################################### # Further Information # # See the snmpd.conf manual page, and the output of "snmpd -H". |
下面是常用的配置选项,
主配置文件:/etc/snmp/snmpd.conf
常用定义项:
(1).首选是定义一个共同体名(community),这里是public(多数SNMP设备或服务默认都是是用public),及可以访问这个public的用户名(sec name),这里是notConfigUser。Public相当于用户notConfigUser的密码:) ,source 在net-snmp中用来对来源IP加以控制,即哪些可以获取SNMP信息
|
1 2 |
# sec.name source community com2sec notConfigUser default public |
(2).定义一个组名(groupName)这里是notConfigGroup,及组的安全级别,把notConfigGroup这个用户加到这个组中。
sec.model:安全模式,可选值为v1/v2c/usm。
|
1 2 3 |
# groupName securityModel securityName group notConfigGroup v1 notConfigUser group notConfigGroup v2c notConfigUser |
(3).定义一个可操作的范围(view)名, 这里是all,范围是 .1
|
1 2 |
# name incl/excl subtree mask(optional) view all included .1 #表示可以查看.1节点下的所有设备信息 |
注:
(4).定义notConfigUser这个组在all这个view范围内可做的操作(即权限),这时定义了notConfigUser组的成员可对.1这个范围做只读操作。
|
1 2 |
# group context sec.model sec.level prefix read write notif access notConfigGroup "" any noauth exact all none none |
注:
(5).端口: 标准的SNMP服务使用161和162端口,厂商私有的实现一般使用199、391、705和1993端口,net-snmp用udp 161。
11.启动snmp
|
1 2 3 4 5 6 7 8 9 10 11 12 13 14 15 |
[root@node1 ~]# service snmpd start 正在启动 snmpd: [确定] [root@node1 ~]# netstat -ntulp Active Internet connections (only servers) Proto Recv-Q Send-Q Local Address Foreign Address State PID/Program name tcp 0 0 0.0.0.0:22 0.0.0.0:* LISTEN 1045/sshd tcp 0 0 127.0.0.1:25 0.0.0.0:* LISTEN 1122/master tcp 0 0 127.0.0.1:6010 0.0.0.0:* LISTEN 2149/sshd tcp 0 0 127.0.0.1:6011 0.0.0.0:* LISTEN 1582/sshd tcp 0 0 127.0.0.1:199 0.0.0.0:* LISTEN 12252/snmpd tcp 0 0 :::22 :::* LISTEN 1045/sshd tcp 0 0 ::1:25 :::* LISTEN 1122/master tcp 0 0 ::1:6010 :::* LISTEN 2149/sshd tcp 0 0 ::1:6011 :::* LISTEN 1582/sshd udp 0 0 0.0.0.0:161 0.0.0.0:* 12252/snmpd |
12.测试一下
|
1 2 3 4 |
[root@node1 ~]# snmpd -v #查看一下net-snmp版本 NET-SNMP version: 5.5 Web: http://www.net-snmp.org/ Email: net-snmp-coders@lists.sourceforge.net |
注,启动代理时也可以使用如下参数使snmpd使用【配置文件】启动:
|
1 2 3 |
[root@node1 ~]# snmpd –C –c /etc/snmp/snmpd.conf -C 不读取默认配置文件 -c 读取指定的配置文件 |
使用这个参数,我们可以配置很多的配置文件,设置不同的运行环境,便于我们开发和学习。
下面来测试一下,
从代理中读取一个管理对象验证代理是否正常运行。读取MIB库中的RFC1213->system->sysDescr 对象,该对象表示设备的描述信息。使用net-snmp提供的snmp工具读取,命令如下:
|
1 2 |
[root@node1 ~]# snmpget -v 2c -c public localhost sysDescr.0 SNMPv2-MIB::sysDescr.0 = STRING: Linux node1.test.com 2.6.32-358.el6.x86_64 #1 SMP Fri Feb 22 00:31:26 UTC 2013 x86_64 |
注,如果得到了信息,表示net-snmp安装成功。
13.net-snmp工具介绍
|
1 2 3 4 |
[root@node1 ~]# snmp snmpbulkget snmpd snmpget snmpnetstat snmptable snmptrap snmpvacm snmpbulkwalk snmpdelta snmpgetnext snmpset snmptest snmptrapd snmpwalk snmpconf snmpdf snmpinform snmpstatus snmptranslate snmpusm |
下面我们来说几个最常用的net-snmp工具,
常用命令:
(1).snmpget命令
|
1 2 3 4 5 |
snmpget [OPTIONS] AGENT OID [OID]... 选项: -v 1|2c|3 指定SNMP版本 -c COMMUNITY 指定community string -m MIB[:...] 指定MIB文件 |
注,snmpget 不同于 snmpwalk ,必须在命令行给出 <object>.<instance> 的格式,不能只给出 object。
案例,snmpget -v 2c -c public localhost system.sysDescr.0 #获取设备的描述信息。
|
1 2 |
[root@node1 ~]# snmpget -v 2c -c public localhost system.sysDescr.0 SNMPv2-MIB::sysDescr.0 = STRING: Linux node1.test.com 2.6.32-358.el6.x86_64 #1 SMP Fri Feb 22 00:31:26 UTC 2013 x86_64 |
(2).snmpwalk/snmpbulkwalk 命令
|
1 2 3 4 5 |
snmpwalk/snmpbulkwalk [OPTIONS] AGENT [OID] 选项: -v 1|2c|3 指定SNMP版本 -c COMMUNITY 指定community string -m MIB[:...] 指定MIB文件 |
注,snmpbulkwalk命令: 获取snmp服务器的mib-2各种资讯,snmpbulkwalk用于通过SNMPv2 的SNMP GET BULK请求命令与其它网络实体通信,只能用于snmpv2,速度快于snmpwalk
案例,snmpbulkwalk -v 2c -c public 127.0.0.1 .1.3.6.1.2.1.1 #获取mib-2的system的数据。
|
1 2 3 4 5 6 7 8 9 10 11 12 13 14 15 16 17 18 19 20 21 22 23 24 25 26 27 28 29 30 31 32 |
[root@node1 ~]# snmpbulkwalk -v 2c -c public 127.0.0.1 .1.3.6.1.2.1.1 SNMPv2-MIB::sysDescr.0 = STRING: Linux node1.test.com 2.6.32-358.el6.x86_64 #1 SMP Fri Feb 22 00:31:26 UTC 2013 x86_64 SNMPv2-MIB::sysObjectID.0 = OID: NET-SNMP-MIB::netSnmpAgentOIDs.10 DISMAN-EVENT-MIB::sysUpTimeInstance = Timeticks: (264551) 0:44:05.51 SNMPv2-MIB::sysContact.0 = STRING: Root <root@localhost> (configure /etc/snmp/snmp.local.conf) SNMPv2-MIB::sysName.0 = STRING: node1.test.com SNMPv2-MIB::sysLocation.0 = STRING: Unknown (edit /etc/snmp/snmpd.conf) SNMPv2-MIB::sysORLastChange.0 = Timeticks: (10) 0:00:00.10 SNMPv2-MIB::sysORID.1 = OID: SNMP-MPD-MIB::snmpMPDMIBObjects.3.1.1 SNMPv2-MIB::sysORID.2 = OID: SNMP-USER-BASED-SM-MIB::usmMIBCompliance SNMPv2-MIB::sysORID.3 = OID: SNMP-FRAMEWORK-MIB::snmpFrameworkMIBCompliance SNMPv2-MIB::sysORID.4 = OID: SNMPv2-MIB::snmpMIB SNMPv2-MIB::sysORID.5 = OID: TCP-MIB::tcpMIB SNMPv2-MIB::sysORID.6 = OID: IP-MIB::ip SNMPv2-MIB::sysORID.7 = OID: UDP-MIB::udpMIB SNMPv2-MIB::sysORID.8 = OID: SNMP-VIEW-BASED-ACM-MIB::vacmBasicGroup SNMPv2-MIB::sysORDescr.1 = STRING: The MIB for Message Processing and Dispatching. SNMPv2-MIB::sysORDescr.2 = STRING: The MIB for Message Processing and Dispatching. SNMPv2-MIB::sysORDescr.3 = STRING: The SNMP Management Architecture MIB. SNMPv2-MIB::sysORDescr.4 = STRING: The MIB module for SNMPv2 entities SNMPv2-MIB::sysORDescr.5 = STRING: The MIB module for managing TCP implementations SNMPv2-MIB::sysORDescr.6 = STRING: The MIB module for managing IP and ICMP implementations SNMPv2-MIB::sysORDescr.7 = STRING: The MIB module for managing UDP implementations SNMPv2-MIB::sysORDescr.8 = STRING: View-based Access Control Model for SNMP. SNMPv2-MIB::sysORUpTime.1 = Timeticks: (9) 0:00:00.09 SNMPv2-MIB::sysORUpTime.2 = Timeticks: (9) 0:00:00.09 SNMPv2-MIB::sysORUpTime.3 = Timeticks: (9) 0:00:00.09 SNMPv2-MIB::sysORUpTime.4 = Timeticks: (9) 0:00:00.09 SNMPv2-MIB::sysORUpTime.5 = Timeticks: (9) 0:00:00.09 SNMPv2-MIB::sysORUpTime.6 = Timeticks: (10) 0:00:00.10 SNMPv2-MIB::sysORUpTime.7 = Timeticks: (10) 0:00:00.10 SNMPv2-MIB::sysORUpTime.8 = Timeticks: (10) 0:00:00.10 |
(3).snmpwalk命令
注,获取snmp服务器的HOST-RESOURCES的各种资讯。
案例,snmpwalk -v 2c -c public localhost system #这条指令用于查看本机系统信息。
|
1 2 3 4 5 6 7 8 9 10 11 12 13 14 15 16 17 18 19 20 21 22 23 24 25 26 27 28 29 30 31 32 |
[root@node1 ~]# snmpwalk -v 2c -c public localhost system SNMPv2-MIB::sysDescr.0 = STRING: Linux node1.test.com 2.6.32-358.el6.x86_64 #1 SMP Fri Feb 22 00:31:26 UTC 2013 x86_64 SNMPv2-MIB::sysObjectID.0 = OID: NET-SNMP-MIB::netSnmpAgentOIDs.10 DISMAN-EVENT-MIB::sysUpTimeInstance = Timeticks: (3335125) 9:15:51.25 SNMPv2-MIB::sysContact.0 = STRING: Root <root@localhost> (configure /etc/snmp/snmp.local.conf) SNMPv2-MIB::sysName.0 = STRING: node1.test.com SNMPv2-MIB::sysLocation.0 = STRING: Unknown (edit /etc/snmp/snmpd.conf) SNMPv2-MIB::sysORLastChange.0 = Timeticks: (10) 0:00:00.10 SNMPv2-MIB::sysORID.1 = OID: SNMP-MPD-MIB::snmpMPDMIBObjects.3.1.1 SNMPv2-MIB::sysORID.2 = OID: SNMP-USER-BASED-SM-MIB::usmMIBCompliance SNMPv2-MIB::sysORID.3 = OID: SNMP-FRAMEWORK-MIB::snmpFrameworkMIBCompliance SNMPv2-MIB::sysORID.4 = OID: SNMPv2-MIB::snmpMIB SNMPv2-MIB::sysORID.5 = OID: TCP-MIB::tcpMIB SNMPv2-MIB::sysORID.6 = OID: IP-MIB::ip SNMPv2-MIB::sysORID.7 = OID: UDP-MIB::udpMIB SNMPv2-MIB::sysORID.8 = OID: SNMP-VIEW-BASED-ACM-MIB::vacmBasicGroup SNMPv2-MIB::sysORDescr.1 = STRING: The MIB for Message Processing and Dispatching. SNMPv2-MIB::sysORDescr.2 = STRING: The MIB for Message Processing and Dispatching. SNMPv2-MIB::sysORDescr.3 = STRING: The SNMP Management Architecture MIB. SNMPv2-MIB::sysORDescr.4 = STRING: The MIB module for SNMPv2 entities SNMPv2-MIB::sysORDescr.5 = STRING: The MIB module for managing TCP implementations SNMPv2-MIB::sysORDescr.6 = STRING: The MIB module for managing IP and ICMP implementations SNMPv2-MIB::sysORDescr.7 = STRING: The MIB module for managing UDP implementations SNMPv2-MIB::sysORDescr.8 = STRING: View-based Access Control Model for SNMP. SNMPv2-MIB::sysORUpTime.1 = Timeticks: (9) 0:00:00.09 SNMPv2-MIB::sysORUpTime.2 = Timeticks: (9) 0:00:00.09 SNMPv2-MIB::sysORUpTime.3 = Timeticks: (9) 0:00:00.09 SNMPv2-MIB::sysORUpTime.4 = Timeticks: (9) 0:00:00.09 SNMPv2-MIB::sysORUpTime.5 = Timeticks: (9) 0:00:00.09 SNMPv2-MIB::sysORUpTime.6 = Timeticks: (10) 0:00:00.10 SNMPv2-MIB::sysORUpTime.7 = Timeticks: (10) 0:00:00.10 SNMPv2-MIB::sysORUpTime.8 = Timeticks: (10) 0:00:00.10 |
(4).snmpdelta命令
注,监控网卡流量等信息, 指定共同体为public,协议为snmpv1,以表格的方式输出结果,显示时间戳。
案例,
|
1 2 |
snmpdelta -c public -v 1 -Cs -CT 127.0.0.1 IF-MIB::ifInUcastPkts.2 IF-MIB::ifOutUcastPkts.2 #监控IF-MIB::ifInUcastPkts(输入流量),IF-MIB::ifOutUcastPkts(输出流量),如监控本地的第二块网卡instance为2。 snmpdelta -c public -v 1 -Cs -CT 127.0.0.1 ifInDiscards.2 #监控ifInDiscards(已经丢弃的收到的数据包的总数),格式同上。 |
(5).snmpnetstat命令
注,查看snmp服务器的端口连接信息, 协议为snmp 2c。
案例,
|
1 |
snmpnetstat -v 2c -c public -Can -Cp tcp 127.0.0.1 #获取127.0.0.1的TCP协议的开放端口状态 |
(6).snmptranslate 命令
注,在MIB OID 在数字和文字名称之间进行转换。
例子,
|
1 2 |
[root@node1 ~]# snmptranslate -On -IR HOST-RESOURCES-MIB::hrSystem .1.3.6.1.2.1.25.1 |
|
1 2 |
[root@node1 ~]# snmptranslate -Onf -IR HOST-RESOURCES-MIB::hrSystem .iso.org.dod.internet.mgmt.mib-2.host.hrSystem |
|
1 2 3 4 5 |
[root@node1 ~]# snmptranslate -Td iso.org.dod.internet.mgmt.mib-2 SNMPv2-SMI::mib-2 mib-2 OBJECT-TYPE -- FROM SNMPv2-SMI, RFC1213-MIB ::= { iso(1) org(3) dod(6) internet(1) mgmt(2) 1 } |
十一、SNMP的MIB详解
1.MIB管理信息库
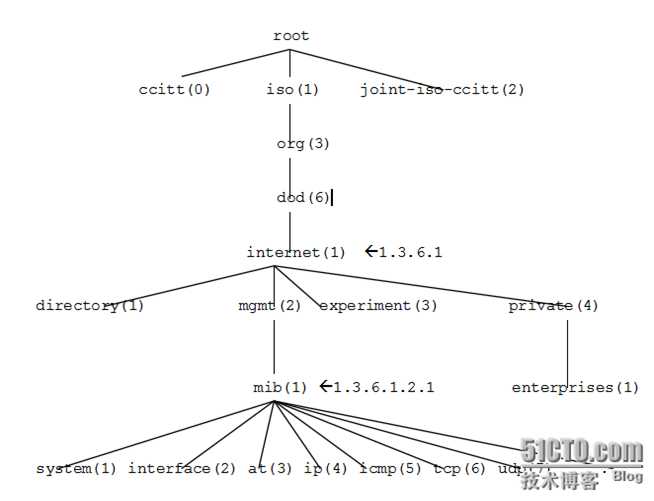
IETF规定的管理信息库MIB(由中定义了可访问的网络设备及其属性,由对象识别符(OID:Object Identifier)唯一指定。MIB是一个树形结构,SNMP协议消息通过遍历MIB树形目录中的节点来访问网络中的设备。下图给出了NMS系统中SNMP可访问网络设备的对象识别树(OID:Object Identifier)结构。
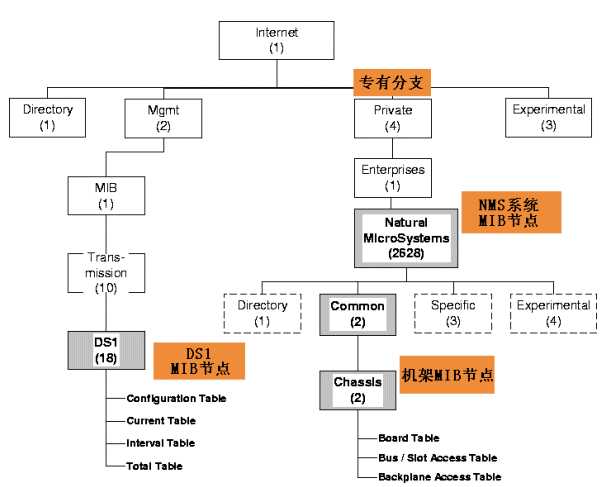
上图中的节点是从internet开始的,其实上面还有几个节点请看下图。
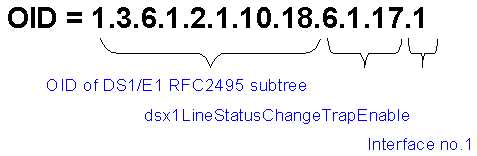
下图给出了对一个DS1线路状态进行查询的OID设置例子。
2.SNMP消息类型
SNMP中定义了五种消息类型:Get-Request、Get-Response、Get-Next-Request、Set-Request、Trap
3.SNMP管理信息库MIB
管理信息库MIB指明了网络元素所维持的变量(即能够被管理进程查询和设置的信息)。MIB给出了一个网络中所有可能的被管理对象的集合的数据结构。SNMP的管理信息库采用和域名系统DNS相似的树型结构,它的根在最上面,根没有名字。下图画的是管理信息库的一部分,它又称为对象命名(objectnamingtree)。

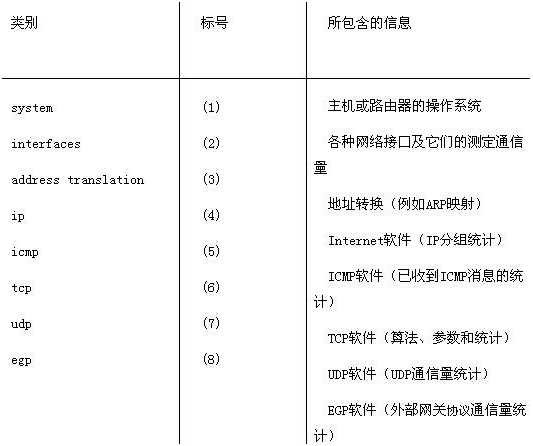
管理信息库的对象命名举例,对象命名树的顶级对象有三个,即ISO、ITU-T和这两个组织的联合体。在ISO的下面有4个结点,其中的一个(标号3)是被标识的组织。在其下面有一个美国国防部(Department of Defense)的子树(标号是6),再下面就是Internet(标号是1)。在只讨论Internet中的对象时,可只画出Internet以下的子树(图中带阴影的虚线方框),并在Internet结点旁边标注上{1.3.6.1}即可。在Internet结点下面的第二个结点是mgmt(管理),标号是2。再下面是管理信息库,原先的结点名是mib。1991年定义了新的版本MIB- II,故结点名现改为mib-2,其标识为{1.3.6.1.2.1},或{Internet(1) .2.1}。这种标识为对象标识符。最初的结点mib将其所管理的信息分为8个类别,见下图,现在mib-2所包含的信息类别已超过40个。
应当指出,MIB的定义与具体的网络管理协议无关,这对于厂商和用户都有利。厂商可以在产品(如路由器)中包含SNMP代理软件,并保证在定义新的MIB项目后该软件仍遵守标准。用户可以使用同一网络管理客户软件来管理具有不同版本的MIB的多个路由器。当然,一个没有新的MIB项目的路由器不能提供这些项目的信息。
这里要提一下MIB中的对象{1.3.6.1.4.1},即enterprises(企业),其所属结点数已超过3000。例如IBM为 11.3.6.1.4.1.2},Cisco为{1.3.6.1.4.1.9},Novell为{1.3.6.1.4.1.23}等。世界上任何一个公司、学校只要用电子邮件发往iana-mib@isi.edu进行申请即可获得一个结点名。这样各厂家就可以定义自己的产品的被管理对象名,使它能用 SNMP进行管理。
好了,到这里SNMP的内容基本就讲解结束了,有关SNMP更详细的内容大家可以参考SNMP的RFC文档http://www.faqs.org/rfcs/rfc1157.html,在下面的博客中我们主要来讲解一下,RRDTool绘图工具的使用。最后想说,希望大家有所收获^_^……
本文出自 “Share your knowledge …” 博客,请务必保留此出处http://freeloda.blog.51cto.com/2033581/1306743
标签:结束 command test class interface web toc 表格 adt
原文地址:http://www.cnblogs.com/zhengxinwei/p/7586059.html