标签:android style blog http color os io 使用 ar
2.3.1文本框TextViw与编辑框EditText功能与用法
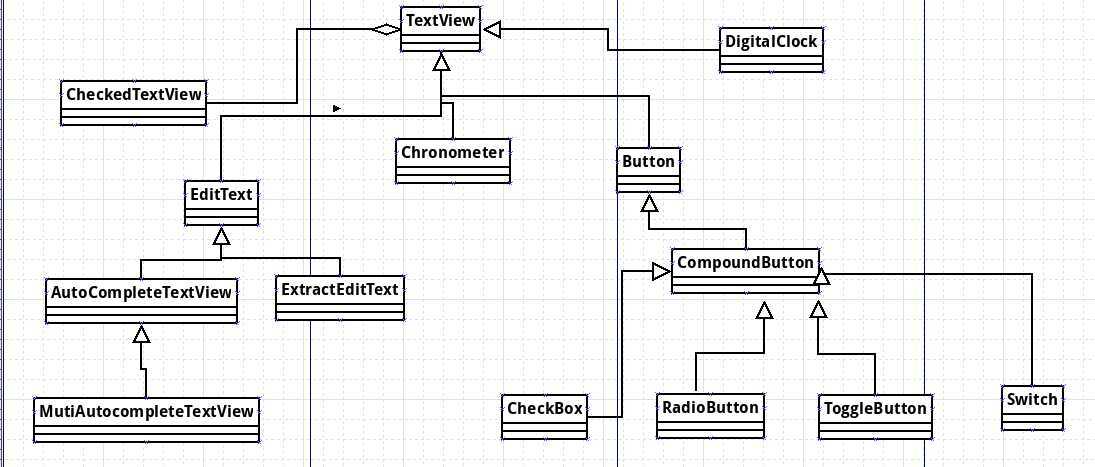
TextView直接继承了View,它还是EditText Button的父类。TextView本身就是一个文本编辑框,不过Android关闭了他的文字编辑功能,如果想定义可以编辑内容的文本框,则使用他的子类EditText,EditText允许编辑文本框它中的内容。TextView还有一个CheckedTextView子类,类似于web中的单选框。

TextView提供了大量的属性
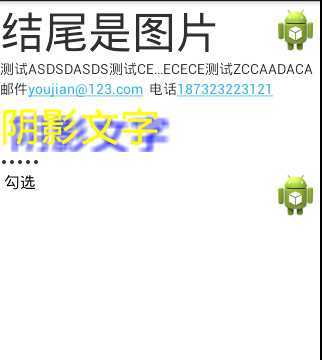
实现不同颜色 字体 带链接的文本

 1 <?xml version="1.0" encoding="utf-8"?>
 2 <LinearLayout xmlns:android="http://schemas.android.com/apk/res/android"
 3     android:layout_width="match_parent"
 4     android:layout_height="match_parent"
 5     android:orientation="vertical" >
 6     <!-- 设置子号并在文本框结尾绘制图片 -->
 7     <TextView
 8         android:layout_width="fill_parent"
 9         android:layout_height="wrap_content"
10         android:text="结尾是图片"
11         android:textSize="20pt"
12         android:drawableEnd="@drawable/ic_launcher"
13         />
14
15     <!-- 设置中间省略,所有字母大写 -->
16     <TextView
17         android:layout_width="fill_parent"
18         android:layout_height="wrap_content"
19         android:singleLine="true"
20         android:text="测试asdsdasds测试ceeddd测试字体dccdcdcdcdceeccececece测试zccaadaca"
21         android:ellipsize="middle"
22         android:textAllCaps="true"
23         />
24
25     <!-- 邮件 电话 增加链接 -->
26     <TextView
27         android:layout_width="fill_parent"
28         android:layout_height="wrap_content"
29         android:singleLine="true"
30         android:text="邮件youjian@123.com  电话187323223121"
31         android:autoLink="email|phone"
32         />
33     <!-- 设置文字大小 颜色 并设置阴影 -->
34     <TextView
35         android:layout_width="fill_parent"
36         android:layout_height="wrap_content"
37         android:text="阴影文字"
38         android:shadowColor="#00f"
39         android:shadowDx="10.0"
40         android:shadowDy="8.0"
41         android:shadowRadius="3.0"
42         android:textColor="#ff0"
43         android:textSize="18pt"
44         />
45
46     <!-- 密码框 -->
47     <TextView
48         android:layout_width="fill_parent"
49         android:layout_height="wrap_content"
50         android:text="hello"
51         android:password="true"
52         />
53     <CheckedTextView
54         android:layout_width="fill_parent"
55         android:layout_height="wrap_content"
56         android:text=" 勾选"
57         android:checkMark="@drawable/ic_launcher"
58         />
59 </LinearLayout>

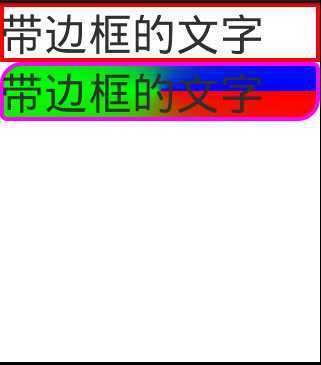
圆角边框 渐变背景的TextView
TextView默认是不存在边框的,因此为了实现圆角边框我们可以为TextView设置一个背景图片,这个背景图片只是一个边框,此时看上去就像是TextView带有了边框效果
还可以设置背景颜色的渐变,这样就实现了边框+渐变背景的效果

1  <!-- 使用TextView的Backgroud属性设置背景  使用图片-->
2     <TextView
3         android:layout_width="fill_parent"
4         android:layout_height="wrap_content"
5         android:background="@drawable/border"
6         android:text="带边框的文字"
7         android:textSize="20pt"
8         />

 1     <!-- 使用TextView的Backgroud属性设置背景  使用XML文件-->
 2     <TextView
 3         android:layout_width="fill_parent"
 4         android:layout_height="wrap_content"
 5         android:background="@drawable/bg_borser1"
 6         android:text="带边框的文字"
 7         android:textSize="20pt"
 8         />
 9     <!-- 使用TextView的Backgroud属性设置背景  使用XML文件-->
10     <TextView
11         android:layout_width="fill_parent"
12         android:layout_height="wrap_content"
13         android:background="@drawable/borser2"
14         android:text="带边框的文字"
15         android:textSize="20pt"
16         />

 1 <?xml version="1.0" encoding="utf-8"?>
 2 <shape xmlns:android="http://schemas.android.com/apk/res/android" >
 3     <!-- 设置背景颜色为透明 -->
 4     <solid  android:color="#0000"/>
 5     <!-- 边框颜色为红色 -->
 6     <stroke android:width="4px"
 7         android:color="#f00"
 8         />
 9
10 </shape>
11
12
13
14 <?xml version="1.0" encoding="utf-8"?>
15 <shape xmlns:android="http://schemas.android.com/apk/res/android"
16     android:shape="rectangle">
17     <!--  -->
18     <corners
19         android:topLeftRadius="20px"
20         android:topRightRadius="5px"
21         android:bottomLeftRadius="5px"
22         android:bottomRightRadius="20px"
23         />
24     <!-- 边框颜色为红色 -->
25     <stroke android:width="4px"
26         android:color="#f0f"
27         />
28     <!-- 指定使用渐变色 使用sweep类型的渐变色 颜色从红-绿-蓝  -->
29     <gradient
30         android:startColor="#f00"
31         android:centerColor="#0f0"
32         android:endColor="#00f"
33         android:type="sweep"
34         />
35 </shape>
 使用TextView的backGroud属性可以很灵活的设置TextView的格式
2.3.2EditText
EditText派生子TextView,他们的属性大致相同,最大的区别是:EditText可以接受用户的输入,额外属性inputType,可以设置输入的类型,此外EditText还有两个常用的子类
AutoCOmpleteTextView:带有自动完成的EditText,该类通常与Adapter结合使用实现自动输入功能
ExtractEditText:它并不是一个UI组件,而是EditText的底层服务,负责提供全屏输入发支持
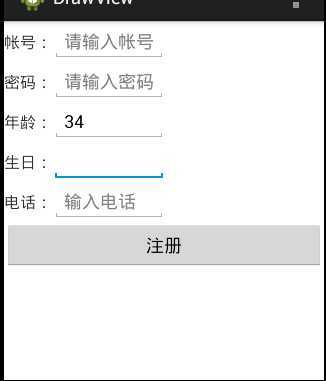
常用用户输入

 1 <?xml version="1.0" encoding="utf-8"?>
 2 <TableLayout xmlns:android="http://schemas.android.com/apk/res/android"
 3     android:layout_width="match_parent"
 4     android:layout_height="match_parent"
 5     android:orientation="vertical"
 6      >
 7
 8     <TableRow >
 9     <TextView
10         android:layout_width="fill_parent"
11         android:layout_height="wrap_content"
12         android:text="帐号:"
13         android:textSize="16sp"
14         />
15     <!-- hint属性表示 当鼠标focus时字体消失 无输入内容时显示此字体内容 -->
16     <EditText
17         android:layout_width="fill_parent"
18         android:layout_height="wrap_content"
19         android:hint="请输入帐号"
20         android:selectAllOnFocus="true"
21         />
22     </TableRow>
23
24         <TableRow >
25     <TextView
26         android:layout_width="fill_parent"
27         android:layout_height="wrap_content"
28         android:text="密码:"
29         android:textSize="16sp"
30         />
31     <!-- 只接受数字密码 -->
32     <EditText
33         android:layout_width="fill_parent"
34         android:layout_height="wrap_content"
35         android:hint="请输入密码"
36         android:inputType="numberPassword"
37         />
38     </TableRow>
39         <TableRow >
40     <TextView
41         android:layout_width="fill_parent"
42         android:layout_height="wrap_content"
43         android:text="年龄:"
44         android:textSize="16sp"
45         />
46     <!-- 只接受数字 -->
47     <EditText
48         android:layout_width="fill_parent"
49         android:layout_height="wrap_content"
50         android:hint="请输入年龄"
51         android:maxLength="2"
52         android:inputType="number"
53         />
54     </TableRow>
55
56                 <TableRow >
57     <TextView
58         android:layout_width="fill_parent"
59         android:layout_height="wrap_content"
60         android:text="生日:"
61         android:textSize="16sp"
62         />
63     <!-- 只接受日期 -->
64     <EditText
65         android:layout_width="fill_parent"
66         android:layout_height="wrap_content"
67         android:inputType="date"
68         />
69     </TableRow>
70
71                    <TableRow >
72     <TextView
73         android:layout_width="fill_parent"
74         android:layout_height="wrap_content"
75         android:text="电话:"
76         android:textSize="16sp"
77         />
78     <!-- 只电话格式 -->
79     <EditText
80         android:layout_width="fill_parent"
81         android:layout_height="wrap_content"
82         android:hint="输入电话"
83         android:selectAllOnFocus="true"
84         android:inputType="phone"
85         />
86     </TableRow>
87     <Button
88         android:layout_width="wrap_content"
89         android:layout_height="wrap_content"
90         android:text="注册"/>
91 </TableLayout>

2.3.3Button按钮的使用
标签:android style blog http color os io 使用 ar
原文地址:http://www.cnblogs.com/justforcoding/p/3963336.html